Tascam M-___ Story...

  • Thread starter Thread starter sweetbeats
  • Start date Start date
Must have been one of those days

Hm...:)...but...isn't it always one of those days? It is for me anyway...:p

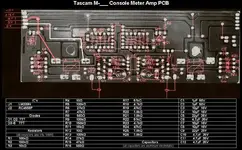
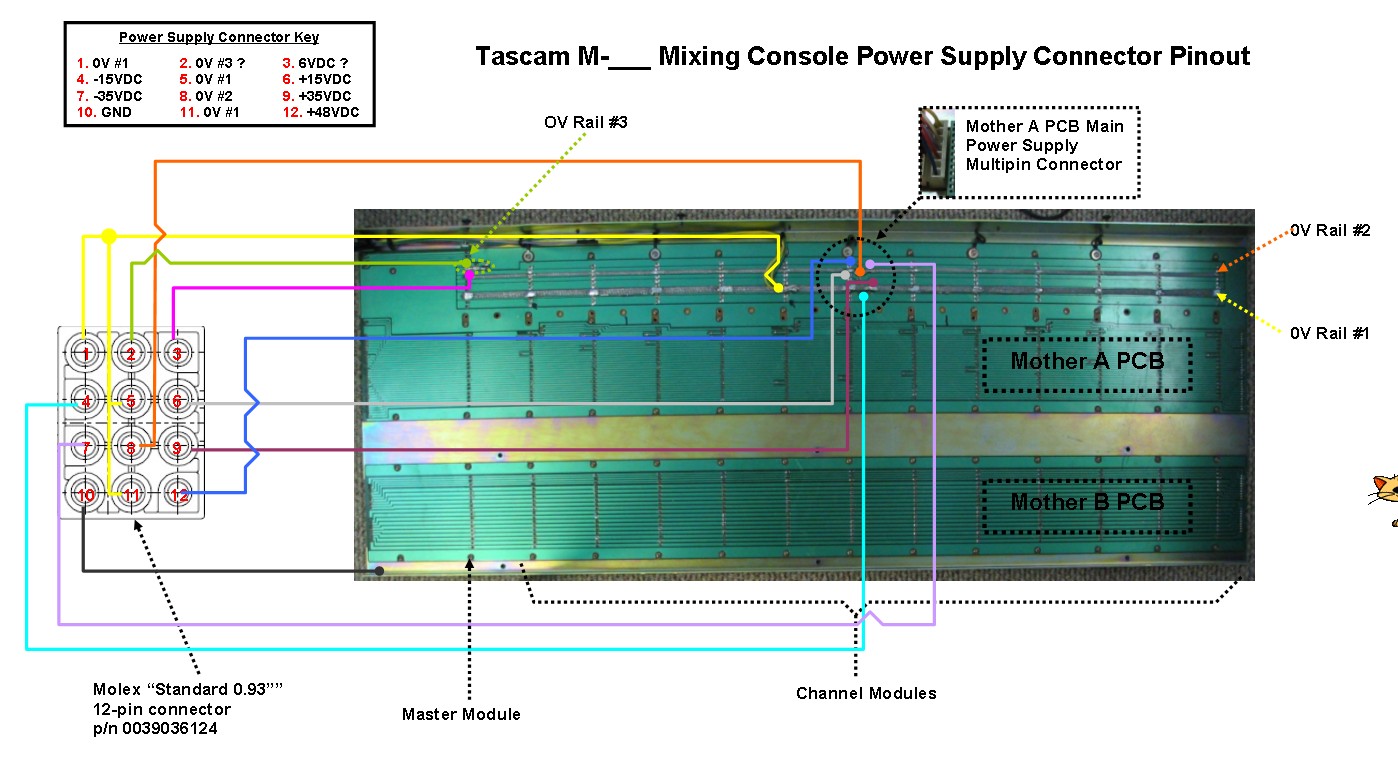
Maybe sometime today I'm going to put up a post with a pinout of the power connector at the mixer and a rough schematic of where the 12 conductors go...its getting a little more complicated for me because of what I discovered last night...the meter amp PCB's are not simple like on the M-520. In other words, I'm pretty sure that my two unknown power supply connectors are not 11VAC...the traces for the meter bulbs are relatively interconnected with the 0VDC and +/-15VDC lines that also go to the meter amp PCB's, so...:(

Back in the saddle.

What I then did was double-check to see if those two unknown lines went anywhere else...they do after all go to the Mother A PCB. I had recalled that they went to the Mother A PCB but then only up to the meter bridge and that was one of the things that got me hopeful that it was 11VAC. My memory was flawed. Must have been some of those days. :o

Those two lines are isolated to the meter bridge and the master module though...they don't go to the channel modules. So I started following where they go in the master section. Fortunately they did use the same wire type and color all the way through...the two lines go to each of the four PCB's in the master module...and then I saw it. On the Studio PCB and Control Room PCB they are labeled. :cool: "0V" and "6V". Now...I noticed something else, and I can't believe I missed it before. All 4 master module PCB's and the Balance Amp PCB's are labeled with part numbers. :eek: That's another topic and I'm going to wait to go there for a moment. My concern is that those PCB's then may or may not be custom fabbed for this console, which could mean that the labels are not correct. You follow me? I don't want to assume that the labels are correct, hook 'er up and fry something and delay power-up by who knows how long. Been there, done that. So I think I'm going to need some help. My brain quickly gets muddled when I start following traces and components. Its going to take some time to develop that skill I think; to reverse engineer a PCB, but I think its going to be necessary to some degree. :rolleyes: So at this juncture I'm hoping that if I post up some details about where these rails go it may trigger some affirmation that they are indeed 0V and 6V. That should be easier than trying to determine the voltage from nothing (i.e. looking at the circuit to determine if it couldn't be 0V and 6V may be easier than looking at a circuit and being able to know the voltage type and amount...process of elmination). I do know that the peak LED's in the VU meters are tied in with these two rails.

Now here's the next thing. I'm getting confused quickly here. There are actually 3 separate 0V rails and a ground. On the power supply connector three conductors go to one 0V rail, one goes to a second, one goes to a third, and one goes to ground. Half that power supply connector is populated with the 0V rails and the ground! My growing confusion is over how to interface that with the 0V rails in the PS-520, which has two of the 0V rails and a ground conductor.

So some time is going to have to be put in on this. Not as close to power up as I was thinking.

I'll put up a sketch later of the pinout for the power connector.
 
The names and part numbers of the Master Module PCB's

This is fun, because I no longer have to wonder what they are called. :)

From left to right as you look at the face of the Master Module:

  • TEST OSC PCB-109 p/n 52100913-00 (I formerly called this one the "Talkback PCB")
  • STUDIO PCB-104 p/n 52100914-00
  • CONTROL ROOM PCB-141 p/n 52100912-00
  • PHONO AMP PCB-1?? p/n 52100915-00 (I formerly called this one the Monitor Master PCB)
  • BALANCE AMP PCB-104 p/n 52100929-00

Do those correlate with anything else you guys know of?

I'm going to contact Tascam too and see if they will be willing able to do a correlation search.
 
Power Supply Pinout

Power%20Supply%20Pinout.jpg
 
Last edited:
No luck on Bill Mohrhoff. The folks at EMu claim to not know who he is. :(
 
Bummer...thanks for trying, Richard.

I have an email out to Hal Leonard Publishing, and I've contacted Tascam with the PCB part numbers.

We'll see! ;)
 
Arg!!!

Well that was quick...Tascam Parts sez:

"None of these part numbers are showing up in our data base."

:mad::mad::mad::(
 
I must say, I'm impressed with your drawings up to this point. Are you certain on these voltages and pinouts, or are you making best-guesses?

I just have to ask? What issues are you coming across at this point?
 
Muck,

Thanks for the comments on the diagram.

Are you certain on these voltages and pinouts, or are you making best-guesses?

I am 100% sure of where each of the pins go from the power supply connector (that's the easy part), and mostly sure of what they carry:

  1. This one is a "for sure". The 0V rails are easy to identify on the Mother A PCB because (for some reason) they tied each solder pad together with flat wire braid as can be seen from the trace side of the mother board picture in the diagram (and labeled "0V" #'s 1, 2 and 3, though #3 is pretty short since it only goes to the master module and the meter bridge...). Secondly, the contacts on the primary channel module PCB's are labeled as to the function of each (be it an audio path or a power supply rail), and they indicate "0V".
  2. This one is questionable at this point, hence why in the pinout key on the diagram it is denoted with a "?". This goes to the short braided wire that interconnects the rail input to the mother A PCB, the output from the mother board to the meter bridge, and the trace to the respective contact of the TEST OSC PCB in the master module which has all the power and audio I/O contacts on it for the module. As this rail makes its way through the master module there are two places I've found so far where it comes into a PCB and is labeled as "0V". That, coupled with the fact that this rail ties in to a flat braided wire like the other 0V rails supports that that is what it is...but I'm a skeptical one, and considering this board is probably the only one of its kind, and totally neat-o at that, I really don't want to fry something if I can help it...I felt bad enough learning that difficult lesson about hastiness on my 58 :(...so before I say I'm 100% confident that this rail is supposed to carry 0V, I want to prove that theory by applying that assumption to a circuit and see if anything in that application indicates that it could not be so. I plan on trying to draw a schemo of the meter amp PCB...it is a much smaller PCB than, say, anything in the master section...so I might be able to do...plus, it is similar to the meter amp PCB in my M-520, so I'll be able to do some cross-referencing as I try to figure it out (while learning how to draw the right symbols and figure out the IC functions and such). Then I'll put the drawing up here and hopefully get some response (to the question "would 0V work in this circuit?") from all of you that know this stuff so much better than I. That will hopefully prove what this rail is without a doubt.
  3. Exact same status as pin #2, just replace "0V" with "6V".
  4. I'm comfortable that this one is indeed -15VDC. All the main channel PCB's are labeled as such, and the circuitry drawing power from this rail looks, with my limited knowledge, to be very akin to that in my M-520 that utilizes 15V. Lots of 072 IC's, blah, blah, blah. Plus it goes up to the meter bridge on the same pin as does the -15V rail on the M-520.
  5. I'm sure of this one. Exact same logic as pin #1.
  6. I'm sure of this one. Exact same logic as pin #4.
  7. I'm sure of this one...similar logic to pins 4 & 6...It is labeled -35V all over the place and, at least as far as I have traced so far, it heads straight for 18V regulators when it gets into daughter boards that feed +4 and +8 balanced and unbalanced outputs. evm1024 has really been helping in this. As he noted several posts ago, the PS-520 power supply that powers the M-520 board actually has an internal +/-35V rail that hits 7818 and 7918 regulators before it leaves the PS...the +/-18V rails drive the tertiary gain stages and balance amp section of that board...all that stuff is centralized on only a couple PCB's in the M-520 so it makes sense to centralize the regulation internally in the outboard PS...the M-512 power supply, which is internal to the mixer, also has unregulated 35V rails and the 18V regulators are (of course) inside the mixer. So the M-___ has similar circuitry and features, and since the 18V regulators are decentralized (because there are at least 14 PCB's that drive +4/+8 outputs on the M-___), it supports that this rail is indeed carrying unregulated 35V.
  8. This one is like pin #1...flat braided interconnect wire on the Mother A PCB, labeled as "0V" all over the place...so I'm confident that it is indeed 0V. Just not sure why it is separated from the 0V #1 rail.
  9. I'm sure of this one. Exact same logic as pin #7
  10. No mistaking this one...nice black line that screws to the metal motherboard frame. ;)
  11. Same as pin #1.
  12. I am totally sure of this one...labeled 48V all over the place, and I've traced it over to the phantom power enable switch on the channel module PCB's.

What issues are you coming across at this point?

Welllll...of course lots of things on the horizon, but, if I understand your question, at present the hottest issues are:
  • Confirming or disconfirming that pin #3 on the mixer power connector is 6V.
  • Confirming or disconfirming that pin #2 on the mixer power connector is 0V.
  • Trying to delineate the nature of the 3 different 0V rails (assuming that 0V rail #3 is indeed 0V). I need to do this because the PS-520 only produces two different 0V rails, and I'll need to get a handle on what's what so I can make the umbilical cable...is one of the 0V rails like the 0V(D) rail in the M-520, and the other two are like the 0V(C) rail? That kinda deal.
 
Are audio grade caps just hype?

Please check out my latest post in this thread over in the DIY forum: https://homerecording.com/bbs/showthread.php?p=3029354#post3029354

I need to recap that PHONO AMP PCB that had mouse poo on it, but not having schemos I don't know which caps are in the audio path and which are not. Would like to use audio grade caps if there really is an advantage, and then I'd just them for everything unless that's a bad idea...
 
This is harder than I thought...

Trying to draw up a schematic for the meter amp pcb...very challenging for me.

When I do a jigsaw puzzle I have a routine. Like many, I like to start with the outside edges of the puzzle, finish the frame and then start grouping the interior sections. I have no routine for this schematic thing, and I quickly get lost. I think a lot of my problem stems from only having very rudimentary understanding current flow.

Not sure what to do.

Ideas anybody? anybody have any tips or routines they follow when trying to figure up a schematic?

Also, the two main 0V rails don't comingle when they reach the daughter boards. I put my test leads on the input contacts on the main channel board, and it reads about 15mohm. So NOW what do I do???
 
Last edited:
Okay...

Either everybody is away this weekend, or nobody wants to go down this rabbit trail with me...or both. :)

Gotta get this thing powered up tho'.

I'm thinking maybe a baby step for might be to take a good picture or a scan of the trace side of the Meter Amp PCB, and then draw in the the components...maybe that might, in and of itself, present some easy answers as to the validity of the questionable 0V and 6V rails...

I'm going to go in that direction.
 
too much data spred in too many threads... i haven't really kept up with all the threads so perhaps a summary along with your questions would help at this point...
 
That's a challenge...

When you say "threads", do you mean posts? This thread is really the only active thread I've got going right now:

  • The 58 is sitting invalid waiting for a parts deck to arrive (supposed to be on its way today)
  • The 48 is coming along nicely, no snags except for lack of time
  • The M-520 is cozy on its perch and mostly cross-connected in anticipation of a tracking session coming up in a week
  • The BR-20T is on the back-burner at the moment, but I'm not really worried about it anyway
  • The recapping thread over in the DIY forum has been helpful and the only question as of late is the question about audio-grade caps being worth it, to which you've already responded
  • Then I guess there's that M-512/M-520 upgrades thread, which I guess is kind of a confusing extension of my M-520 Story thread, but the upgrades are on the back burner at the moment with the 48, BR-20T and M-___ mixer projects. I may be getting back to the upgrades, or evm1024 might like to hijack that thread at some point since IIRC he may be looking at developing an M-520 upgrades cookbook of sorts. He may carry on the thread I started or start anew, and if the latter is the case I'll close mine out. BUT...point is, that thread (my upgrades thread) really doesn't have any unresolved burning questions...its "static", for lack of a better term.

Those are pretty much the only ones I consider "active" right now, and most of those aren't really active...I'll be picking the inactive projects/threads back up over time, and the ones that are somewhat active are related to projects that are less dubious; I feel I am doing more "FYI" posts on progress rather than encumbering the forum with thick questions...

That's from my perspective anyway...This very thread here is really the only one I've got going from my view that actively has questions/asks for support, and really that can be, at present time, boiled down into needing help:

  1. Confirming two of the power supply rails (suspected to be the third of three 0V rails, and +6VDC)
  2. Getting some advisement on figuring out how to connect the PS-520 0V rails (of which there are two) to the three 0V rails in the M-___

I'll try to keep things more focused...I do realize I'm a bit overactive and I'm posting a lot in a lot of places. What can I say? I like it here. :p

Demented et al, does that help?

Anything else I can do to elicit more responses? Am I burning out Analog Only? :D:rolleyes::o

Again, regarding M-___ question #1 above (which really is the primary issue right now), I'm making a PCB layout and parts list for the Meter Amp PCB. I know its not as good as a schematic, but my knowledge is too limited yet to draw a schematic on even this relatively small PCB, so my plan is to develop the layout and parts list and hope that somebody might be able to look at it long enough to confirm or disconfirm whether or not the two mystery rails are 0V and 6V. Then I'll be able to work on how to cross connect the 0V rails from PS to mixer. I'm in dialogue with Mouser right now on the Molex connector for the power supply umbilical connection at the mixer. Once I can confirm all the rails, ascertain the cross connection and make up the cable I will power it up! :eek::cool::D
 
I heard back from author Randy Alberts

Very nice of him to get back to me, but no leads.

He said in his email:

hi Cory,

Good to hear from you, and thanks for your kind words about my Tascam book. You're right, Tascam isn't very helpful when it comes to their older legacy gear; great gear, it is, but managed by just another corporate structure too big for requests like these, at least for its customers looking into Tascam's award winning legacy products.

I passed your video link to a couple of fellow engineers/musicians, but none of us can ID your mystery board. Sorry, I can't help you to identify this winner. I'd suggest contacting mags like Mix, EQ and Keyboard, the latter I used to work at and seem to recall hearing about some guy's "museum" of old recording gear. Maybe a magazine like that can turn you on to someone like that.

Good luck, Cory.

cheers,

Randy Alberts

So...oh well. :o
 
Here is the PCB layout for the Meter Amp PCB

Meter%20Amp%20PCB%20Layout.jpg


Dunno of it is readable, but, again, I am hoping that somebody could help me determine if the 6V rail and adjacent 0V rail are feasible...A litmus test if you will.

Help me. Help.

Let me know if there is additional info that is needed.
 
Tryin' to fix bent pot shafts

There are a number of bent pot shafts on the M-___. I don't like bent pot shafts. I tried straightening one that was pretty badly bent (to the point that you couldn't turn it when the knob was in place). It broke off. :mad::(

This wouldn't be a big deal as I'd be fine pruchasing replacements, but I think it would be pretty tough to find them. The specs on a number of pots on the M-___ are pretty obscure at least in my experience.

Then I thought "Hey, I've got M-520 spares...lotsa pots...some of them have the same physical configuration, even if the specs on the pot aren't the same...maybe I could actually remove a shaft from a good pot and retrofit it to replace a bad one in the M-___.

Nope.

The pots are easy enough to open up (just bend back the soft metal tabs), but the shafts are punched in at the base...I could easily drill it out, but then there is the whole issue of how to effectively reassemble in the M-___ pot.

Back to the drawing board... :o

EQ%20Pot%20Exposed.JPG
 
Repairing the front cross-member

The extruded aluminum front cross-member that ties the side panels together and sits behind the armrest assembly was damaged. In the picture below you can see how, for some reason, the holes that the self-tapping screws go into to tie the two together were notched out...the holes don't go all the way around the screw so it is easy for those to spread and strip.

I cleaned out the old adhesive and packed 2.5 ton epoxy in the troughs. My thumb, forefinger and middle finger are pointing to the three screw holes (not really seen because they are on the end of the cross-member, but you can see the epoxy and the troublesome troughs that were cut in...)

I cleaned up the ends with a file, and once I line the cross-member up with the side panels I will mark holes to be drilled with a spring punch, and then drill pilot holes through the set epoxy for the new longer screws I purchased (the original screws were very short).

Front%20Cross-Member%20Repair.JPG
 
Last edited:
Not sure what you mean by feasible.....

The +6 volt rail and the ground are the lamp circuit. You can see how it powers the lamps in the meters (highlighted in photo) and goes to the peak LED. I call it +6 volts because the peak LED and the LM339 comparator need it.

Does this answer your question?

You shold tie the grounds together at some place (at one place).

The image appears like a negative and is hard to read....
 

Attachments

  • Meter Amp PCB Layout 1.webp
    Meter Amp PCB Layout 1.webp
    45.7 KB · Views: 224
I'm getting that excited feeling again...maybe its just the coffee...

I'm really concerned that my wordiness is making it hard for anybody to help...its a struggle for me...wordiness. To hopefully help everybody to see the key issues in a post I will change the text color to red. That way you can read the post and then if you are left with the "what is he talking about/asking" question you can look at the red text. Let me know what else I can do to help you all help me get this beastie going. ;)

Not sure what you mean by feasible

Translation: Those two rails in question are labeled as "0V" and "6V" on other daughter boards. By my poor choice of the word "feasible" I meant "do the assumtions hold true." In other words, if we assume the labels are correct on the daughter boards, do the assumptions hold true if we apply those voltages to the circuits on the Meter Amp PCB?" Hopefully that helps it make more sense.

The +6 volt rail and the ground are the lamp circuit. You can see how it powers the lamps in the meters (highlighted in photo) and goes to the peak LED. I call it +6 volts because the peak LED and the LM339 comparator need it.

Yes. Thank you. I could certainly see that those rails powered the lamp circuits, but my greater concern was that those rails went elsewhere as well. On the M-520 Meter Amp PCB the lamp rails are totally isolated to the lamp terminals...I understand that that is because it is 11VAC on the M-520, but I wanted to make sure that the other places those rails go on the M-___ Meter Amp PCB made sense (i.e. it would take me a long time to figure out if 6V to the LM339 chip was proper for instance.

Does this answer your question?

If I am reading your post correctly, the Meter Amp PCB supports that those rails are 0V and 6V, yes? And if so, then yes you answered my question! :D:D:D:D:D:D:D:D:D

SO...if I wanted to test the meter lamps in the M-___ meters, I could connect those terminals on the Meter Amp PCB to the +6VDC and 0V(D) rails on the PS-520?

You shold tie the grounds together at some place (at one place).

Can't figure out where the three 0V rails tie together, and if they don't, how to do it. This one is going to be a challenge for me...still...and I'm sorry. I feel pretty frustrated at my lack of understanding. Not sure how to deal with this. There are three places where 0V rails come into the M-___ mixer...0V is different than GND right? There was dialogue about this earlier. You stated, as you did in your last post, that the 0V rails need to tie together...I asked if it was safe to assume that the tie occurs in the mixer circuitry...you answered yes, that it is a good assumption, but that it should be checked, like by checking for continuity accross the separate terminal contacts on a channel card...I did that and the resistance was in the mega-ohm territory...not tied together. Don't know what to do. I will do the same test on the master section input terminals, as well as on the card sockets on the mother PCB. Ethan, is there an easy way to point me to where the 0V rails tie together on the M-520 schematics? This might help me to identify if/where it may/should occur on the M-___. I will also review your detailed explaination of +/-/0 voltage in...uh...some other thread...you were talking about a car battery and stuff...I will find that. It may make more sense now.

The image appears like a negative and is hard to read...

I'm sorry about that...I was trying to emulate how the PCB layouts appear in any of the Tascam service manuals which appear, to my eyes, as a negative. I see what you mean. I won't do that in the future.

Ethan, thanks again for taking the time to review/invert images/study circuits/advise.
 
This is an extension to the red questions in the last post...

Regarding the 0V rails needing to tie together somewhere...

I took my DMM and tested every section where 0V goes on this board:

  • At the power supply connector
  • On the mother PCB
  • At the main terminal connections of the Master section
  • At the main terminal connections of a channel strip
  • At the main connections of the Meter PCB array

At no point is there any continuity between 0V rails to speak of outside of mega-ohm levels.

So it appears to me, unless I just really don't get it (which I am fully prepared and comfortable accepting), that there truly are 3 completely distinct 0V rails that are not tied together, at least not in the board. Might they have tied together in the original power supply?

Guys, I really am going to need help on this if this thing is going to be powered up, and I don't want to keep leaning on Ethan (though he has been incredible...chiclet the man!)

I'm just anxious and I'm not getting much response. Do I:

  1. Pipe down and be patient :o
  2. Is there a better forum to tap for some of this more in-depth technical stuff (I'd like to keep it all here, but I'm wondering if this is just stretching the scope of this forum)
  3. Or????

I'm open to all ideas/criticism/comments.
 
Back
Top