Tascam M-___ Story...

  • Thread starter Thread starter sweetbeats
  • Start date Start date
check your wiring on the light box... those double ganged oulets are typicaly wired in paralell you want them in series... for mine (sorry no camera) i used a single switch with oulet on one side and the other is loaded with a lightbulb holder... so ya dont have to use that adapter... if ya plug in something without using the light adapter and the unit powers up... then they're paralelled...
 
The Studio PCB is recapped...well...almost.

That was silly...I went through and figured out what PCB's I have that could be totally recapped with what caps I have on-hand...there were only two. Neither of them were the Studio PCB. Duh. I got it mixed up in my brain. So all but one of the 24 caps on the board are now new Nichicon KT caps. Waiting for 2.2/50V caps to stuff that last position.

It went well. I found a way to that works good for me to bend the tails so that the cap stays put when you stuff it and tip the card upside down to solder. Stuffed the 23 positions, flipped it over and melted away! In the past I've done one or two at a time, flipping and stuffing in between, but this went really quick.

Studio%20PCB%20Almost%20Recapped.JPG
 
Last edited:
A couple Balance Amp PCB questions...

The Balance Amp PCB's in the Control module have 4 resistors each that are bypassed with electrolytics...here's a picture of one (with one tail broken off):

Balance%20Amp%20PCB%20Bypassed%20Capacitor.JPG


Here's the first question...I'd normally stuff both tails in the hole and solder both to each pad...notice that these ones are soldered to the resistor tails in close proximity to the resistor body. Not so durable (obviously), but is there any reason why they may have done it that way and should I follow suit? The holes in the PCB are pretty small and I'm trying to determine if that's why they did it this way, or if there is an engineering reason to do it this way?

Okay...Second question: here is a picture of the trace-side of the Balance Amp PCB.

Balance%20Amp%20PCB%20(trace%20side).JPG


Are those tantalum caps I see there, and if so is there any advantage to replacing/upgrading those? It was recommended to me to replace tantalums with a poly or metalized film cap in a recent thread I started on possible mods for a Studio Projects mic...
 
Last edited:
Here's the first question...I'd normally stuff both tails in the hole and solder both to each pad...notice that these ones are soldered to the resistor tails in close proximity to the resistor body. Not so durable (obviously), but is there any reason why they may have done it that way and should I follow suit? The holes in the PCB are pretty small and I'm trying to determine if that's why they did it this way, or if there is an engineering reason to do it this way?

I kinda doubt the legs of both the resistor and the cap would fit in the one PCB hole. The caps were probably added as an afterthought, after the PCB had been made. I don't think these should be too much of a problem... I mean, caps get soldered directly to the trace side of PCBs all the time. If it's a worry, you could always loop the leg of the cap under the resistor's leg and wrap it back around for more hold, much like the point-to-point wiring in early tube-based circuits, where the circuit was constructed by wiring the components directly to one another.
 
check your wiring on the light box... those double ganged oulets are typicaly wired in paralell you want them in series... for mine (sorry no camera) i used a single switch with oulet on one side and the other is loaded with a lightbulb holder... so ya dont have to use that adapter... if ya plug in something without using the light adapter and the unit powers up... then they're paralelled...

demented...I did it like you said (I think)...the tabs connecting the two outlets are removed so the outlets are isolated from each other:

  1. hot from wall in to hot side of "Test Bulb" outlet
  2. neutral out of "Test Bulb" outlet to hot of "Power Out" outlet
  3. neutral out of "Power Out" outlet to switch
  4. neutral out of switch to wall neutral

Did I get it right?

I kinda doubt the legs of both the resistor and the cap would fit in the one PCB hole. The caps were probably added as an afterthought, after the PCB had been made. I don't think these should be too much of a problem... I mean, caps get soldered directly to the trace side of PCBs all the time. If it's a worry, you could always loop the leg of the cap under the resistor's leg and wrap it back around for more hold, much like the point-to-point wiring in early tube-based circuits, where the circuit was constructed by wiring the components directly to one another.

Ritzy, thanks for the info. Very helpful. I appreciate the contribution. I'll try and stuff them both and if that doesn't work I'll wrap them like you said. ;)

Ceramic disc caps.

Sheesh...how do you tell those things apart? Any benefit to swapping them out? I know ceramics last a long time, longer than electrolytics for sure...

Fascinating sh** indeed

:D:D:D:D:D:D:D:D:D:D:p
 
Bzzzzzzz!

Bzzzzzzz! Zzzzapppp! Powwww! Pooffff!:eek:;)

J/K!:eek:;)
 
Don't forget to wrap your arms in tin foil and soak them in water before beginning your work. You want to make sure you are well grounded. ;)
 
Safety_Ladder_In_Pool.jpg


:D

Got the power supply back from evm1024 yesterday...thank you Ethan!! :p

Didn't have a chance to do anything with it last night...sometime in the next few days I'll open it up and move connections for the 11VAC to a third 0V rail, map out how I'll go from the 20-pin connector at the PSU to the 12-pin connector at the mixer. Then I can finish the power umbilical. Then I'll plug the cable into the mixer and do simple continuity testing from the PSU end of the cable to the contacts on the motherboard to make sure everything looks okay. Then I'll connect the PSU and power up the empty motherboard, make sure nothing smokes there and check voltages at the motherboard, and then...plug in a channel strip and see what we get. :eek:
 
that's right... should have figured you would know about the jumpers... but atleast some newbie that reads this may be spared...
 
demented...I had to go back and look to make sure it was there, but it is. Look at the second picture and caption in post #136...I highlighted the de-coupling of the two outlets there.

This dialogue underscores the importance of doing that though, so I'm glad it is taking place...the Demented Idiot Light would not work with those tabs in place! :eek::o;)
 
The Transformation Is Complete!

Insert the wild cackle of a mad scientist now...I can't say "its alive yet", but the mods to the power supply are now totally complete.

To bring us up to date, Ethan (evm1024) bypassed the 18V regulators in the Tascam PS-520 allowing the "35V" (in quotes because its running about 26.5V) to pass to the mixer since with the M-___ the 18V regulation occurs in the mixer, like, all over the place, rather than in the PSU as with the M-520/PS-520 combo.

Ethan also did a fine recap job on the Power Supply PCB. ;)

As Ethan and I discussed and agreed, the regulators and all the wiring were left in the PS-520 so that it could quite easily be converted back to stock if needed.

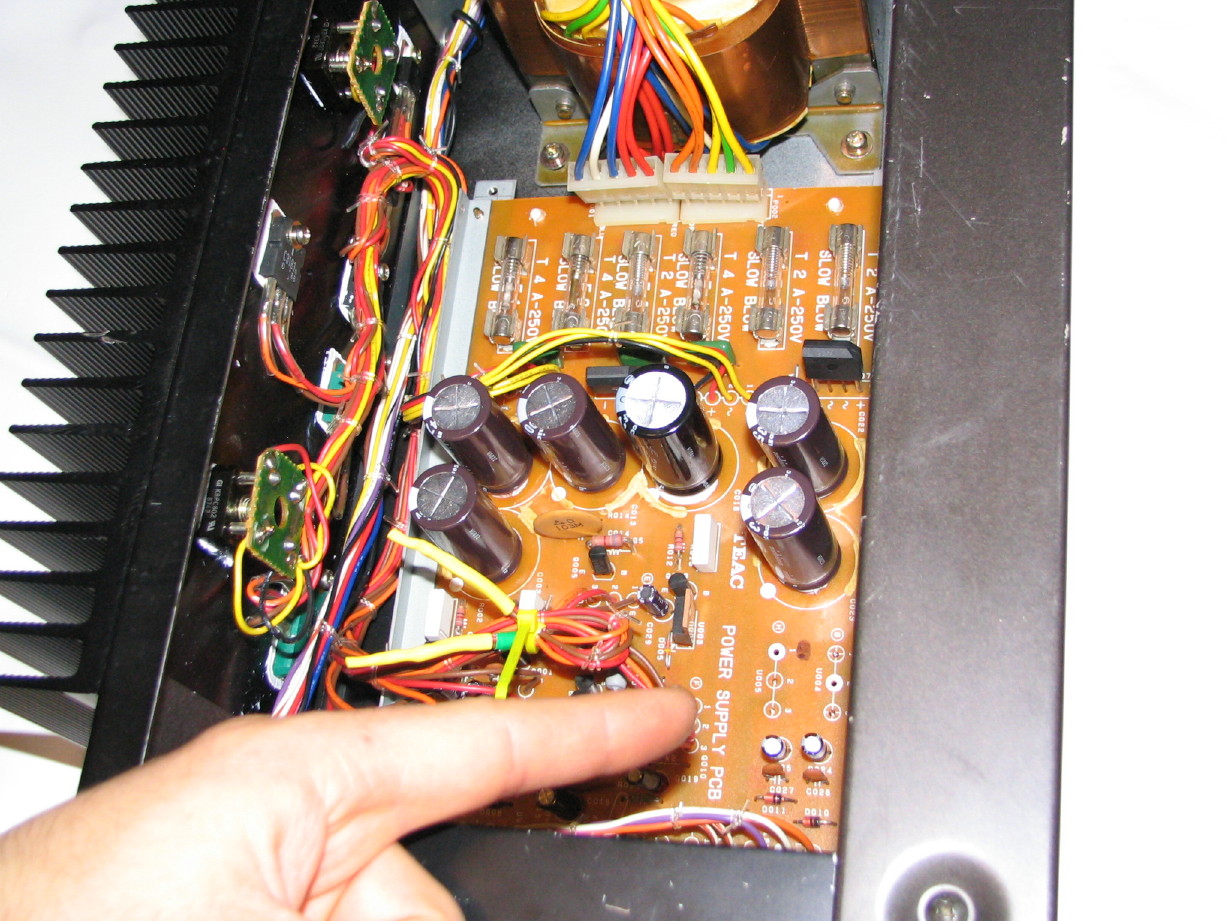
Here are the regulators still attached to the heatsink:
IMG_8637_3_1.JPG


And here are the wires bundled and protected:
IMG_8635_2_1.JPG


And here is where they used to connect to the Power Supply PCB:
IMG_8634_1_1.JPG


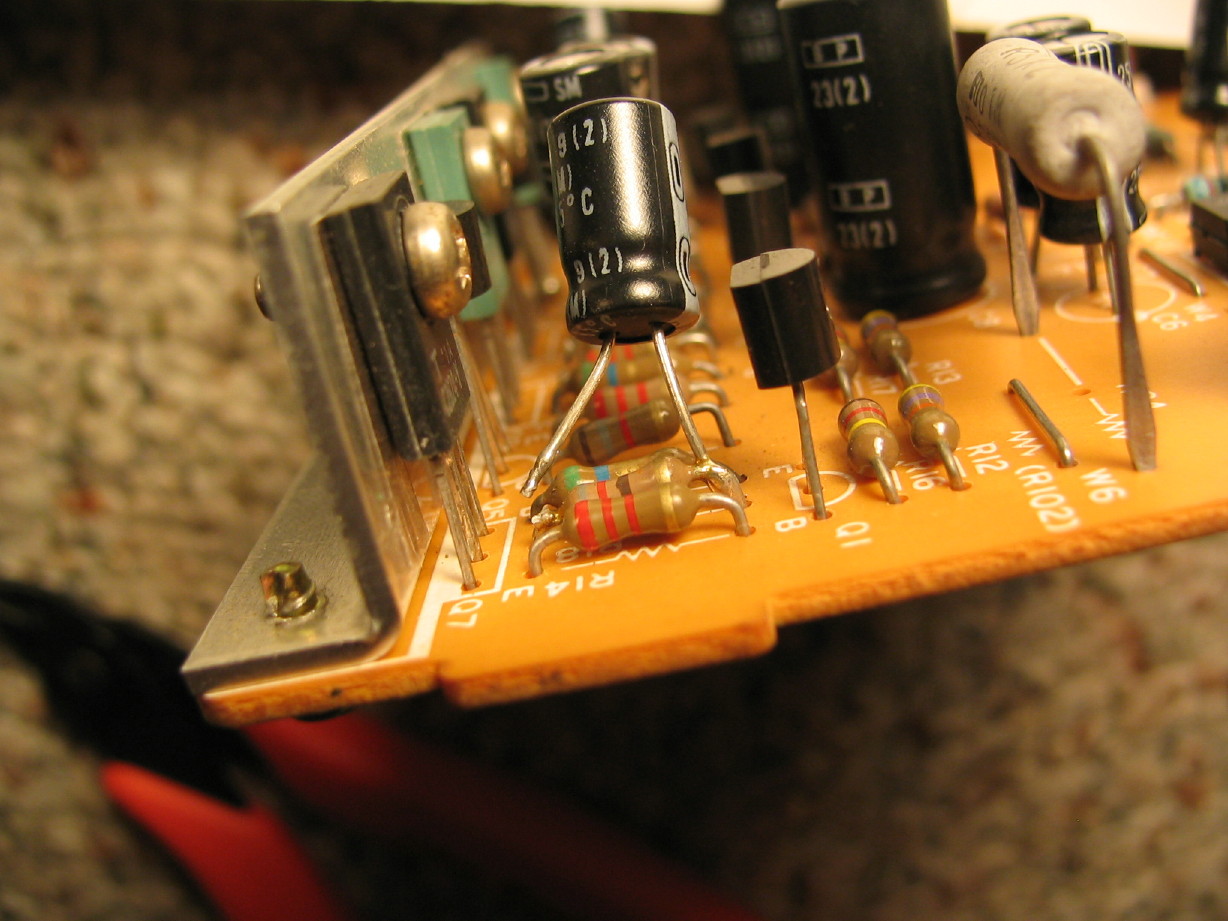
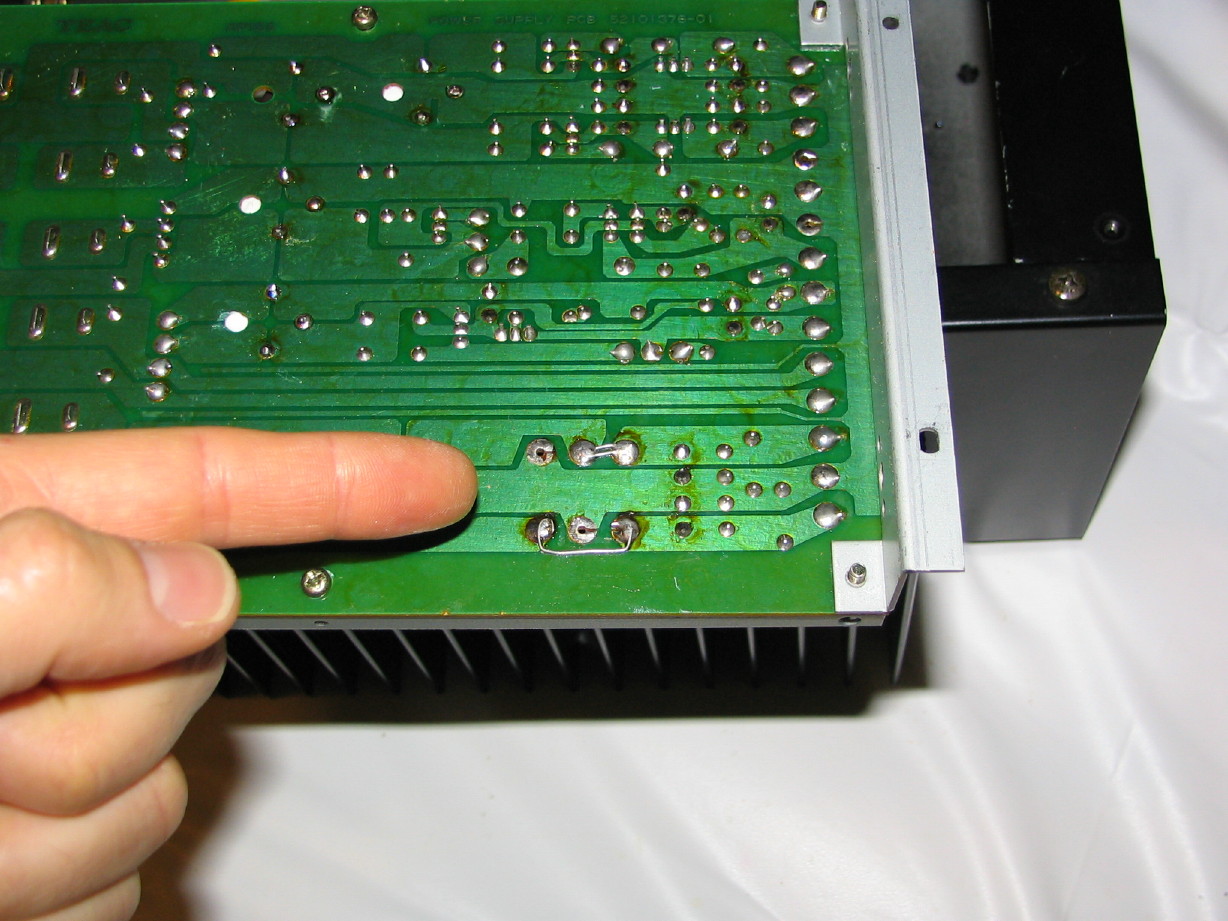
And here is the underside of the PCB...the wires were simply removed and the "IN" and "OUT" pads for the regulators were jumpered:
IMG_8638_4_1.JPG


Now...this is where things got a little interesting. If you've followed the thread you'll know that I have agonized somewhat over the whole 0V rail thing...schematically two of them coming out of the PS-520, but three needed for the M-___. Then recently I looked again at the PS-520 schematic and confirmed that all the 0V rails do indeed tie together in the PS-520, and that there are two more terminals for 0V rails on the Power Supply PCB! That made it easy in my mind as the M-___ wouldn't need the 11VAC rails, so, internal to the PS-520, those wires could simply be moved to the two open 0V terminals on the Power Supply PCB and then those additional 0V connections would be carrried to the mixer over the wires which carry the 11VAC rails for the M-520/PS-520 combo. Well, the schematic doesn't match the production PCB entirely...no big whoop, but it is interesting to me nonetheless.

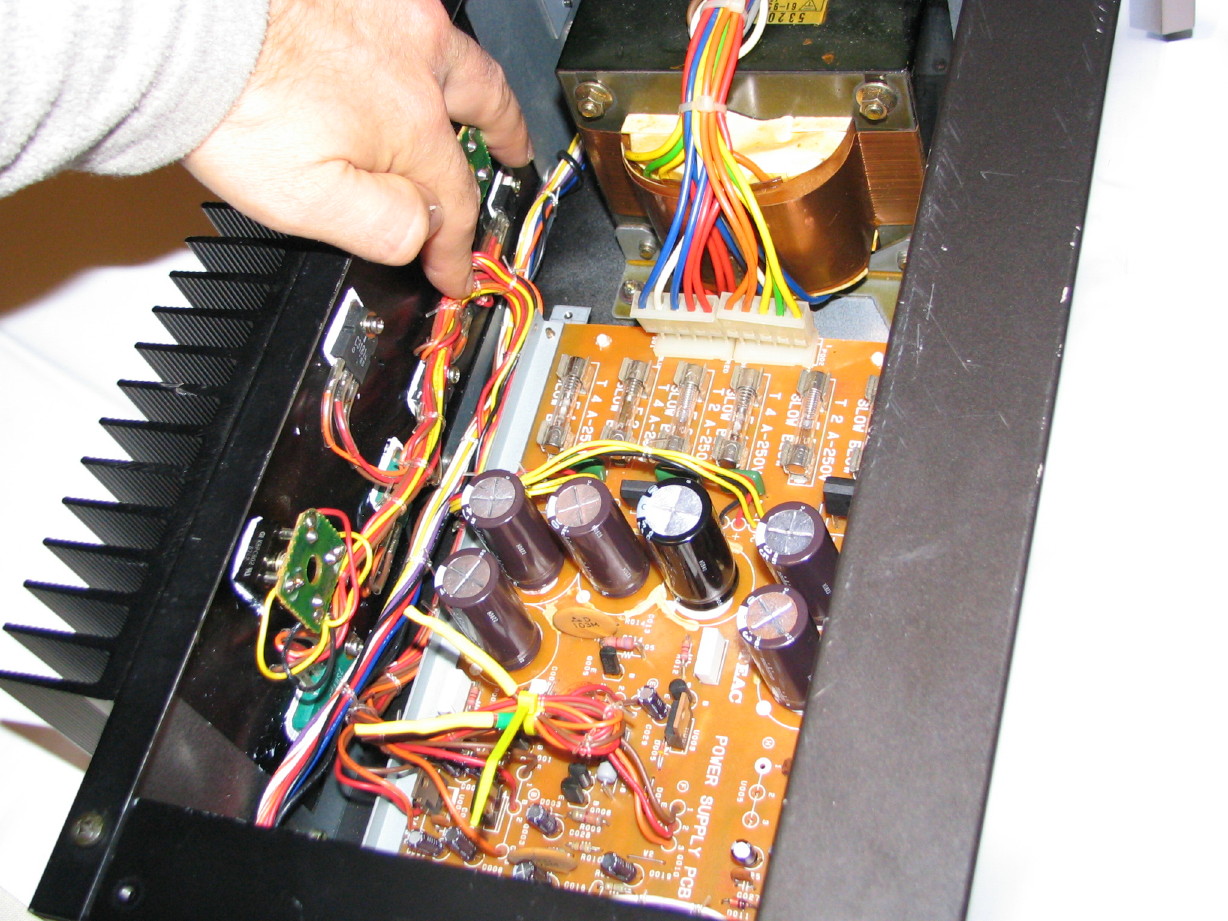
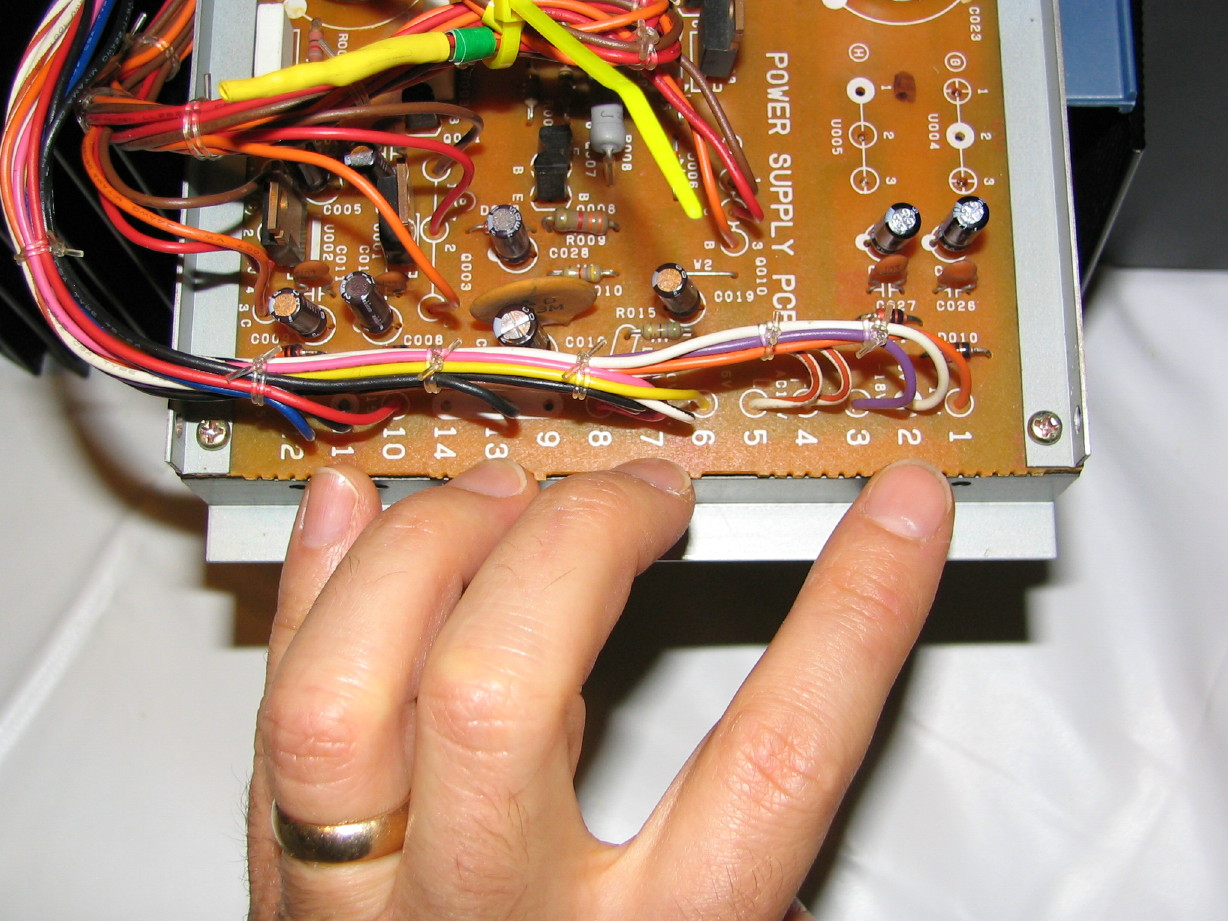
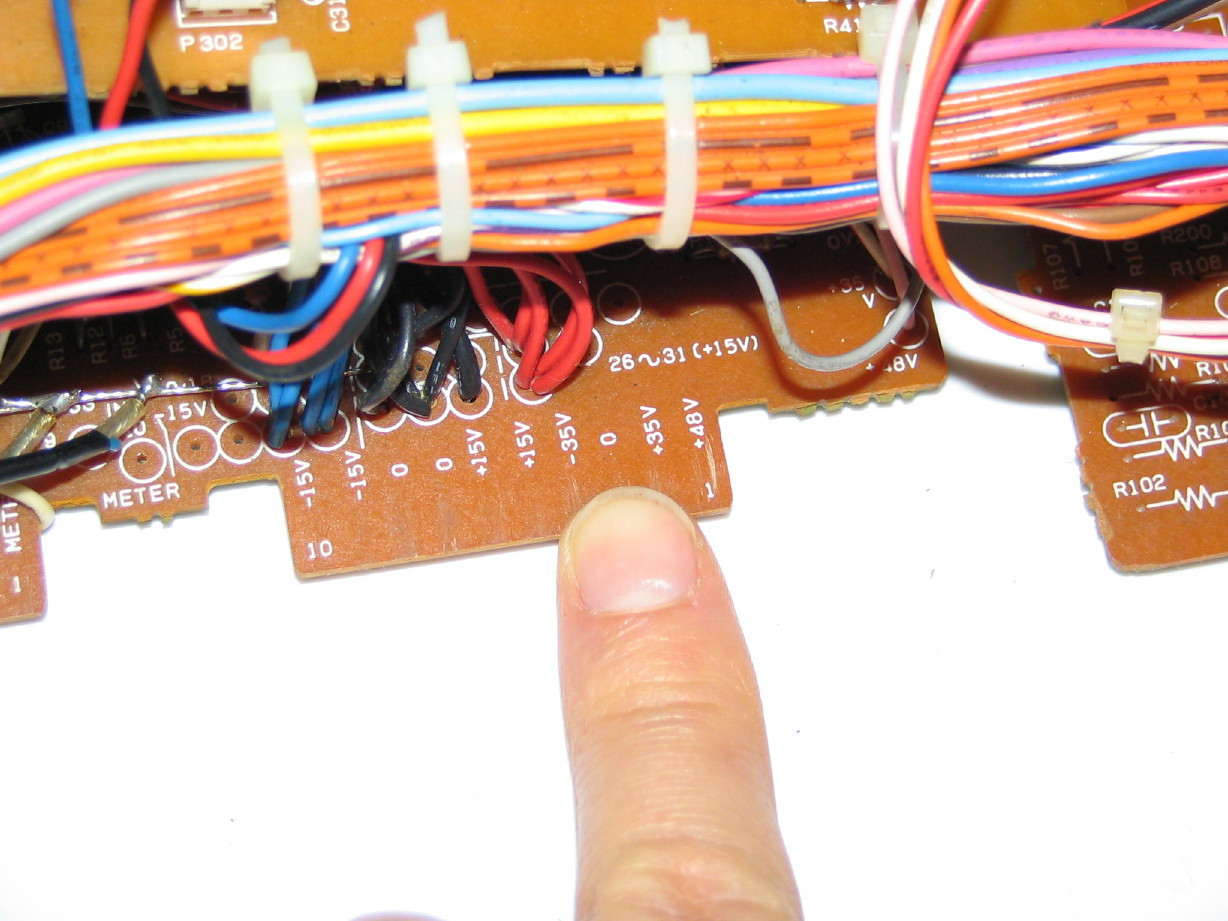
The schematic says that terminals 13 and 14 on the Power Supply PCB are open and connected to the 0V buss. Looky here at a picture of what they actually did at the factory:
IMG_8640_5_1.JPG


My four fingers are pointing to 0V/GND connections. My pinky finger is pointing to terminal 11, which goes to the mixer chassis ground, even though it is physically associated with the 15V rails on the Power Supply PCB which are in terminals 10 and 12.

My ring finger is pointing to terminal 13 which is connected to the PSU chassis ground. This is supposed to be on terminal 9 leaving 13 and 14 open. No matter, its all the same buss, and terminals 9, 13 and 14 are even graphically and physically grouped on the PCB. So 9 and 14 would be the new home for the third 0V rail using the wires originally connected to the 11VAC terminals 4 and 5.

My middle finger is pointing to terminal 7 which is the 0V "0V(D)" rail physically associated with the 6V rail on terminal 6. This 0V rail is connected to scads of LED indicator circuits in the M-520 and even the headphone opamp. :confused: I didn't follow it all the way through the mixer, but it is clearly primarily non-audio related circuits.

My index finger is pointing to terminal 2, which is the main audio 0V rail in the M-520, "0V(C)". It is physically associated with the 18V rails on the Power Supply PCB which are on terminals 1 and 3.

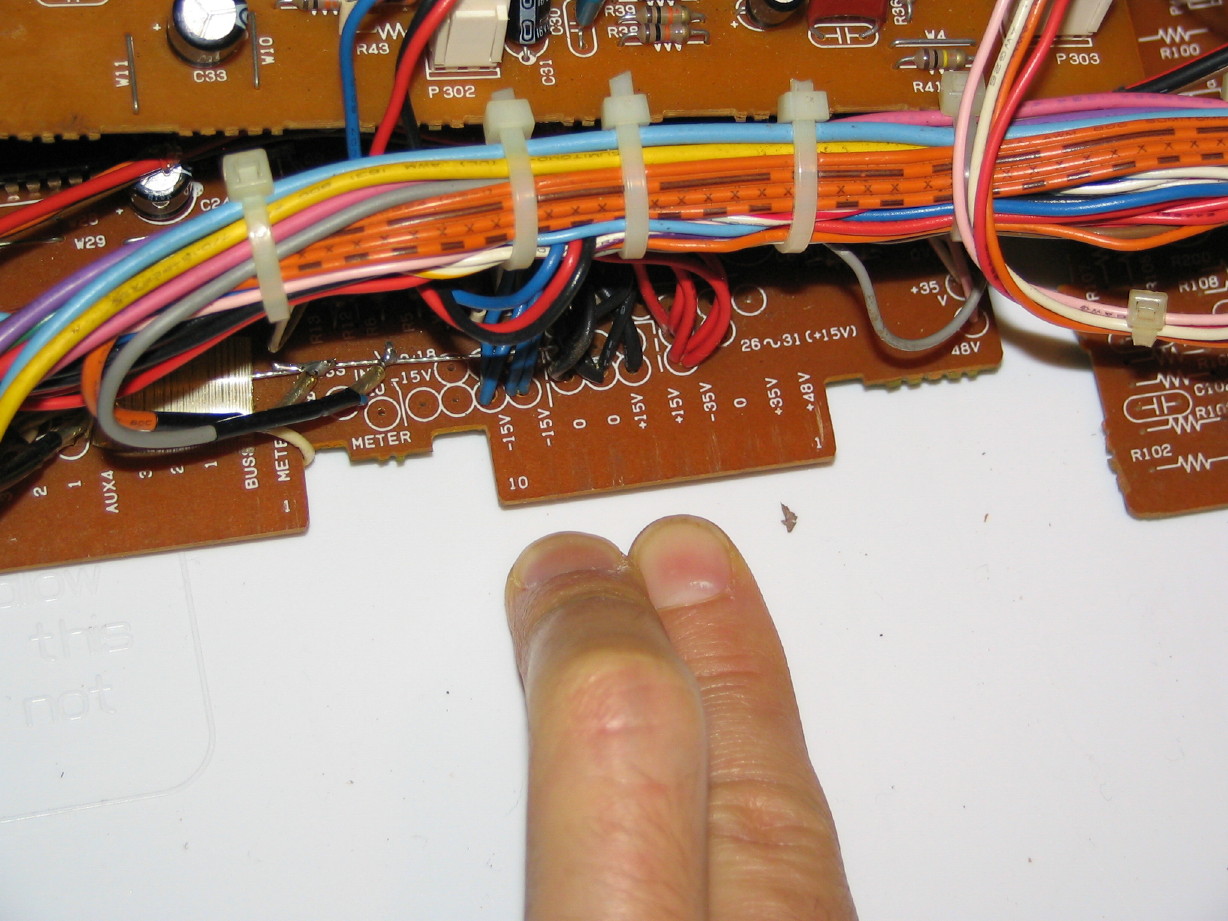
Ohhhhkay. So I started thinking about these physical groupings. I took another look at the Channel PCB's for the M-___, and in particular the (what I call) Input (A) PCB which, for each channel strip, carries all the power and audio connections from the strip to the motherboard. Notice in these next two pictures that there is a 0V rail physically associated with the 15V rails, and another physically associated with the 35V rails. Again, these are two distinct 0V rails circuit-wise in the M-___:
IMG_8644_8_1.JPG

IMG_8645_9_1.JPG


The third 0V rail needed in the M-___ (connection example not pictured), is indeed distinct and physically associated with the 6V rail in the mixer...that pair of rails (the third 0V rail and the 6V rail) only propogates to the master "Control Module" and the meter bridge.

SO...three distinct 0V rails each respectively associated with the 15V, 35V and 6V rails in the mixer...and then looking at the Power Supply PCB again and seeing 0V rails physically associated with the 15V, 18V (now "35V") and 6V rails...so I decided that, rather than use terminals 9 and 14 in the PSU as the third 0V rail I'd have terminal 2 connect to the 0V rail associated with the 35V rails in the mixer, terminal 7 connect to the 0V rail associated with the 6V rail in the mixer, and terminal 11 connect to the 0V rail associated with the 15V rails in the mixer. Then, I'd use terminals 9 and 14 for the connections to the mixer chassis ground rather than keeping that on terminal 11 as it is in the stock M-520/PS-520 configuration.

Don't know if that is right, but it makes logical sense to me.

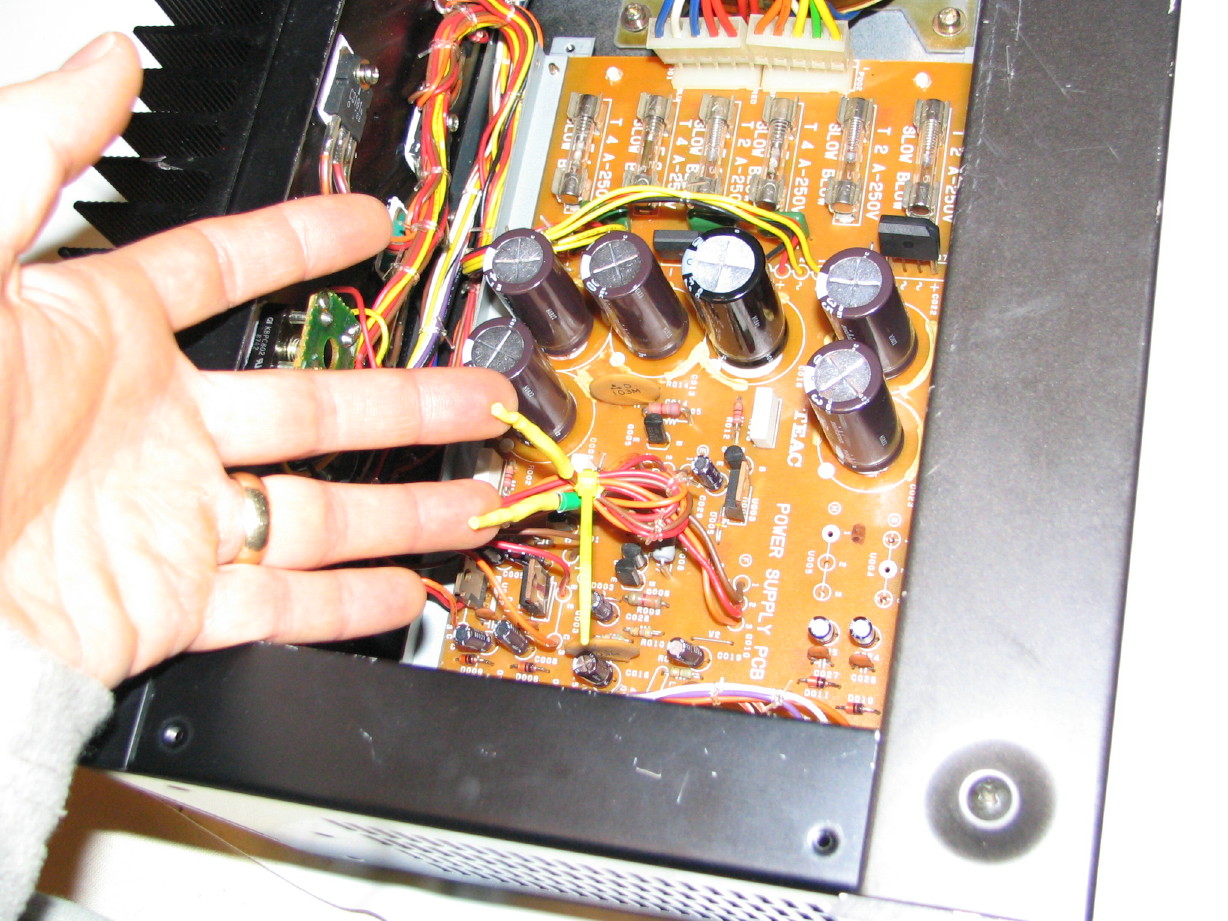
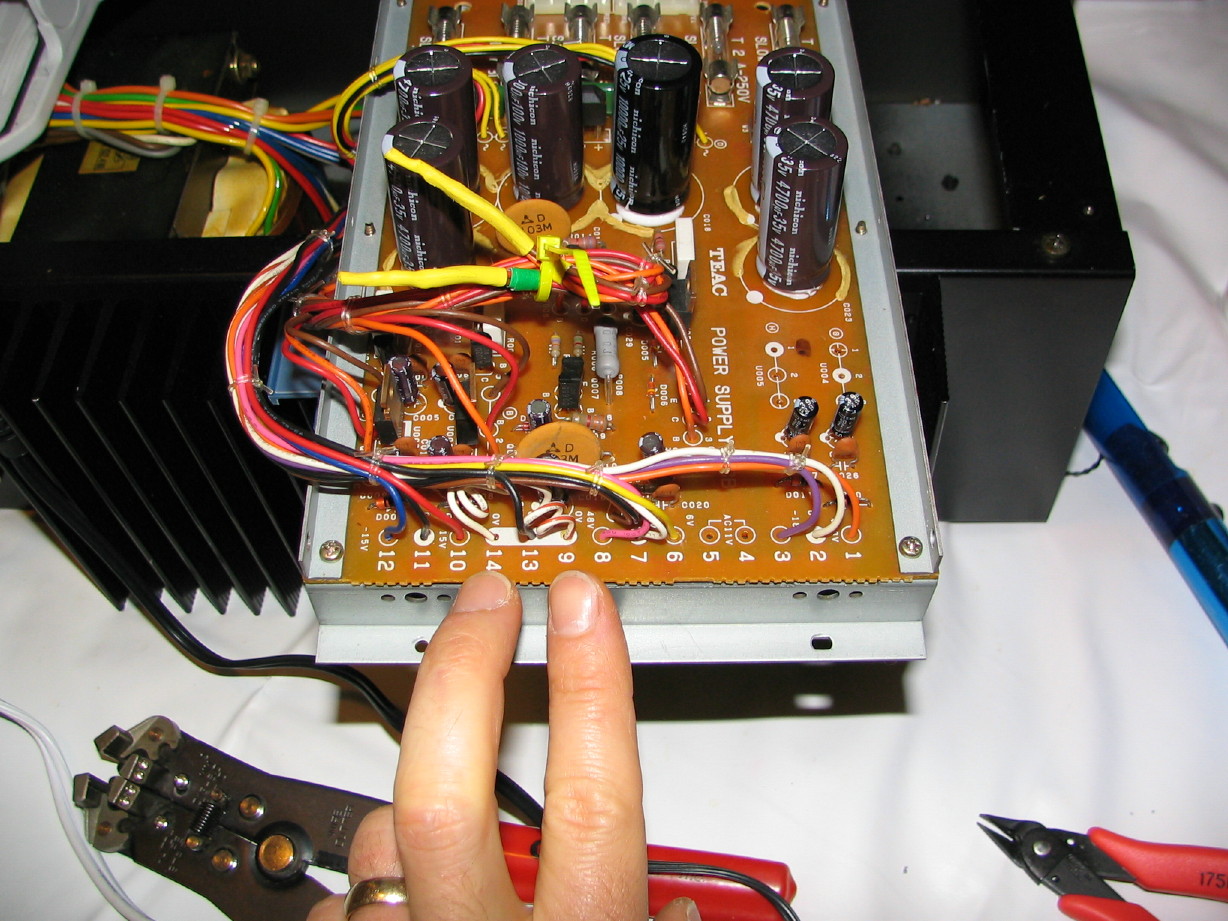
Here my fingers point to the wires coming out of terminals 4 and 5; the 11VAC rails:
IMG_8641_6_1.JPG


And here at long last after my dissertation you see the same wires no connected to terminals 9 and 14 which will connect to the mixer chassis GND over the power umbilical:
IMG_8642_7_1.JPG


After doing this I powered up the modded PS-520 and tested everything to make sure it was all still good, and it is though I have one question:

The 0V rail on terminal 7 truly seems isolated. When I measure the 6V rail on terminal 6 and put the negative probe on terminal 7 I get approximately 6V...if I put the negative probe on any of the other 0V terminals (i.e. 2, 9, 13, 14 or 11) I get nothing. This baffles me completely since terminals 2, 9, 13, 14, 11 and 7 are all physically on the same buss on the Power Supply PCB...how...does...THAT work??? :confused::confused::confused:

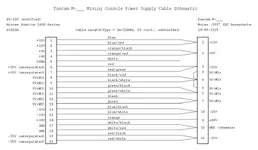
Here is a large .jpg of the Power Supply PCB layout: https://www.torridheatstudios.com/ftp/share/Documentation/Tascam/Tascam M520/PS-520 Schematic.jpg
 
Last edited:
You're

You're gonna have one helluva nice board when that thing finally powers up! Not only a long forgotten one-of-a kind relic from the bone yard, but...

Best Mixer Ever!:eek:;)
 
just bobbed in to wish you all the best... im really impressed with the thread :thumbsup... you got staying power !!!!

watching from the sidelines :cool:
 
The Power Umbilical comes together...

We're close...very, very close.

Got the mixer end of the power umbilical put together. It was not easy...had to redo some stuff. It would have been a cinch but there are two wires from the PSU that carry one of the three 0V rails to three different wires from the power connector on the mixer. Not sure why it was done that way as the three wires all go to the same spot on the motherboard, but... :rolleyes:

So trying to get those two little wires split to three different places in a way that would fit, and not splay everywhere and be durable was a chore. It didn't help that I was putting adhesive-lined 3:1 heat-shrink on everything. I suppose I didn't have to do that, but I wanted the job to be durable...at the PSU end the Hirose connector hood of course has a cable clamp and all that...not so for the Molex connector at the mixer end...as usual I think I may have gone overboard.

Anyway, after having to dicker a bit I came up with a solution that worked...

Than I had some trouble because I didn't understand all the lumps and bumps on the Molex pins...some keep it from backing out (they are obvious), and others keep it from going too far, and those were covered up with heat-shrink...dummy... :mad: So I had to dicker with that too.

Here is a closeup shot of a couple of the Molex pins...I got pretty handy using the crimping tool to get things good and secure...I also soldered the wire in. Again, probably overkill:
IMG_8648_1_1.JPG


Here is a shot of all 12 pins installed:
IMG_8650_2_1.JPG


And here is a shot of the cable prior to stuffing the pins into the connector shell:
IMG_8652_3_1.JPG


Here they are all stuffed in there:
IMG_8653_4_1.JPG


I put one band of heat-shrink around end of the factory sheathing on the multi-core cable, and then...:
IMG_8654_5_1.JPG


I put a big piece around the whole mess:
IMG_8655_6_1.JPG


Here is a (blurry) shot of the cable connected up to the mixer:
IMG_8656_7_1.JPG


Not exactly pretty, but I think it'll work and stand the test of time. It is appropriate for a prototype mixer, yes? :D

I did redundant continuity tests of the cable for each conductor end-to-end, and then connected the cable to the mixer and did redundant continuity tests from each pin of the PSU end of the cable to one of the channel card slots on the motherboard. I also tested the resistance on some of the conductors and it was good.

Next I will closely inspect the mixer motherboard for any suspect connections (damaged slot pins, bad solder joints, that sort of thing...), and test to make sure that each rail is isolated using the voltmeter. I'm going to do these steps because I was getting some hig-resistance continuity (about 35-40kOhms worth) between the 0V#1 rail (the one that accompanies the 15V rails) and the mixer chassis ground...maybe not a big deal, but my instinct says it might created a ground loop issue...right? It didn't happen the next time I checked which doesn't make me comfortable, so I'm going to see if I can find the source before I apply power.

Once I'm comfortable with the above I will connect the umbilical cable up to the PSU and, with power applied, check to make sure the proper voltages are indeed present in the proper places.

THEN, I'll hook the cable up to both the PSU and the mixer and, with power applied, make sure that voltages appear where they should on the motherboard.

Than it will be time to plug in a channel strip and see what happens. :)

Here is the power umbilical pinout:
 

Attachments

  • Tascam M-___ Mixing Console Power Cable Schematic.webp
    Tascam M-___ Mixing Console Power Cable Schematic.webp
    30.9 KB · Views: 268
Last edited:
BTW, thanks for the encouragement everybody...it helps the staying power. :D
 
Yeah, watching from the sidelines as well. I'm truly speechless [actually, if my jaw wasn't attached, it'd be bouncing off the floor as we speak :eek::D ].

Indeed, Cory's got staying power and then some! WOW!! :eek:

--
 
Back
Top