Tascam M520 Story...

  • Thread starter Thread starter sweetbeats
  • Start date Start date
bad news........

no wonder the guy sold it so cheap...

the pictures are of the bottom of the monitor B pcb.

sorry the pictures are low quality. I think I had traced the wrong cables the first time around...ridiculous that I didn't notice it, still.......suck. A little surprised/glad this is the only issue caused by this...but......dang.

what are my chances?
 

Attachments

  • -1.webp
    -1.webp
    22.9 KB · Views: 688
  • -2.webp
    -2.webp
    23.1 KB · Views: 691
Ahhh. That is actually good in my book because now you know what the problem is! Okay...

  • Is that the Monitor B PCB in the pics?
  • Important: look close...are there other damaged PCB's? Can you tell how it happened?
  • onesong, how good are you with a soldering iron? That looks to me like a fairly doable repair job depending on your skills. I can kind of walk you through it if you like but it basically involves scraping the green coating off the PCB to expose the copper trace and bridging the affected areas with soldered in material like tails trimmed off of resistors or capacitors. Check out this post for sort of a pictographic tutorial on what I'm talking about. You could epoxy the board back together and then bridge all the cracks. The other option would be to just remove that chunk and bridge across the gap left by the missing chunk. If it was me though I'd be gluing the chunk in since it has a mounting screw in it. If this idea is beyond your skill set you could consider removing the board and sending it to me and I can do the repair. PM me on that if you'd like.
 
1. yes

2. no. there's a little piece of metal the kind of hooks into a hole in the pcb, it looks like when whoever screwed the pcb down last, they did not line that up with the hole, so when they tightened the screw it broke the pcb.

3. I'm pretty comfortable with a soldering iron. Not the cleanest or 100% accurate, but I've done a fair amount. What is the scrap cap you used in the tutorial? I feel like, looking at that, I'd be able to do it no problem. I just would need to be careful to not solder the wrong traces together. I guess once I know what to use to bridge the gap with, I'll get right on it!

-again, thanks so very much for all your help.
 
Sheesh...that's irritating (the probable cause of the broken PCB), but, again, is good news in a way since it appears that it wasn't trauma to the whole mixer. With a better picture I bet we could explain what's going on with your SOLO problem too, but bottom line once you get that PCB repaired your issues might be gone. ;)

Okay. I was referring to cap(acitor) tails since that's what I've had the most of laying around...I'm just talking about the excess leads from a resistor or cap when you're putting new ones in...they're much longer than needed when new and you solder them in and then trim off the extra giving you a short piece of wire...any short piece of solid core wire will work. Just something to reinforce the bridge...you could get some smaller guage solid core copper wire or whatever.

Just make sure you keep the tip of the iron clean as you go (wiping on a piece of damp cloth or sponge) and clean the surface of the area on which you are going to work on the PCB with iso alcohol. Really helps the solder to take, and you could even tin the newly exposed bits of trace with solder. If you're relatively comfortable handling an iron I suspect you'll be just fine. Its kind of fun even. :)

Anyway, best wishes, let us know if you have any questions before or after the repair, and please keep us posted.
 
!!!!!!!!

:D:D:D:D:D:D:D:D:D

IT WORKED!

So stoked....just finished all the soldering, wired it all up and closed it....hooked up an ipod through th tape inputs on channel 1 and 2 and routed them to the Busses then the Monitor section ...BOTH CHANNELS!!! I double checked every little detail and everything works exactly as advertised!

SweetBeats, Thank you SO much for your help. Seriously, you're a lifesaver and my hero.
 
Yeahhhhhh!!!

onesong...that...is...AWESOME!!

So glad I could help! ;)

Its exciting isn't it? Liberating to be able to open up a complex piece of gear and make it work. Good job!

Keep us posted on how the rest of it is working. Its a community here and I pass your kudos on to the rest of the forum. I would not have been able to give you the advice I gave you a year ago. I've learned so much from many, and its a pleasure to pass on the help that has been given to me many times over. :D

So did the fix resolve your SOLO buss issue too?
 
...Its exciting isn't it? Liberating to be able to open up a complex piece of gear and make it work. Good job!

Keep us posted on how the rest of it is working. Its a community here and I pass your kudos on to the rest of the forum. I would not have been able to give you the advice I gave you a year ago. I've learned so much from many, and its a pleasure to pass on the help that has been given to me many times over. :D

Isn't that just the coolest thing? Almost makes putting with all the BS that comes along with it, worthwhile.
 
Tascam M520 Power Supply Chord?

I stumbled onto this thread and read through all of it (all 16 pages!). I recently aquirred a Tascam M520 console, Power Supply, Patchbay and a Tascam MS-16 1" recorder as part of a recording job I did for a friend of mine at my studio. Unfortunately the M520 console did not have the cable to connect the Power Supply to the console so I could test it out. It did work prior to my aquirring it and I really have no need for another console here at my studio. I did want to check the M520 out before I got rid of it (Sale/Trade/Donation) and I have no info on this particular console. I was able to download the Opperator's Manual posted by one of your contributors (Thank You).

Since I already have one large (Harrison MR-4) console that takes a lot of my time to keep running and I do a lot of other recording for friends I have here in the Pac NW, I am hoping one of you folks might help me locate this particular item, or maybe be interested in the console as a spare parts item (or even wish to fix it up and use it in your own recording space) Right now it is taking up valuable space in my studio's entry hallway and I need to move it out ASAP. I am very much into getting things into the hands of those who will use them and not making lots of $$ on them, just getting soemthing of equal value that I can use.

I intend to keep the Tascam MS 16 1" tape machine.

Also I am not much for posting on-line these days, but if you send me a note here, chances are I will get it and be able to reply.

Pretty cool on-line community you have here too. I used to be involved in at lot of stuff like this years ago and I hope I have time to post some things about what I know (music, recording, etc...) if and when I ever get any time in the foreseable future to do so. I hope to see a reply to my post soon.

Thanks!
 
Okay...back on this project...

All 20 channels are now completely gone through. I haven't tested the last four strips. that'll happen tonight. And then after that I'll be finishing up going through the master section.

Here is what I'm doing to each channel strip:

  • general dust removal from PCB
  • remove LED's and polish the legs and clean and exercise LED sockets with DeoxIT (no more flickering LED's)
  • clean and exercise pots: clean mounting threads, clean fuzz/dust out of gaps between pot body and shafts with dental floss (try it!), strategic and liberal application of DeoxIT to elements and wipers (one dose, exercise, another dose to rinse all the while keeping the pot positioned so the cleaner and debris can drain out)
  • clean and exercise all toggle and push switches with DeoxIT: toggle switches get similar treatment as with pots, push switches get injected/filled with DeoxIT and exercised (generally 100 cycles each)
  • All card connectors polished
  • Visual inspection and full functional tests

I have developed callouses...
 
Its all done, and its for sale!

I'm finally done going through my M-520.

Every channel has been pulled, contacts, pots, and switches strategically cleaned, PCB and components visually and functionally tested.

Cosmetically it has been 
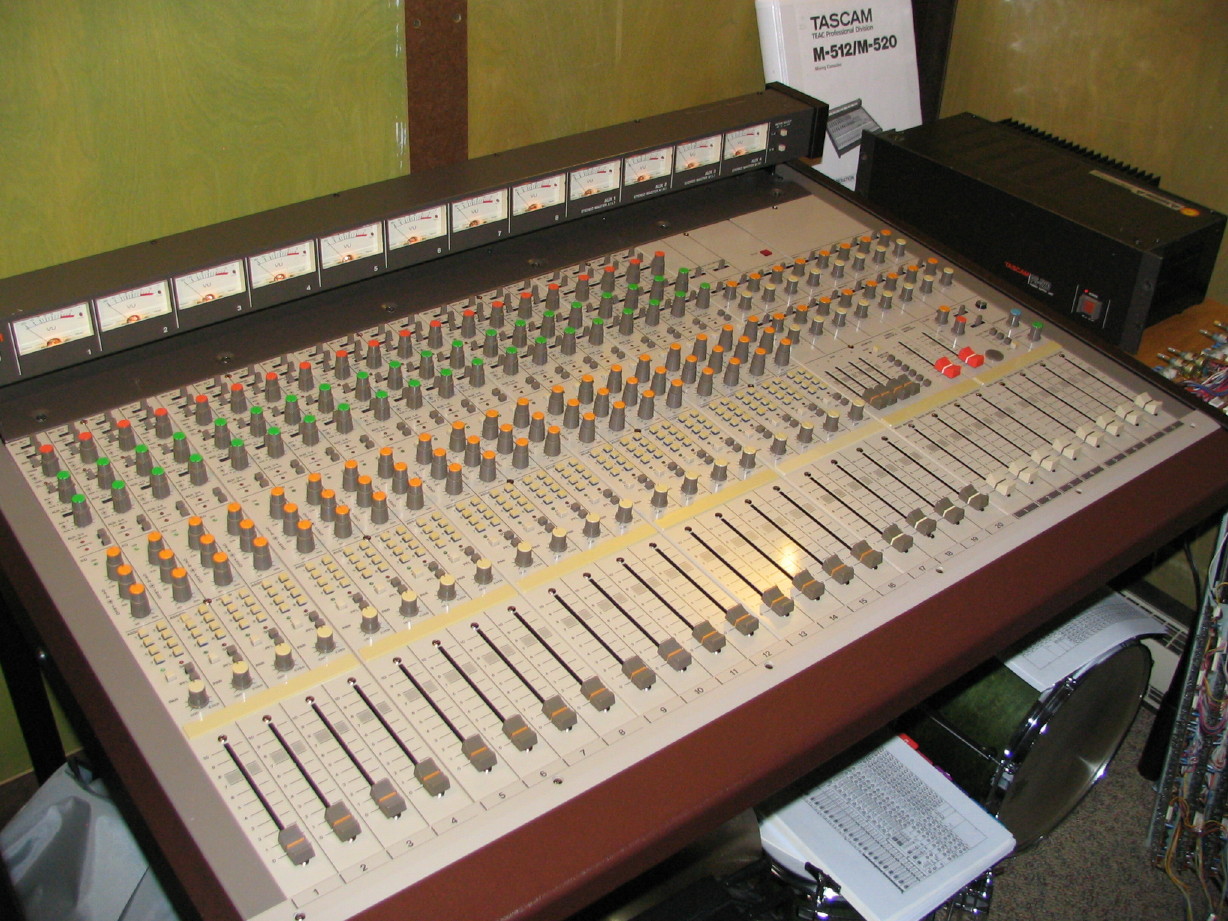
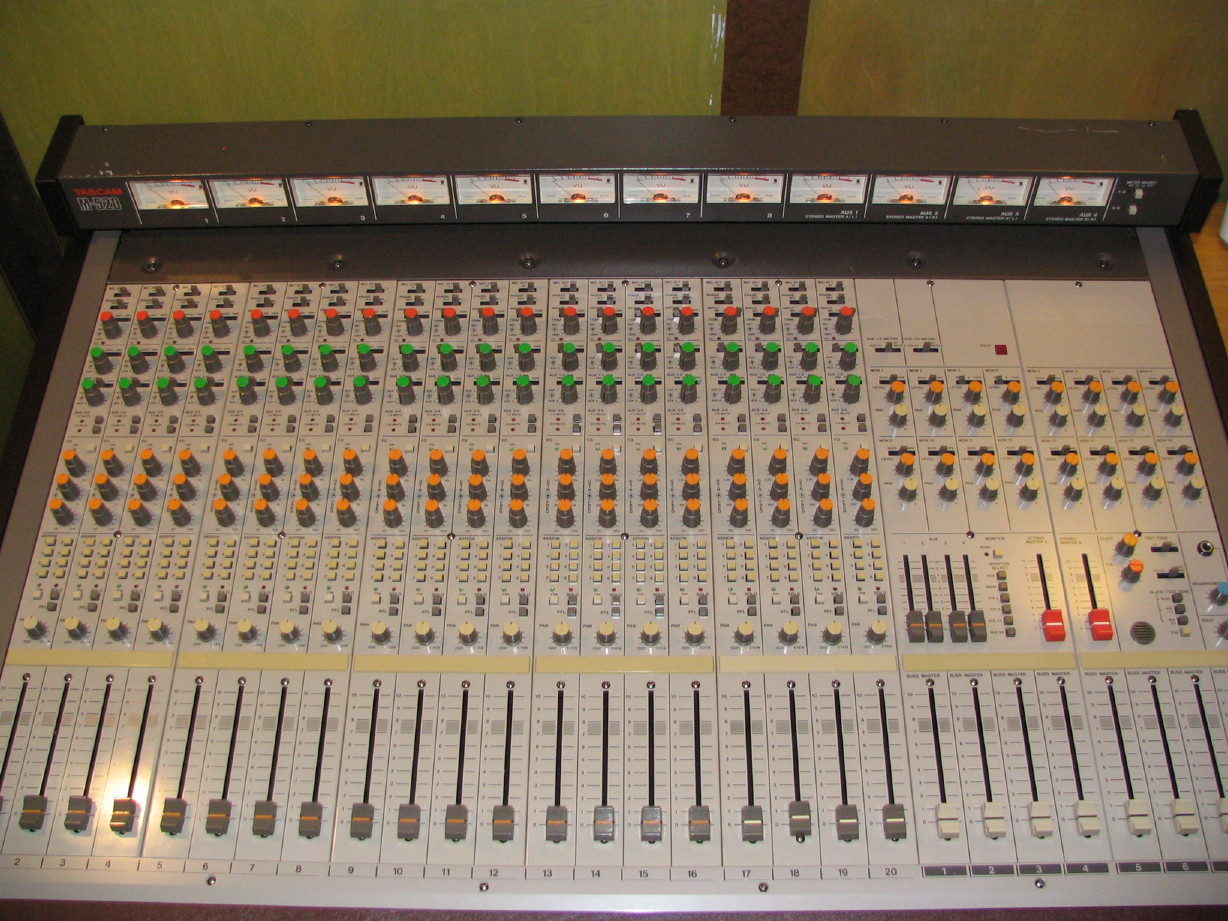
detailed. You've seen the pics. This is a beautiful mixer save for a few scratches on the top of the meter bridge.

It is 100% complete (right down to the SEND/RCV jumpers), and everything functions as it should (caveat: I have not tested the RIAA phono amp...I have no turntable) right down to every pot switch and lamp.

I'm including the high-quality custom cover made by LeCover which is practically brand new, the original operations and service manual (in non-original binder) and a spare incomplete channel card. Of course the PS-520 power supply and power umbilical cable are included, and the PS-520 has been recapped with high-quality Nichicon 105-degree caps.

Need additional spares? I have them! Knob/switch caps, dress panels, OR...how about 4 channel cards that have been fully cleaned and recapped and tested???

Okay. So I'm asking $750 for the mixer with all the trimmings.

Here is a collection of 5 videos that cover this particular mixer as well as the M-520 in general:

YouTube

YouTube

YouTube

YouTube

YouTube


Here are some recent pictures:

IMG_0644_1_1.JPG


IMG_0645_2_1.JPG


Here is a link to a picture directory with lots of pictures in it, though a lot of them are duplicative:

https://www.torridheatstudios.com/ftp/share/pictures/Tascam%20M520/2008_09_06/

Let me know if you have any questions. Soon I'll put it up on the HomeRecording For Sale forum, then craigslist, then :eek: eBay.
 
Last edited:
Gosh, that's sweet! Picturesque!

... & nice meter lamps!:eek:;)
 
I have not tested the RIAA phono amp...I have no turntable
I have one. Bring it over and we'll test it. ;)

Actually, my turntable has been getting a workout lately. I'm working on remastering a bunch of records that a fellow played drums on back in the '70's. He played on a ton of stuff including the Animal House soundtrack record. His father played guitar on a bunch of stuff in the '50's-'60's also, so it must be in the family. So I have 40 or so records that I am burning CD's of so he can listen to them again. He also doesn't have a turntable, which is good for me.

VERY nice job on the board. Looks like new.
 
. His father played guitar on a bunch of stuff in the '50's-'60's also, so it must be in the family.

You wouldn't be talking about Tommy Tedesco, would you?
 
M-512 and M-520 parts for sale

Okay analog dogs, this stuff is going one way or the other but putting it up here before it goes on eBay.

Details in this thread.

Boo-yah.
 
You wouldn't be talking about Tommy Tedesco, would you?

Nope, his name is Billy Mure (I posted a video of his 93rd birthday a while ago). Billy was a studio guitar guy in New York rather than LA. He also had a series of guitar albums on his own name (Supersonic Guitar, etc.). His son, Gary Mure, is the drummer and played mostly in the '70's and was quite active sharing credits on albums with the likes of Steve Gadd. Gary became much less active upon the arrival of drum machines. :( Billy still plays every weekend at a club here and seams to stop by the house here just about every Monday night to say hi.
 
M-520 Maintainence Help...

Hey everyone,

First off, this thread has been amazing. I just got a 520 and have learned a lot following your adventures.

I have two questions and since this is where all the experts seem to be, I thought I'd post here.

Question #1:

Chanel 1 on my board does not pan left. It won't pan left no matter which odd bus is selected. Any thoughts on how to fix this?

Question #2:

My odd number buss' (1, 3, 5, 7) output about 2 -5 dB more than my even buss'. Right now, when I send a mix to my 2-Track, I have to compensate by boosting the even buss (or lowering the odd bus) if I want an balanced output on a mix. This is a small problem, but it would be nice to know if there was a simple way to calibrate the level that buss' output, or if this is a symptom of a larger issue...

Thanks in advance!

Matt
The Brewery Recording Co.
http://www.myspace.com/thebreweryrecordingco
 
Question #1: first thing I'd do is pull the card and check that the buss witing is intact on the card and to the motherboard. After that I'd test the pan pot...I had a card do the same thing and it turned out one of the elements in the pan pot was cracked from an old impact I imagine.

Question #2: Are you saying that the output is lower at the BUSS OUT jacks, or through the MONitor mixer to the STEREO A/B outs?
 
Question #1: first thing I'd do is pull the card and check that the buss witing is intact on the card and to the motherboard. After that I'd test the pan pot...I had a card do the same thing and it turned out one of the elements in the pan pot was cracked from an old impact I imagine.

Thanks! I'll try that.

Question #2: Are you saying that the output is lower at the BUSS OUT jacks, or through the MONitor mixer to the STEREO A/B outs?

Through the Monitor mixer to the Stereo A/B's...
 
Do you have full service manual for your M-520?

That would help the troubleshooting dialogue. Keep in mind you are going to need to access your master section so be prepared to:

  1. remove the buss faders
  2. remove the master dress panels
  3. remove the armrest trim strip
  4. remove the 6 screws on the top rear panel under the meter bridge and tip the meter bridge and panel back
  5. remove the 4 screws holding the master section to the frame and tip it up
 
Hey there sweet beats, I hope you still read this... I just acquired a tascam board just like yours. I can't find the manual, of course. Any Ideas? If I can't find it is there any way I could pay you to photocopy one for me? Or is it just way to big? I appreciate any advice you can give me Take Care-
 
Back
Top