briank
analog for the people!
Hey, Sweetbeats can't hog up ALL the MCI insanity around here, eh? 
")
Forgive the ensuing typos and grammar, I will go in for some editing later!
So this requires some backtracking because I actually bought this console at the end of February, and received it at the tail end of March. I started installing it the day it came in, and have been working on getting this puppy in action ever since. As we've seen in other "Story posts," these things do tend to snowball....
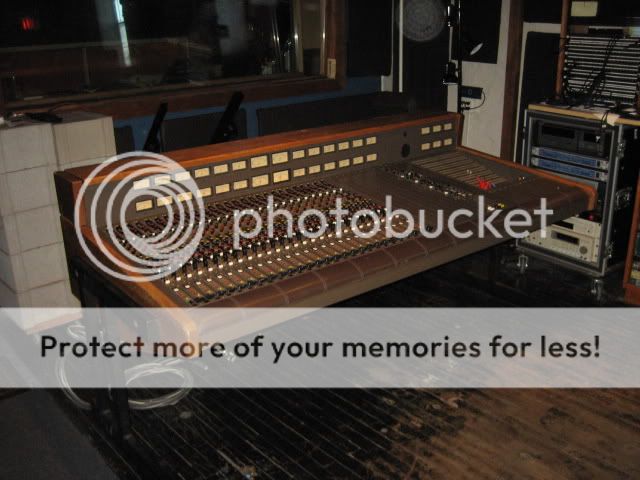
As the story goes, a fellow from the Dallas area posted on another forum that he knew a guy with a pretty clean MCI 636 console that could probably be gotten for a good price. It seems the seller had this in his home studio (that is to say, the house was the studio and he lived in it), but he was in well over his head and needed to get the console out. Unfortunately, he....how do I put this delicately...was utterly lacking in the most basic tenets of salesmanship and couldn't answer the most basic questions about its condition. Fortunately, the fellow who had hipped me to the console was willing to go check out the console for me and report back. He wound up doing this several times.
After some back and forth, I had ascertained that this 636 was shortloaded to 28 channels, that one of those channels was missing some parts and needed to be rebuilt, and that about 7 more channels weren't passing signal and had some lights out. This console had the optional phase meter which I pleased to learn because it's something I've found myself wishing for for a while now. The console, like all 600s, had a very nice, flexible full TT patch bay built in, and it also had an optional tie-line patch bay which would be very necessary because large format consoles with built-in patch bays don't have your typical XLR and TRS jacks on the back like smaller format mixers. They have multi-pin connectors and the idea is you wire your entire studio to the console: recorders, rack gear, studio lines, the whole enchilada. My studio is a co-op space meaning I had a studio, a buddy had a studio, and we combined our gear into a big studio with lots of gear all of which would need to be hard wired to the console! It was going to be a big-boy install job! Up until now, we'd been using a battery of 9, count 'em 9 DBX 1/4" TRS 48-point patch bays, and frankly, they really hadn't been up to the task these days, they weren't quite commercial quality and in the last year I'd found myself correcting many cracked solder joints in the TRS modules to get signal flowing through them properly, so the idea of a solid, commercial grade TT patch bay really did appeal to us despite the big job it was going to require.
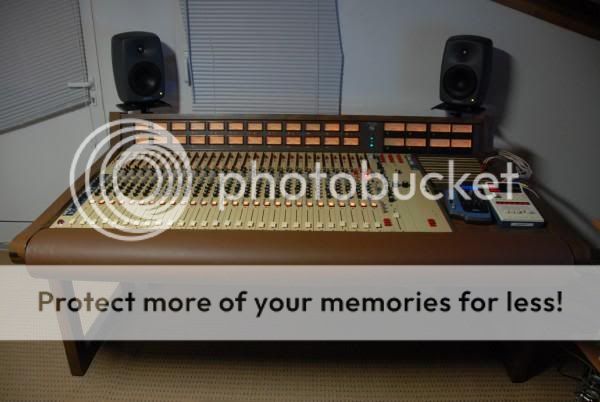
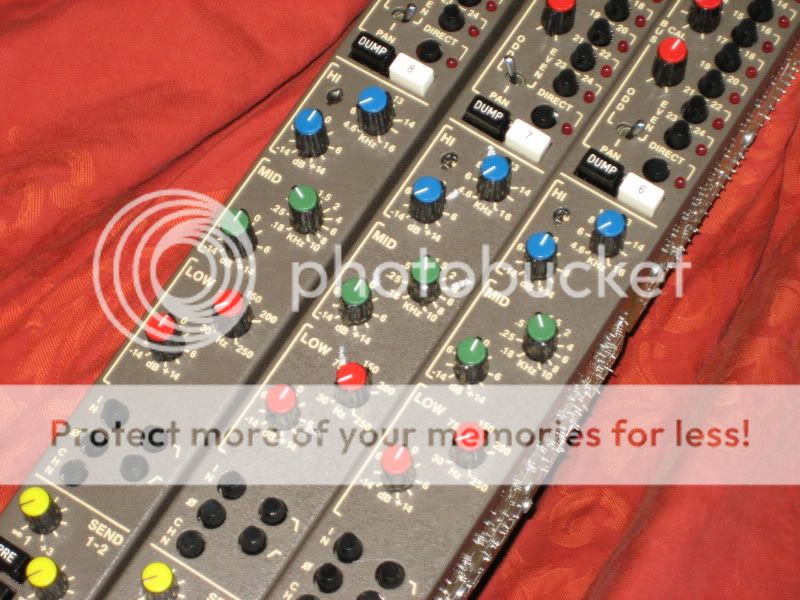
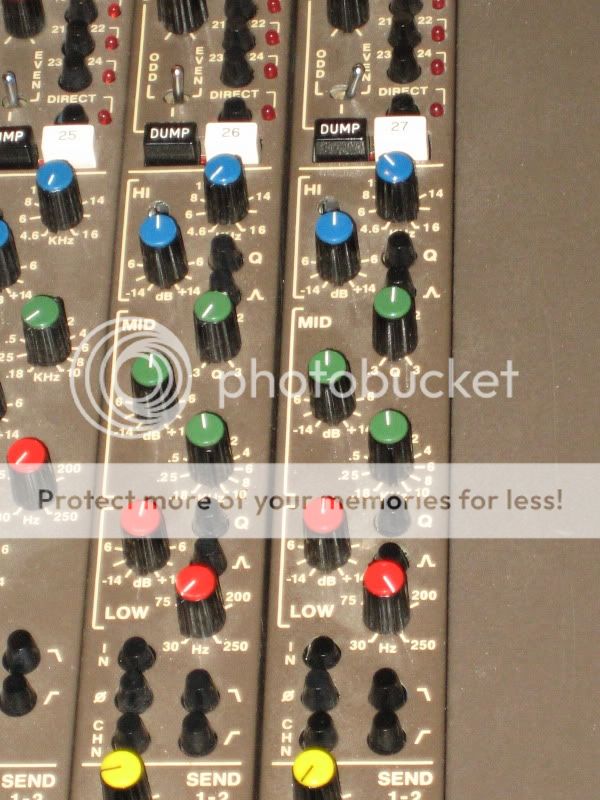
The console's channels were mostly standard 3-band semi-parametric EQ channels, but a couple had the nice VariQ parametric EQ options, and since it was shortloaded, I could fill it up with some more VariQ channels from parted out consoles as they became available and funds allowed, so I looked at this is being a better situation than if it had been fully loaded with standard EQ channels. I also learned that this one was a JH-636-VU-AF, meaning it had standard mechanical VU meters rather than the plasma meters that were and expensive option back in their day, but are nothing but problems these days. I also think the VUs look much better and I prefer their ballistics. It also had a box of spare odds and ends--an extra phase meter card and four spare fader packs, which made me happy because it meant I could add in four more channel modules later without needing to source matching fader packs.
The "AF" meant Auto Faders. Oh yes, late 70's VCA automation at its fin...auh, worst, actually The MCI JH-50 was as far as I know the first commercially available console automation system and, as tends to be the case with these things, they didn't quite nail it on the first try. Instead of later systems which used either an on-board or outboard computer to crunch data and store on hard or floppy discs, this early version used digitizer boards in the console's belly which sent data through patch points on the patch bay to TAPE! Yes, the idea was to send the data to a couple tracks of your 24-track machine for storage, egads! It was also almost certain that the auto system wasn't performing correctly because frankly most people haven't bothered with that auto system in years. However, on the "AF" MCI 600s, the automation system not only controls fader positions and channel mutes, but also solo-in-place and the grouping, so even if I didn't aim to automate mixes with it, it still needed to work. I figured I could probably get the auto system back up with a re-cap and maybe some cleaning or at worst a couple chip replacements, and in the meantime, the console would be functional enough with the auto system switched off as there are still hard channel mutes and the faders on this model would thankfully still work with the auto off.
I also ascertained that this console had the "dreaded red" IC sockets which are notorious in MCI gear of the mid-70s through early 80s for being fairly not-great quality. Now, I've been regaled by tales of ICs having badly oxidized contacts or even falling right out of the sockets due to poor contact. This said, MCI fans are polarized on the "dreaded red" socket issue. Some say they're all garbage and to plan on removing them ALL and putting new, quality machined sockets in. Others say that only some will be a problem and to just replace as necessary. I decided that I would subscribe to the latter.
I further learned that other than some scraped up woodwork, the console was relatively clean inside and out for its age, that it wasn't caked with grime, missing paint, covered in a film of tobacco stank and so-on, but would need some re-furbing. It had other typical issues such as most of the VU lamps being burnt out (when it finally came in I counted 7 out of 68 lamps working). I knew this console, like any console of this age, would need a good cleaning as far as pots, faders and switches were concerned, no surprises there either.
I also learned that it hadn't ever been re-capped, which was a good point of leverage on the price as I would be going waaay out on a limb to buy this sucker and wanted to get it as cheaply as possible. Re-capping a console like this is a BIG, tedious job, but not one that has to break the bank if DIY'd. I also knew that I would NOT be likely to find a fully re-capped 600, and if I did it would cost a mint to buy, so I made peace pretty quickly with this point and decided I'd rather be the one to re-cap it if it had to be done, as I could spec out my own preference for caps and have control over the job.
Knowing that the seller had ZERO tech skills and most likely had never put the slightest bit of maintenance into it, I felt that the derelict channels were most likely caused by some combination of cooked caps and funky ICs or sockets and that I could probably have them passing signal pretty easily, so made peace with those issues and again used it as leverage on the final price.
I had decided what the console was worth to me and and made the offer. The seller was going through personal problems and had become somewhat emotional about things. He rejected my first offer despite his desperation and I realized that the fellow who had been answering my questions and doing the legwork was better at talking to him. I arranged to have him act as a broker, get my offer accepted, then secure the console for me and hold it in his garage until I arranged to get the console out of there. Eventually after a couple weeks of patience and cajoling, the seller accepted an offer and I wound up paying what it was realistically worth given the condition, which was about half of what he'd been asking.
In the meantime, I had been working out how I would get this beastie the 1,100 miles from Dallas, Texas to Oshkosh, Wisconsin. I estimated the combined weight of the console and PSUs to be around 700lbs and quickly learned that any kind of freighting really was going to break the bank. Rut-roh! It was going to have to be picked up... "OK, who do I know with a big vehicle? Aha, my stepfather has a Suburban!" I worked on getting some measurements of the console, the PSUs and the load area of the Suburban. I really thought it would be a close one. As it turned out, the console was a little over 7' long (sweeet ) and about 41-42" deep. My stepfather smugly informed me that he could fit a sheet of 4' x 8' plywood in the back of the Suburban no problem...phew! It would all fit. The console would need to be transported with the modules removed and boxed up, because moving a console frame of this size and weight will cause it flex. This could damage the module boards and I really didn't want to deal with broken card ends. Fortunately, the broker could have the modules removed, boxed up and ready and it would all fit. All I had to do was figure out if my stepfather was up for a road trip to Dallas, and work out how long the trip would take and how much gas it would gobble up--less than the cost of freighting, that's for sure! 
Well, by now it was early March and the Wisconsin winter had been a real dickens. I called my folks up to talk turkey about the transit right around the time we'd gotten yet another late-season blizzard and, wouldn't you know it, a trip to warm Texas sounded pretty good to them! They had been thinking about taking a short vacation somewhere to get away from the winter (and work) woes, and since they dig a good road trip, decided that at the end of the month they would drive down to Texas and hang around the Dallas area for a few days, get a little relaxing in, enjoy the weather, see a few sights and then pick up the console for me on the way out  At this point, I would like to say that my folks really are fantastic people!
This is actually a good tip for anyone here who's thinking about buying a large piece of gear from a distance but isn't sure how to get it home. Maybe you know someone who wants an excuse to take a road trip, eh?
Well, I spent the rest of March anxiously waiting while researching preparing what I would need to get the console installed and refurbished. I had the broker mail the manual up to me ahead of time so I could look through it, get familiar with the console's functionality, look at schematics and figure out what how signal flowed through the console and get an idea of what I'd be in for re-capping-wise. I also needed the wiring diagrams so I could get a head start in the installation process.
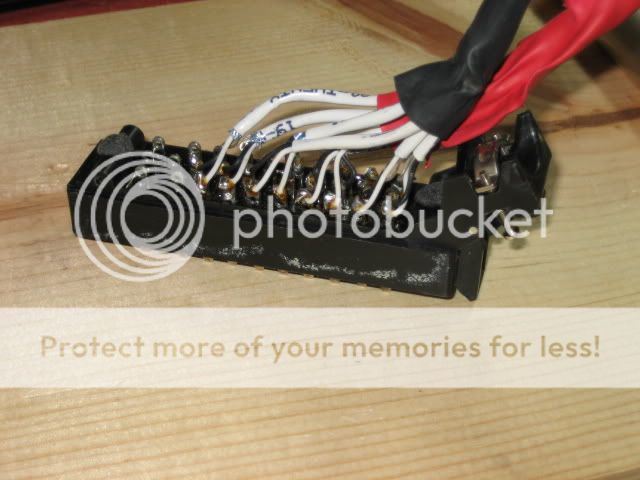
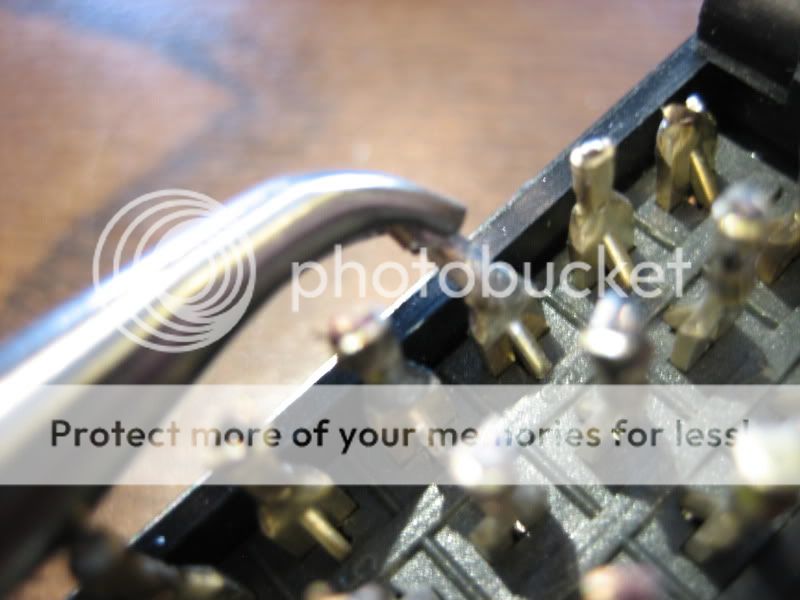
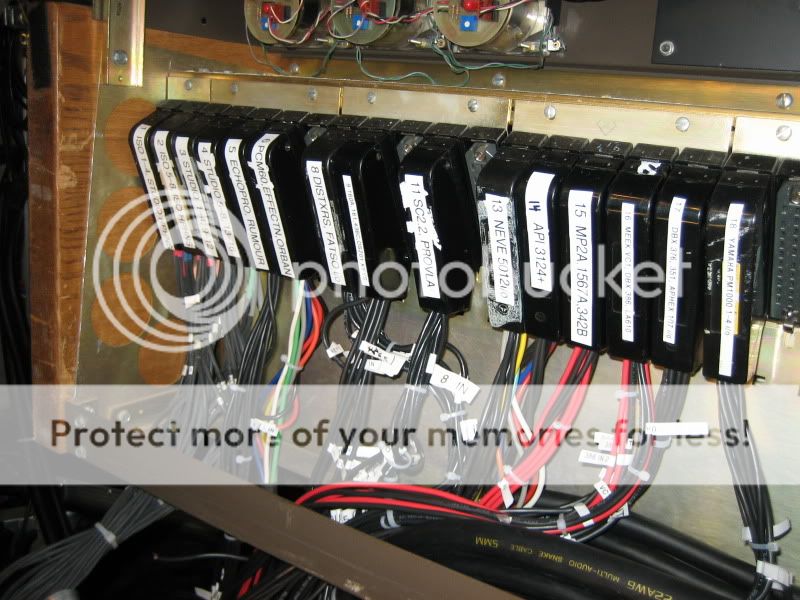
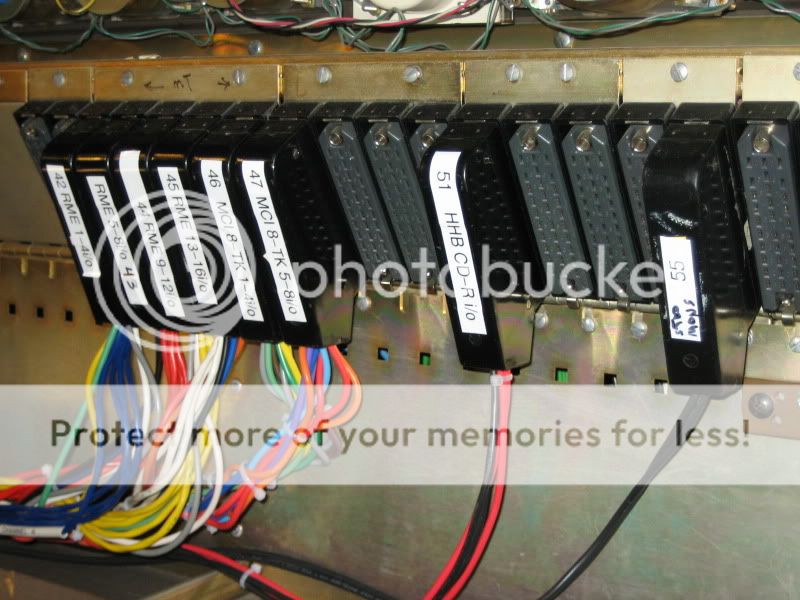
Consoles with patch bays use multi-pin connectors that you hard-wire your studio to. Some use D-Subs, others use EDACs, while some, including MCI 600 series, use a 30-pin connector called a Tuchel.
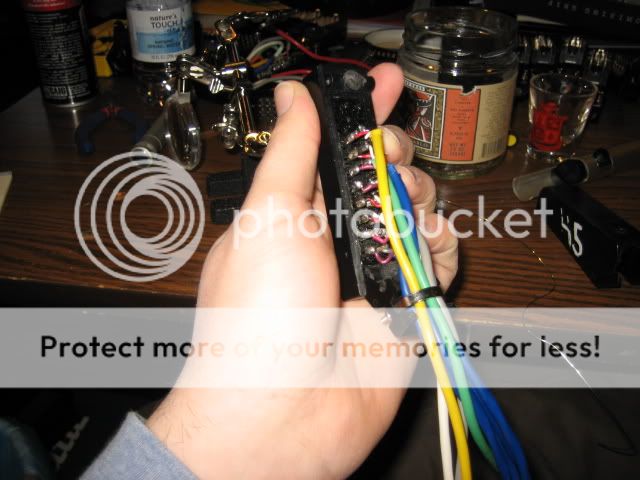
This is what Tuchels look like; note the one with the housing off so you can see how the audio cables are wired to them. In this case, the previous installer had used black and red heatshrink to denote inputs and outputs:
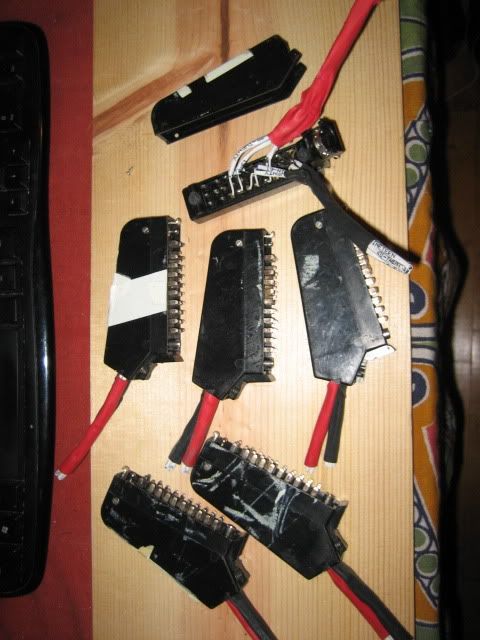
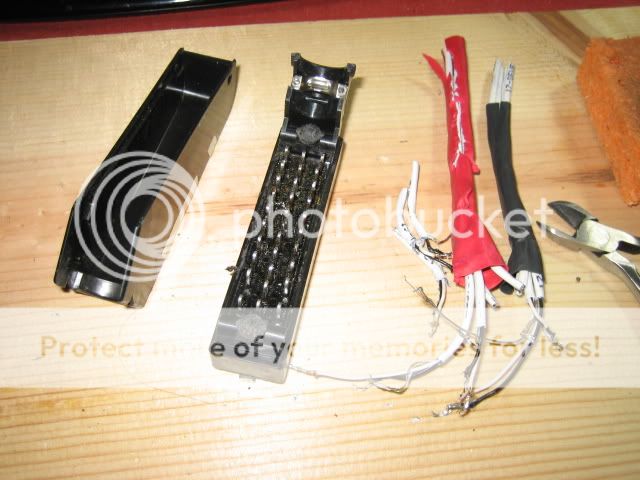
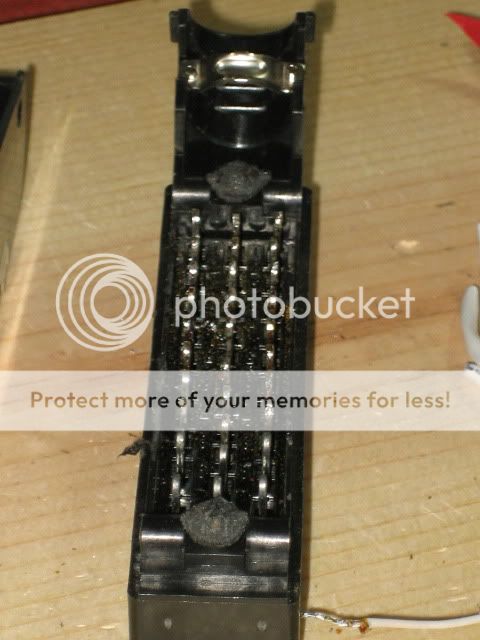
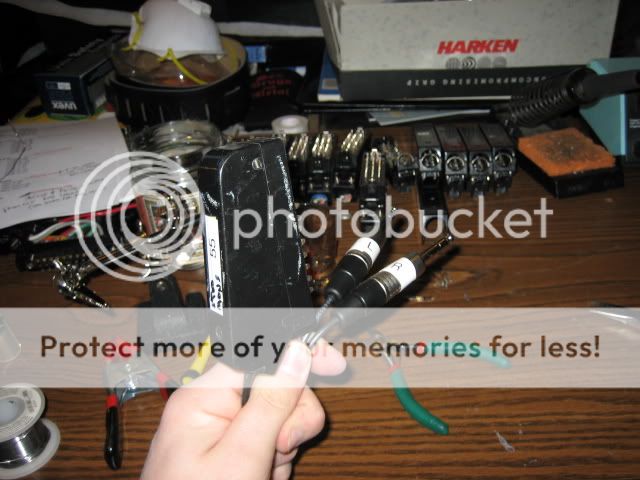
These are the Tuchels I'd bought ahead of time. They'd had a bolt cutter taken to the looms during the previous owner's uninstall as is typical, and I had to de-solder the old bits of cable left on them. What a PITA, but used Tuchels are much cheaper than buying news ones! This was the first of several ways I wound up trading tedium for value.
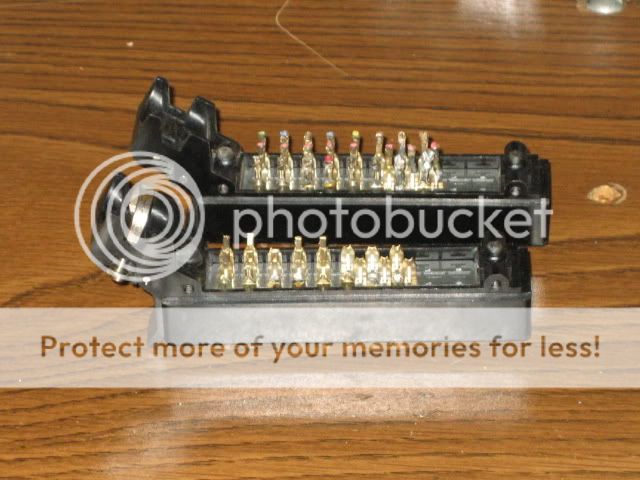
In the case of this console, only 24 of the 30 pins carry signal; there are columns of three pins that respectively carry the high signal, low signal, and shield of each balanced audio line, and they're in rows of 10, with only 8 actually being used on MCIs for some reason. You wire it up from bottom to top with a 4 channel in-out configuration, that is, from bottom to top, channel "1" out, channel "2" out, channel "1" in, channel "2" in, channel "3" out, channel "4" out, channel "3" in, Channel "4" in. This was all kinds of confusing at first, but as I started to write my wiring diagram for the studio it became second nature pretty quickly. Did I mention our studio has lots of stuff to wire in? With each Tuchel connector carrying only 4 channels of inputs and outputs (and a couple only carrying 2 i/os due to 36x2-pt the patch bay configurations), I figured that we would more than fill up every multitrack and tieline point on the patch bay, would need 28 Tuchels to do this, and that the console was only coming with 15 of them. Fortunately I was able to source more Tuchels before the console came in, and decided to get the multitracks and studio monitors wired up by the time the console came in so that I could plug the Tuchels in and start testing its functionality right away. My wiring plan ended up 9 pages long in the end, and that's only because I ran out of patch points to fill
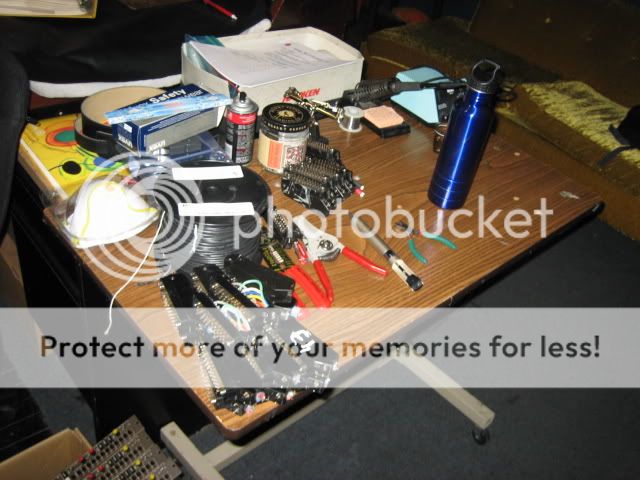
I also needed to figure out how to wire things in as cheaply as possible--this meant recycling as much of our old cabling as possible. Some weren't long enough to reach the console, so I was tasked with figuring out what gear would need to have new cable looms made. Some were on pre-made line snakes, some I had re-wired for a previous patch bay re-config with custom Belden 8451 looms, and in some cases I found that the gear further away from the console could have its looms harvested, re-terminated as necessary, and re-used for closer gear while the further racks would get new longer looms made. My studiomate bought 1,000' of Gepco install cable for any new looms I would need to build and we get them as 500' of red jacket for inputs, 500' of black jackets for outputs so the color coding was a nice touch. Also, since we were going from a 1/4" TRS patch bay to hard wired, it meant that I would be clipping off hundreds of TRS jacks from the looms and would have plenty of TRS jacks (mostly Neutrik) to recycle for any rack gear that needed them with new or re-built cable looms. This would add more time on the install job because lots of parts would need to be de-soldered before being re-soldered, but I had worked up an efficiency plan so that in the end, the studio would only see about 3 days of full-on downtime (!!) during the install anyway, especially since I was getting a head start on the job and snagging off-days leading up to the console's arrival, so I was able to fudge in more install time without much inconvenience the the studio's operation while saving a mint too!. As you can see, our tight budget made this install extra-extra-complicated! I'll tell you, I learned A LOT about keeping costs to a minimum while still doing a decent quality job of it, and I learned a lot about how to keep the studio going as much as possible eve during HUGE transitions. This console was making me a more professional engineer even before it arrived, and as you see, I kept plenty busy while I waited for for it.
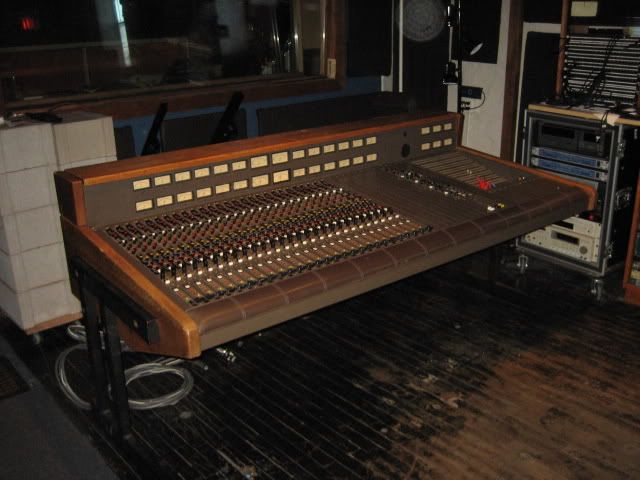
Well, finally the console arrived at the end of march with the broker and my folks all confirming that the console was PLENTY heavy even with all the modules removed and that I'd better have some guys on my end ready to help unload and schlep it into the studio. In the end it took 5 of us to get it pulled from the Suburban, flipped onto its back on some furniture dollies, finessed into the studio through three doorways and into the control room. We bolted the legs on, got it upright, and I'll tell you the sight of this behemoth in the room, standing up in its new surroundings even with with no modules, really made us forget about the dull back pain. I can't imagine having less than 5 people schlepping! "They don't make 'em like they used to!" Heavy steel and solid oak, I love you but you're freakin' heavy!
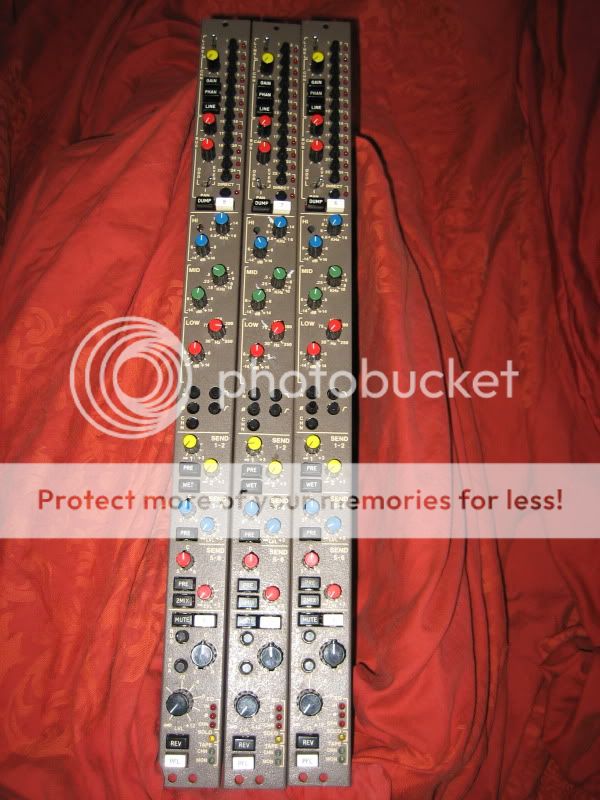
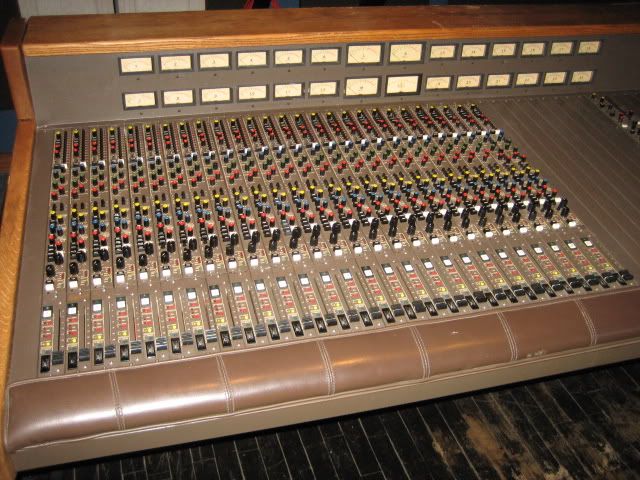
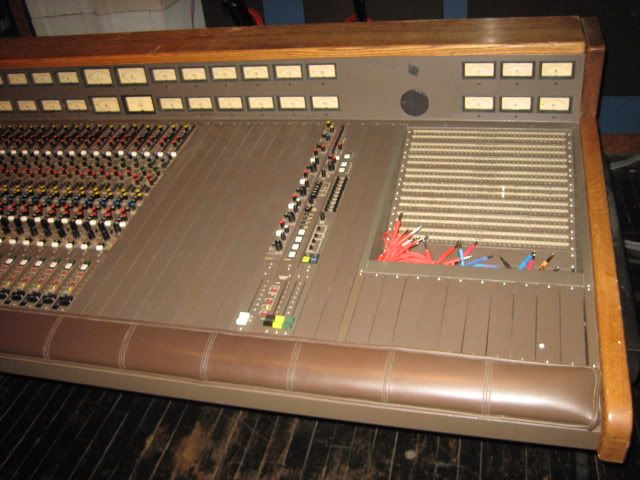
That night I inventoried what came in and took stock of any visual problems I spotted. As I put modules into the console, I inspected them, and, hey wouldn't you know it, I found 7 modules that either had ICs missing or damaged. Yep, it looked like my hunch on the 7 derelict channels probably being an easy fix was right. One selling point on this console is that it has lots of parts that are not only available off the shelf from places like Mouser and Digikey, but also in common with our MCI JH-110 8-track tape machine. The missing ICs in the modules were MCI 2003, also known as common NE5534s which I had a stash of in the tape machine parts bin. I put those in some of the missing spots, and found that that 28th channel that needed some rebuilding was actually missing several knobs, switch caps and the mic preamp. I decided to keep it out as a spares, buy another channel off eBay later and only load 27 channels to start. I harvested the rest of the ICs I needed from it and had 27 channels loaded up with all the necessary parts to start testing it out.
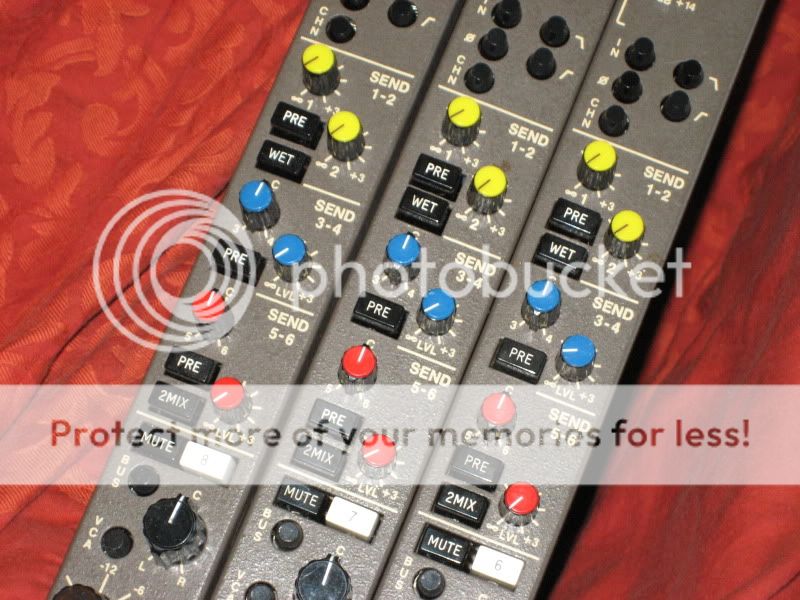
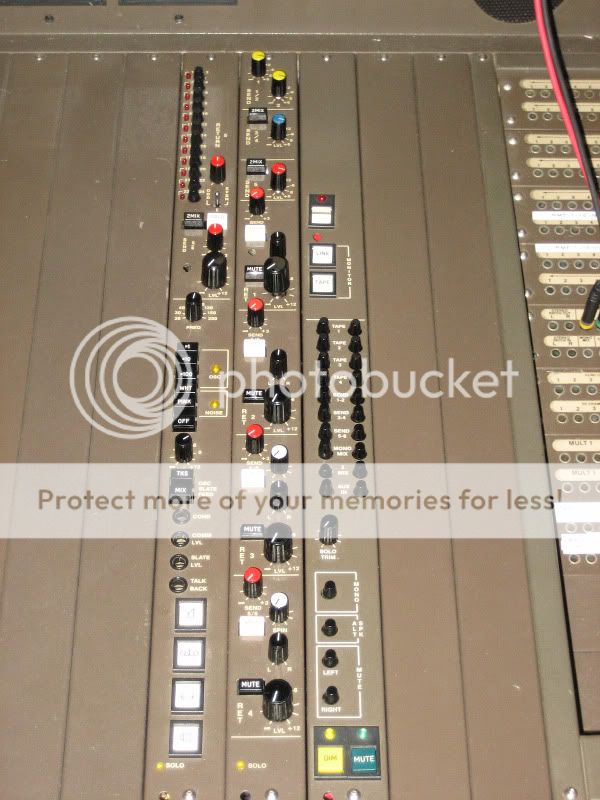
When I had everything in the console, I snapped these pics and called it a night....
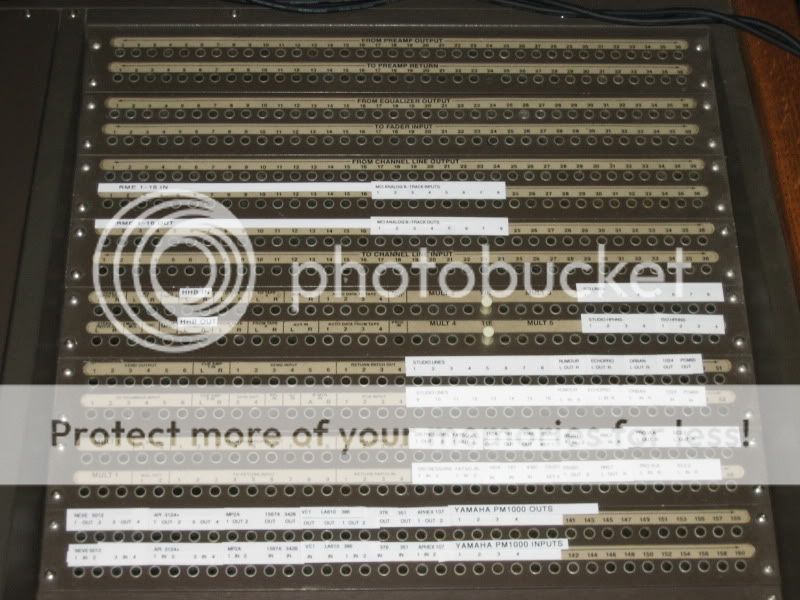
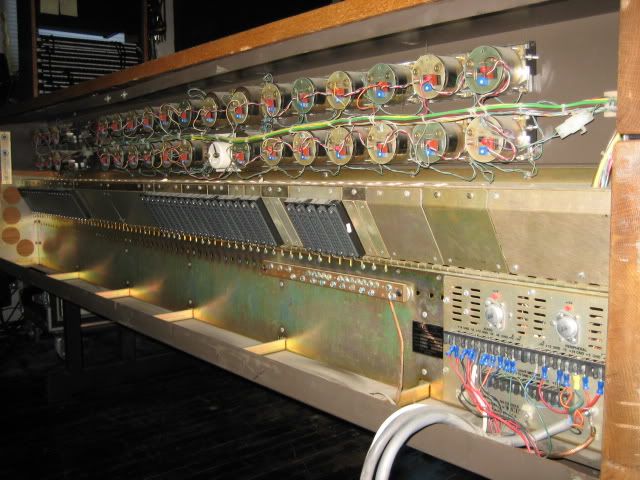
It always bugs me that people never show the backs of big consoles like this. I was really curious to see the anatomy of rear panel of this console especially with the unfamiliar multi-pin connection scheme and it drove me nuts that I couldn't find a photo of it on them internets...so, for the curious, here's what an MCI's rear panel looks like with nothing except the power supply harnesses hooked up to it:
OK, there's more to the story but enough typing for now, I have to get back to re-capping modules (ah but now I'm getting ahead of myself on the story, hehe!)
(to be continued...)
Forgive the ensuing typos and grammar, I will go in for some editing later!
So this requires some backtracking because I actually bought this console at the end of February, and received it at the tail end of March. I started installing it the day it came in, and have been working on getting this puppy in action ever since. As we've seen in other "Story posts," these things do tend to snowball....
As the story goes, a fellow from the Dallas area posted on another forum that he knew a guy with a pretty clean MCI 636 console that could probably be gotten for a good price. It seems the seller had this in his home studio (that is to say, the house was the studio and he lived in it), but he was in well over his head and needed to get the console out. Unfortunately, he....how do I put this delicately...was utterly lacking in the most basic tenets of salesmanship and couldn't answer the most basic questions about its condition. Fortunately, the fellow who had hipped me to the console was willing to go check out the console for me and report back. He wound up doing this several times.
After some back and forth, I had ascertained that this 636 was shortloaded to 28 channels, that one of those channels was missing some parts and needed to be rebuilt, and that about 7 more channels weren't passing signal and had some lights out. This console had the optional phase meter which I pleased to learn because it's something I've found myself wishing for for a while now. The console, like all 600s, had a very nice, flexible full TT patch bay built in, and it also had an optional tie-line patch bay which would be very necessary because large format consoles with built-in patch bays don't have your typical XLR and TRS jacks on the back like smaller format mixers. They have multi-pin connectors and the idea is you wire your entire studio to the console: recorders, rack gear, studio lines, the whole enchilada. My studio is a co-op space meaning I had a studio, a buddy had a studio, and we combined our gear into a big studio with lots of gear all of which would need to be hard wired to the console! It was going to be a big-boy install job! Up until now, we'd been using a battery of 9, count 'em 9 DBX 1/4" TRS 48-point patch bays, and frankly, they really hadn't been up to the task these days, they weren't quite commercial quality and in the last year I'd found myself correcting many cracked solder joints in the TRS modules to get signal flowing through them properly, so the idea of a solid, commercial grade TT patch bay really did appeal to us despite the big job it was going to require.
The console's channels were mostly standard 3-band semi-parametric EQ channels, but a couple had the nice VariQ parametric EQ options, and since it was shortloaded, I could fill it up with some more VariQ channels from parted out consoles as they became available and funds allowed, so I looked at this is being a better situation than if it had been fully loaded with standard EQ channels. I also learned that this one was a JH-636-VU-AF, meaning it had standard mechanical VU meters rather than the plasma meters that were and expensive option back in their day, but are nothing but problems these days. I also think the VUs look much better and I prefer their ballistics. It also had a box of spare odds and ends--an extra phase meter card and four spare fader packs, which made me happy because it meant I could add in four more channel modules later without needing to source matching fader packs.
The "AF" meant Auto Faders. Oh yes, late 70's VCA automation at its fin...auh, worst, actually
The MCI JH-50 was as far as I know the first commercially available console automation system and, as tends to be the case with these things, they didn't quite nail it on the first try. Instead of later systems which used either an on-board or outboard computer to crunch data and store on hard or floppy discs, this early version used digitizer boards in the console's belly which sent data through patch points on the patch bay to TAPE! Yes, the idea was to send the data to a couple tracks of your 24-track machine for storage, egads! It was also almost certain that the auto system wasn't performing correctly because frankly most people haven't bothered with that auto system in years. However, on the "AF" MCI 600s, the automation system not only controls fader positions and channel mutes, but also solo-in-place and the grouping, so even if I didn't aim to automate mixes with it, it still needed to work. I figured I could probably get the auto system back up with a re-cap and maybe some cleaning or at worst a couple chip replacements, and in the meantime, the console would be functional enough with the auto system switched off as there are still hard channel mutes and the faders on this model would thankfully still work with the auto off. I also ascertained that this console had the "dreaded red" IC sockets which are notorious in MCI gear of the mid-70s through early 80s for being fairly not-great quality. Now, I've been regaled by tales of ICs having badly oxidized contacts or even falling right out of the sockets due to poor contact. This said, MCI fans are polarized on the "dreaded red" socket issue. Some say they're all garbage and to plan on removing them ALL and putting new, quality machined sockets in. Others say that only some will be a problem and to just replace as necessary. I decided that I would subscribe to the latter.
I further learned that other than some scraped up woodwork, the console was relatively clean inside and out for its age, that it wasn't caked with grime, missing paint, covered in a film of tobacco stank and so-on, but would need some re-furbing. It had other typical issues such as most of the VU lamps being burnt out (when it finally came in I counted 7 out of 68 lamps working). I knew this console, like any console of this age, would need a good cleaning as far as pots, faders and switches were concerned, no surprises there either.
I also learned that it hadn't ever been re-capped, which was a good point of leverage on the price as I would be going waaay out on a limb to buy this sucker and wanted to get it as cheaply as possible. Re-capping a console like this is a BIG, tedious job, but not one that has to break the bank if DIY'd. I also knew that I would NOT be likely to find a fully re-capped 600, and if I did it would cost a mint to buy, so I made peace pretty quickly with this point and decided I'd rather be the one to re-cap it if it had to be done, as I could spec out my own preference for caps and have control over the job.
Knowing that the seller had ZERO tech skills and most likely had never put the slightest bit of maintenance into it, I felt that the derelict channels were most likely caused by some combination of cooked caps and funky ICs or sockets and that I could probably have them passing signal pretty easily, so made peace with those issues and again used it as leverage on the final price.
I had decided what the console was worth to me and and made the offer. The seller was going through personal problems and had become somewhat emotional about things. He rejected my first offer despite his desperation and I realized that the fellow who had been answering my questions and doing the legwork was better at talking to him. I arranged to have him act as a broker, get my offer accepted, then secure the console for me and hold it in his garage until I arranged to get the console out of there. Eventually after a couple weeks of patience and cajoling, the seller accepted an offer and I wound up paying what it was realistically worth given the condition, which was about half of what he'd been asking.
In the meantime, I had been working out how I would get this beastie the 1,100 miles from Dallas, Texas to Oshkosh, Wisconsin. I estimated the combined weight of the console and PSUs to be around 700lbs and quickly learned that any kind of freighting really was going to break the bank. Rut-roh! It was going to have to be picked up... "OK, who do I know with a big vehicle? Aha, my stepfather has a Suburban!" I worked on getting some measurements of the console, the PSUs and the load area of the Suburban. I really thought it would be a close one. As it turned out, the console was a little over 7' long (sweeet
) and about 41-42" deep. My stepfather smugly informed me that he could fit a sheet of 4' x 8' plywood in the back of the Suburban no problem...phew! It would all fit. The console would need to be transported with the modules removed and boxed up, because moving a console frame of this size and weight will cause it flex. This could damage the module boards and I really didn't want to deal with broken card ends. Fortunately, the broker could have the modules removed, boxed up and ready and it would all fit. All I had to do was figure out if my stepfather was up for a road trip to Dallas, and work out how long the trip would take and how much gas it would gobble up--less than the cost of freighting, that's for sure! Well, by now it was early March and the Wisconsin winter had been a real dickens. I called my folks up to talk turkey about the transit right around the time we'd gotten yet another late-season blizzard and, wouldn't you know it, a trip to warm Texas sounded pretty good to them!
They had been thinking about taking a short vacation somewhere to get away from the winter (and work) woes, and since they dig a good road trip, decided that at the end of the month they would drive down to Texas and hang around the Dallas area for a few days, get a little relaxing in, enjoy the weather, see a few sights and then pick up the console for me on the way out At this point, I would like to say that my folks really are fantastic people! This is actually a good tip for anyone here who's thinking about buying a large piece of gear from a distance but isn't sure how to get it home. Maybe you know someone who wants an excuse to take a road trip, eh?
Well, I spent the rest of March anxiously waiting while researching preparing what I would need to get the console installed and refurbished. I had the broker mail the manual up to me ahead of time so I could look through it, get familiar with the console's functionality, look at schematics and figure out what how signal flowed through the console and get an idea of what I'd be in for re-capping-wise. I also needed the wiring diagrams so I could get a head start in the installation process.
Consoles with patch bays use multi-pin connectors that you hard-wire your studio to. Some use D-Subs, others use EDACs, while some, including MCI 600 series, use a 30-pin connector called a Tuchel.
This is what Tuchels look like; note the one with the housing off so you can see how the audio cables are wired to them. In this case, the previous installer had used black and red heatshrink to denote inputs and outputs:
These are the Tuchels I'd bought ahead of time. They'd had a bolt cutter taken to the looms during the previous owner's uninstall as is typical, and I had to de-solder the old bits of cable left on them. What a PITA, but used Tuchels are much cheaper than buying news ones! This was the first of several ways I wound up trading tedium for value.
In the case of this console, only 24 of the 30 pins carry signal; there are columns of three pins that respectively carry the high signal, low signal, and shield of each balanced audio line, and they're in rows of 10, with only 8 actually being used on MCIs for some reason. You wire it up from bottom to top with a 4 channel in-out configuration, that is, from bottom to top, channel "1" out, channel "2" out, channel "1" in, channel "2" in, channel "3" out, channel "4" out, channel "3" in, Channel "4" in. This was all kinds of confusing at first, but as I started to write my wiring diagram for the studio it became second nature pretty quickly. Did I mention our studio has lots of stuff to wire in? With each Tuchel connector carrying only 4 channels of inputs and outputs (and a couple only carrying 2 i/os due to 36x2-pt the patch bay configurations), I figured that we would more than fill up every multitrack and tieline point on the patch bay, would need 28 Tuchels to do this, and that the console was only coming with 15 of them. Fortunately I was able to source more Tuchels before the console came in, and decided to get the multitracks and studio monitors wired up by the time the console came in so that I could plug the Tuchels in and start testing its functionality right away. My wiring plan ended up 9 pages long in the end, and that's only because I ran out of patch points to fill
I also needed to figure out how to wire things in as cheaply as possible--this meant recycling as much of our old cabling as possible. Some weren't long enough to reach the console, so I was tasked with figuring out what gear would need to have new cable looms made. Some were on pre-made line snakes, some I had re-wired for a previous patch bay re-config with custom Belden 8451 looms, and in some cases I found that the gear further away from the console could have its looms harvested, re-terminated as necessary, and re-used for closer gear while the further racks would get new longer looms made. My studiomate bought 1,000' of Gepco install cable for any new looms I would need to build and we get them as 500' of red jacket for inputs, 500' of black jackets for outputs so the color coding was a nice touch. Also, since we were going from a 1/4" TRS patch bay to hard wired, it meant that I would be clipping off hundreds of TRS jacks from the looms and would have plenty of TRS jacks (mostly Neutrik) to recycle for any rack gear that needed them with new or re-built cable looms. This would add more time on the install job because lots of parts would need to be de-soldered before being re-soldered, but I had worked up an efficiency plan so that in the end, the studio would only see about 3 days of full-on downtime (!!) during the install anyway, especially since I was getting a head start on the job and snagging off-days leading up to the console's arrival, so I was able to fudge in more install time without much inconvenience the the studio's operation while saving a mint too!. As you can see, our tight budget made this install extra-extra-complicated! I'll tell you, I learned A LOT about keeping costs to a minimum while still doing a decent quality job of it, and I learned a lot about how to keep the studio going as much as possible eve during HUGE transitions. This console was making me a more professional engineer even before it arrived, and as you see, I kept plenty busy while I waited for for it.
Well, finally the console arrived at the end of march with the broker and my folks all confirming that the console was PLENTY heavy even with all the modules removed and that I'd better have some guys on my end ready to help unload and schlep it into the studio. In the end it took 5 of us to get it pulled from the Suburban, flipped onto its back on some furniture dollies, finessed into the studio through three doorways and into the control room. We bolted the legs on, got it upright, and I'll tell you the sight of this behemoth in the room, standing up in its new surroundings even with with no modules, really made us forget about the dull back pain. I can't imagine having less than 5 people schlepping! "They don't make 'em like they used to!" Heavy steel and solid oak, I love you but you're freakin' heavy!
That night I inventoried what came in and took stock of any visual problems I spotted. As I put modules into the console, I inspected them, and, hey wouldn't you know it, I found 7 modules that either had ICs missing or damaged. Yep, it looked like my hunch on the 7 derelict channels probably being an easy fix was right. One selling point on this console is that it has lots of parts that are not only available off the shelf from places like Mouser and Digikey, but also in common with our MCI JH-110 8-track tape machine. The missing ICs in the modules were MCI 2003, also known as common NE5534s which I had a stash of in the tape machine parts bin. I put those in some of the missing spots, and found that that 28th channel that needed some rebuilding was actually missing several knobs, switch caps and the mic preamp. I decided to keep it out as a spares, buy another channel off eBay later and only load 27 channels to start. I harvested the rest of the ICs I needed from it and had 27 channels loaded up with all the necessary parts to start testing it out.
When I had everything in the console, I snapped these pics and called it a night....
It always bugs me that people never show the backs of big consoles like this. I was really curious to see the anatomy of rear panel of this console especially with the unfamiliar multi-pin connection scheme and it drove me nuts that I couldn't find a photo of it on them internets...so, for the curious, here's what an MCI's rear panel looks like with nothing except the power supply harnesses hooked up to it:
OK, there's more to the story but enough typing for now, I have to get back to re-capping modules (ah but now I'm getting ahead of myself on the story, hehe!)
(to be continued...)
Last edited:
")