The shop:
.
Storage for car parts is on the left (first picture), though since these pictures were taken over a year ago, you can't see the wall anymore. The shelves are 24" deep and fully packed sorted by what project the shelf of parts are for. The large desk in the center is actually an office desk, that I slapped a piece of 12 ga sheet of steel on top to use as
my workbench. Made a steel frame underneath it, and bolted on 6" diameter pneumatic casters so I can roll it in and out of the garage. I welded to that steel top a 3/4" steel dowel for the ground clamp of my welder and plasma cutter, so I can just weld on the surface and not worry about the ground clamp and wire getting in my way or having to move it often as I rotate the project around on the desk.
In the second picture you see my mechanic's chest. That's where most of my hand tools are.... the rest of my hand tools sadly are scattered all over the floor, my truck, the house, and my studio. I need another one. Past that are my homemade worktops. My wood lathe is mounted on slides underneath the first section, so I can access it but since I don't use it that often I can keep it slide underneath at about knee height, leaving the tops for tools I use more often. Grinder, benchtop drill press, my parts washer, a metal cutting miter saw, and so forth. I've added floor standing bandsaw and a 7' high Delta drill pess in the back corner. Along the "fake wall" I built just behind the worktops (again, second picture), I have black pipe going the length of it, that goes into the closet just off camera, which has multiple quick disconnects for compressed air. My air compressor is in the closet, so it's not annoying loud while working. The air plumbing isn't in the pictures since these are a year and a half old. On the outside of the garage, on the wall between the two garage bays, I have an outdoor electrical box installed with a flip down door. The left side of that box has a 3-prong duplex, and on the right side there is a roller air hose sticking out about two inches. You can yank that hose just about to the street. A quick tug and it rolls itself back up inside the wall. This gives me electricity and compressed air outside, where I do most of my work since it's very messy.
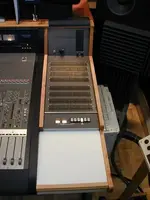
Since this is a home recording/studio building forum, look at the second picture at the lower right hand side. That's 24-channel Mogami balanced snake cable on a wooden spool that's probably 3' diameter or thereabouts. It's 500'.

I have an "electronics workshop" down in the basement next to the furnace, in a room that's about 9'x7' or thereabouts. All the stuff that's down there is leaving, and coming into the garage shop over the winter, so all my stuff is together. It's always annoying to need an o-scope and have to go downstairs to pick one, come back up and use it, then go back down and put it back. So I built out one shelf for the o-scopes, frequency counters, frequency generators, and various other test equipment so all my stuff is together. Then I can move the wall of the basement electronics workshop closer to the furnace, and give my wife more room in the laundry room, since it's ridiculously cramped now, and I can build her some counter tops for sorting, storing supplies, and so forth.


")


")