Failed? DIY Guitar dent

CoolCat

Well-known member
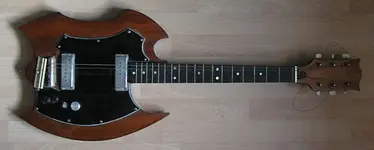
I had two guitars with small paint chips, and one had some wood chip.
Then I watched the youtube experts and they make it look simple.

I was lucky is both mine are on the back and black paint. Both seemed to be "easier" than fancy stuff. Being it was black and non-vintage I thought it would be fun.
Using some black - super glue, Starbond, I spent $15.

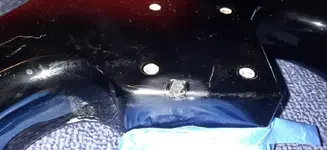
The tiny applicator seemed cool. I had my magnifier glasses but then it went worse. I dripped the tiny drops into the spots.

Went worse- The glue didnt cure very fast at all. I left it sit overnight and it turned to a dry rubber?
The dried version was a dull black, not high glass .

Then as Im messing about looking for high grit 2000 sandpaper , the experts said "oh 50 cents" but Home Depot is $8 for a pack. I spent another $15 on high grit and some Scratch remover polish at the Auto store. ($30+ now on this project)

So now its been 3 days, adding small drips to fill a small dent. I tried the razor, taped off edges, all the stuff they say in the videos. All the experts seem to use the same simple looking methods when using the SuperGlue method. But its not going well, its like a skeptical vibe now....that I was watching Sponsored Propaganda...and maybe its not easy and maybe it doesnt really even look that good in real life.?

Ive never really done this paint gloss body work before, so now I think Im moving on to the sanding the area part. To be honest it looks like crap now.
Im hesitant to scratch up a larger area and then find out this was youttube and not real and the videos make it look better than it really is.


I wonder how much a real pro would charged for a simple black gloss belt buckle chip and /or a dent in the back in the black area?
Seems like a Failed DIY or if it costs more money to get it right and go to a pro...this has been a waster of time. Is the youtube BS?

Anyone else done this superglue kind of small DIY repair and had great results, or even "ok" results?

Maybe going relic and let it just rot away into relic world would be better? gives it personality right?:confused:
 
I was just placing my Takamine acoustic guitar on the stand at a small gig, and accidentally dropped it a few inches onto the floor.
The top of the body split away, at the big end, for several inches.
At first I thought that was it for that guitar, but about a year later, I set about repairing it.
Got a few screw-drivers to open up the split, then squeezed in a far bit of Bostik glue, then piled some books on top to weigh it down.
When it was set, I rubbed it with fine sand paper, and then applied a bit of laquer to the area.
It was not a perfect repair, but the guitar lives on.
 
Yeah, I don't think a little touch-up kit is going to get you too far with this - not like on a car scratch or chip where you use a pen or brush to dab it on. If you were into major mods and repairs - that kinda luthier stuff - you could dip into your mass quantity of materials and do a pro repair for pennies. But you'd have to make the upfront investment on the materials. It's probably not dissimilar to auto body paint repair where, for a fully restored look, you'd need to strip and sand out a much larger area so the finish can blend in with the surrounding areas.
 
I think the videos make it look too simple and most are sponsored. Im in total amazement with the Luthiers, I watch the videos and the vintage repairs and the full guitar building...its amazing. And then fixing a small black gloss paint chip seems like Kindergarten 5yr old beginner level...but for me even this is too difficult? wow....
 
If you have a dent in wood, sand away the finish to a larger area and apply warm water to the dent. Leave to dry and repeat and it should if you are lucky rise to what it was or almost what it was before. Sand or fill and sand until level and refinish.

Gluing wood.........sand joints so they are clean and apply appropriate wood glue (pva/araldite) and compress tightly under pressure. (clamp).
 
Dents in wood arent repaired that way and bostik is not the glue for wood either.
You're right Ed, I was just using what I had. So far so good though.
The Takamine played perfectly well with the split, but the sharp jagged edges were uncomfortable on my bare forearm.
I once made a guitar from scratch, and used proper guitar glue for all of that. It was called 'Cascamite', and came as powder in a tin.
I can't remember whether it was mixed with water, or spirit.
 

Attachments

  • imadeit.jpg
    imadeit.jpg
    52.7 KB · Views: 7
Well after $35 in stuff...the weekend came and the chip is now filled with Starbond black glue but its more like a rubber grey and not smooth at all.
I went to the next step and started sanding to avoid making things worse to worse I decided to take more time and use 2000 grit polishing paper. Its slower but Im not in a hurry and probably wont ever do this again after these two guitars. Hopefully will learn something along the way.

So the glob of rubbery super glue was sanded down and the "white-ish spot " from sanding looked horrible, but I figured this is normal per the videos. (Ive watched a bunch more and even started repeating watching them...)

Getting the super fine scratch fine polish from the Auto part store I applied and buffed with my hand, thumb over and over and it actually brought a shine to it.
So the sanding with 2000grit and super fine polish for 4 or 5 times is working. USing more coarse sandpaper and polish would be faster but I tried to be super safe and used only 2000grit and very fine polish liquid.

RATING the JOB/QUALITY:
In my mind I was grading the work. If a scale of 10 being best, like Factory new, magnifying glass perfect.....then 5 is maybe 12inches/ 30cm away and looks good...
Below a 5...maybe it looks good 36inches away/ 91cm .is like a 3...a 2 is just a bad slob job, a 0 would be do nothing, leave the paint chipped. Relic with Character and like so many guitars seen on Hall of Fame and at Museums they are beaten to hell and battered road worn.... Id give this a 3 about now. Thanks to the polish working and sandpaper. Basically saying its better than nothing but is not close to being invisible perfection.

Mines mint with a factory new but a chip. So imo the "black super glue is a fail".. I decided to try some old fashioned TESTORS Black Gloss Enamel paint like the old days of painting model cars and airplanes and characters. .One YouTube dude did this and it looked pretty shiny and black.
I applied it with a tip of a sewing needle....then I looked up how long to dry? 24-48hrs! I dont remember that from childhood.

Oh well, once dried I will sand it down with 2000 and then polish it up....($2 spent on Testors Black Gloss paint= $37 total)
I went to the auto place but they wants $21 for paint. Decided the Hobby Shop $2 Enamel is better.

any tips or tricks appreciated. I guess wait 2 days for the tiny dab of enamel paint to dry?
 
Last edited:
Can you slide us some pics?

Can't tell from here, of course.. but after applying one coat of paint you could try wet sanding it, letting it dry, using a tack cloth to remove loose particles, then repeat until it looks good to you or it fairly matches the surrounding OEM finish in color, then do a clear finish. Then possibly some rubbing or polishing compound to smooth it all out and blend it in.

That'll probably increase your expenditure, so...
 
Yes I'll keep some pics and post.
Seems I could have just used some black gloss paint from the start and sanded, then polished.
This "superglue thing" was mentioned by pretty big youtube-pro's on guitar repairs so I thought it would go better, as I mentioned.

if 0 is doing nothing. and 10 is being factory perfect......I'll be ok with spending $35 on a 5...hoping for a 7 or 8!
A lot of the youtubes the dudes will say "it wont be perfect" or "dont expect miracles" and even on video a blob-mark bump can be seen.
I would hate to pay a pro $200 and get it back a 5 though. Theres a couple youtubes and the dudes done! and it looks like crap...lol

I suppose using super glue the cracking and peeling might stop, where the enamel paint wont "glue" things down?
 
I try to avoid the colored superglue. Whatever pigment is mixed in seems to interfere with the curing of the glue.

If I’m using CA glue for filling, I’ll put the color into the raw spot directly and use the CA to build up the chip.,

But for small chips in the paint, nail polish works very well. It comes in so many colors and you can always bring your guitar body in to match up the color.

That has the added benefit of the employees not thinking you’re Emo, Gay, or Trans. 😂 They’ll just think you’re nuts.....which is acceptable. 😂

Just build it up slow and let each coat fully harden.

In the old days we’d use lacquer sticks and melt them in, but that stuff is hard to find nowadays and it’s labor intensive and takes practice to get right.
 
Interesting....I dont think I would use it again either, the black wasnt like the video and it shrunk and was rubber like after 1 week of sitting.

I added the original small ding...I thought it would be easy after watching youtubes..lol ....... not

2nd and 3rd picture is the dried glue blob after a week. Looks like crap to me. Even worse after drying. Then started sanding it with 2000grit wet.
had tried the razore blade thing and decided not to, then the harsh sandpaper first but decided not too.,,,,
I removed the tape and got out the 2000 fine paper wet- with a little water and started risking ruining it more. lol
4th is first polish from auto scratch remover and microfiber...luckily this at least got the scratched out area back to shiny....but it only looks "ok" from about 30cm/24inches.....up close it looks like crap imo, I'd rate it a 3 out of 10best scale.
 

Attachments

  • Wood Chip black.jpg
    Wood Chip black.jpg
    14.4 KB · Views: 10
  • dried glue black.jpeg
    dried glue black.jpeg
    447.9 KB · Views: 10
  • glue blob crap.jpg
    glue blob crap.jpg
    76.6 KB · Views: 10
  • 30cm away 24inch.jpeg
    30cm away 24inch.jpeg
    152.7 KB · Views: 10
Last edited:
I don't know if this would be easily done at this point, but how about using a wood filler? This is right up it's alley - small fill-ins that can be smoothed out for repainting. A commercial wood filler would accept new paint.
 
Interesting....I dont think I would use it again either, the black wasnt like the video and it shrunk and was rubber like after 1 week of sitting.

I added the original small ding...I thought it would be easy after watching youtubes..lol ....... not

2nd and 3rd picture is the dried glue blob after a week. Looks like crap to me. Even worse after drying. Then started sanding it with 2000grit wet.
had tried the razore blade thing and decided not to, then the harsh sandpaper first but decided not too.,,,,
I removed the tape and got out the 2000 fine paper wet- with a little water and started risking ruining it more. lol
4th is first polish from auto scratch remover and microfiber...luckily this at least got the scratched out area back to shiny....but it only looks "ok" from about 30cm/24inches.....up close it looks like crap imo, I'd rate it a 3 out of 10best scale.
I just looked at the pics on a phone. How much detail can you see there? But it gives an idea.

If you wanted to start over..... get some acetone and melt out your superglue patch.

Little amount on a q tip. It will melt the patch long before it melts the surrounding finish.

That’s either a catalyzed poly or UV cured urethane. Hard stuff.

Once you get the stuff out of the chip, build it up with some wood dust and CA.

Just sand some wood and put a small amount of the fine dust in the chip. A teeny drop of superglue on the dust will soak in and make your patch hard as a rock.

Then get some black nail polish and fill the rest.

Build it up a bit higher than the damaged area (it shrinks)

When all cured, sand and buff.

Practice on some scrap if you need to, but I think you can do it and achieve a good result.
 
  • Like
Reactions: TAE
Those pics arent what you would class as dents. They are more like damage and in an area where normal wood filler may fail due to use. If it were mine I would get some of that epoxy putty that comes in a small tube in two parts and mix together. It sets rock hard.

Sand away the paint from a larger area for refinishing, but do not sand the damage away. The dent damage needs to be rough for the putty to bite too. Put the putty in just slightly higher and when gone off sand level and repaint.
 
But for small chips in the paint, nail polish works very well. It comes in so many colors and you can always bring your guitar body in to match up the color.
Yes, women's nail varnish is great. I have a bottle of red and one of black. They have integral brushes.
I built a transport control box with a row of buttons, then masked the shapes of the icons above the buttons, before painting them with nail varnish.
Stripped away the masking, leaving glossy icons.
I'll just point out I don't paint my nails.
 
Sand away the paint from a larger area for refinishing
Why? That’s just going to make it worse.

The original finish is either poly or urethane.

Nothing commercially available will melt into the existing finish. So whatever you use to ‘refinish’ will leave ‘witness lines’
 
You’ll just end up with a bigger area that looks like crap. Better in my opinion to have a small area that looks ‘touched up’ than a larger mess.
 
Back
Top