muttley600
Banned
I agreed to do a short photo essay for another site that detailed the pulling of an acoustic bridge and re-gluing it along with the fitting of a new saddle. I've decided to post it here as well in response to this thread for any and all that may find it of interest.
The reason for the rather drastic operation is that the bridge has started to lift on the bass wing after the top was subjected to a severe impact of some sort. The case suffered the greatest damage. A good advertisement for a decent case for your axe. They are cheaper than a new guitar and in this instance has saved a lot of further expensive repair work.
There are several ways to remove a bridge. I always like to try and do it cold first but on occasion a bit of heat to the area is required to soften the glue line. As this is a guitar I built some fifteen years ago I'm certain the original was put on with Titebond Original. I've only ever used hide glue or Titebond Original for bridges and a quick check of my notes from back then proves it.
I can get the parting knife under the wing of the bridge of the bass side and that makes a good place to start. I start by masking off the surrounding area and see how far I can separate the join without pulling any of the top away with it. This needs to be done slowly and carefully. working with the direction of the grain and without moisture. A lot of people advise using water to help, it doesn't all it does is damage the top by making it easier to pull the grain up with the bridge.


Progress stalled a bit at this point as the glue was holding on pretty good around the centre. A little localised heat should sort that. I use a sheet of polystyrene to mask off the surrounding area and use a combination of an angle poise lamp and a domestic iron to get some heat into the bridge. Not too much but just enough to get the parting knife to start moving through the glue line again.
(There's an image missing here because I can't get it to show I'll edit and upload it when I'm in front of my machine with photo editing software)


I've got the edge up all the way round now taking care not to lift any of the top with it or damage the bridge and I can get a larger parting knife in there. The one I'm using is a cake Icing tool that I've ground to a fine edge and polished to give a sharp flat edge. Nearly there now and particular care is need when the bridge is nearly free. That last little bit can just pop off and take spruce with it so real care on the last bit and voilà the bridge is off.


This one has come off reasonably cleanly and the next task is to clean up the top and the bottom of the bridge. Done with scrapers and a little careful sanding with very fine grit paper. Now I'll turn to getting the bridge back on.
Obviously the bridge wants to go back in exactly the same place. The bridge pin holes provide a method of locating the bridge and a simple tool I made up years ago provides the clamping pressure.


The base plate above is of a shape that allows it to sit on the bridge plate inside the guitar while the bolts come up through the two outside bridge pin hole. The bridge can then be dropped on top and clamped down with another shaped plate as below.


The main clamping pressure comes from the two big brass threaded knobs that bolt onto the threads placed through the bridge. The wings of the bridge are helped down using two bolts threaded through the edge of the clamp. This is all done dry (without glue) to check alignment and make sure a good joint is possible. Once I'm happy with it. I'll take is apart and glue up.


Glued up and cleaned up. It's time to set it aside for twenty four hours to give the glue time to fully cure.
The reason for the rather drastic operation is that the bridge has started to lift on the bass wing after the top was subjected to a severe impact of some sort. The case suffered the greatest damage. A good advertisement for a decent case for your axe. They are cheaper than a new guitar and in this instance has saved a lot of further expensive repair work.
There are several ways to remove a bridge. I always like to try and do it cold first but on occasion a bit of heat to the area is required to soften the glue line. As this is a guitar I built some fifteen years ago I'm certain the original was put on with Titebond Original. I've only ever used hide glue or Titebond Original for bridges and a quick check of my notes from back then proves it.
I can get the parting knife under the wing of the bridge of the bass side and that makes a good place to start. I start by masking off the surrounding area and see how far I can separate the join without pulling any of the top away with it. This needs to be done slowly and carefully. working with the direction of the grain and without moisture. A lot of people advise using water to help, it doesn't all it does is damage the top by making it easier to pull the grain up with the bridge.
Progress stalled a bit at this point as the glue was holding on pretty good around the centre. A little localised heat should sort that. I use a sheet of polystyrene to mask off the surrounding area and use a combination of an angle poise lamp and a domestic iron to get some heat into the bridge. Not too much but just enough to get the parting knife to start moving through the glue line again.
(There's an image missing here because I can't get it to show I'll edit and upload it when I'm in front of my machine with photo editing software)
I've got the edge up all the way round now taking care not to lift any of the top with it or damage the bridge and I can get a larger parting knife in there. The one I'm using is a cake Icing tool that I've ground to a fine edge and polished to give a sharp flat edge. Nearly there now and particular care is need when the bridge is nearly free. That last little bit can just pop off and take spruce with it so real care on the last bit and voilà the bridge is off.
This one has come off reasonably cleanly and the next task is to clean up the top and the bottom of the bridge. Done with scrapers and a little careful sanding with very fine grit paper. Now I'll turn to getting the bridge back on.
Obviously the bridge wants to go back in exactly the same place. The bridge pin holes provide a method of locating the bridge and a simple tool I made up years ago provides the clamping pressure.
The base plate above is of a shape that allows it to sit on the bridge plate inside the guitar while the bolts come up through the two outside bridge pin hole. The bridge can then be dropped on top and clamped down with another shaped plate as below.
The main clamping pressure comes from the two big brass threaded knobs that bolt onto the threads placed through the bridge. The wings of the bridge are helped down using two bolts threaded through the edge of the clamp. This is all done dry (without glue) to check alignment and make sure a good joint is possible. Once I'm happy with it. I'll take is apart and glue up.
Glued up and cleaned up. It's time to set it aside for twenty four hours to give the glue time to fully cure.

") In truth most luthiery tools are just adaptations of others and we all make our own to suit our methods.
In truth most luthiery tools are just adaptations of others and we all make our own to suit our methods.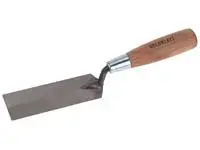


 - Don't mean to resurrect another thread (not that this one has passed away or ever should, imo), but last night I decided to finally throw away a Fender 12 string acoustic whose neck had broken for the third time (this is one I decided to attempt repair on myself, btw
  ) - before it went in the heap, I decided to pull off whatever I could -- I aggressively went after the bridge with a mallet and a piece of 1x4 pushed up against it. Snap! [clinkle...] a sliver of bridge came loose and fell to the floor. The rest of the bridge remained with the body as it left the building...