On the contrary, you've been extremely patient with me and helping for 2+ weeks and counting. In your debt!
I sound like a broken record here, but I do really appreciate it! And getting to know the tascam 388 on the inside is exciting.
It also seems this issue happens a bit frequently to other owners, but nothing really on it and how to solve it in different threads, so I hope, and I expect, this chain will help future tascam 388 owners as well, which is a cool concept.
Anyway, here we go.
So I took the metal back of the tascam off (after using an x-acto blade to take the freaking dirt and dust out of the threading of the screws, wow), vaccumed up the cobwebs, and then got to work on taking off the bracket. I easily took it off, removed the belt to slide the assembly up-- but then here's where I ran into trouble.
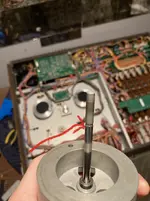
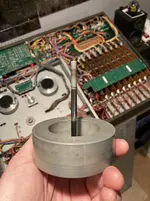
The capstan assembly does not easily slide off. I tried pulling the whole circle/bearing assembly thing (
red circle in photo) up, and it moved like half an inch up easily, but then I felt like it was caught and I would have been really forcing it up. I tried a few times before realizing I would have to use a good bit of force.
Since you said to slide it up "carefully" earlier, I figured if it wasn't budging easily there's something I should have done that I didn't. And really pulling on it made me fear I'd break something.
And in the spirit of transparency as being a tascam novice, and you allowing my over-questioning, can you confirm what I have circled in red is the exposed capstan assembly? (just to triple check that I am working on and were are talking about the same thing).

Ultimately, I feel like it's caught on something on the front side or doesn't want to budge.
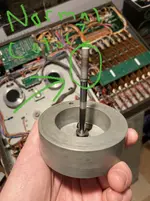
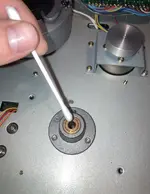
I also looked if there was a screw I missed on the capstan assembly but it doesn't look it (photo 2). If you look on the second photo here,
the green circles, those aren't screws or thread for an allen wrench or anything.

Question time!
Should I have removed the plastic escutcheon and pinch roller top from the front side of the tascam first that would block the capstan assembly from sliding off when the tascam is upside down?
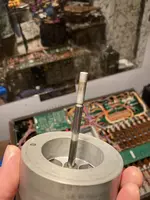
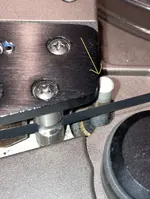
It's weird because here in picture 3 (the one you uploaded earlier in the thread) it doesn't look like there's anything to unscrew from the top of the tascam that would make the whole capstan assembly not come off from the bottom being slid up.

Should I just apply more force in taking the whole thing up from the bottom? That whole circle thing in the red circle photo 1, yes?
Is the bracket the only thing that keeps it secure and I just need to pull harder and not be a scaredy cat?
After your advice and I take the whole capstan assembly up off the tascam, I'll probably take pictures of what I'm looking it and upload here for you to approve to make sure I'm applying oil in the right place, one last time -- and this should make it clear for anyone else having the same issue in the future too.
Thanks again! Feel like I'm getting close here, and all thanks to you!!

")