Tascam M-3500 refurbishment

timkroeger

Custom Title User
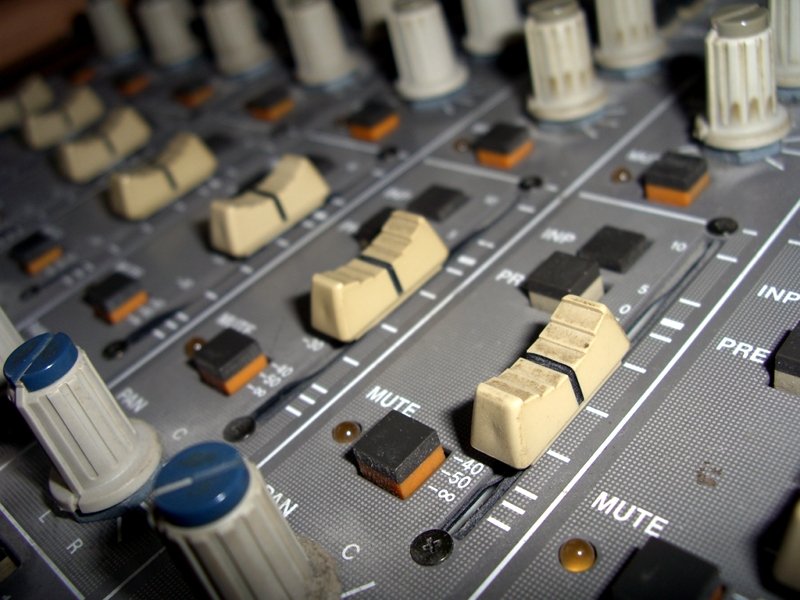
Today I started to clean up and fix my M-3500 console. I'll post here what I did and what problems got in my way. First of all the console seems to work fine. It needs a thorough cleaning (on the outside and the inside) and some of the pots and faders are crackling a little. That crackling goes away after moving the fader/pot a little. The shaft of the Control Rook Solo Volume Pot is broken (and it's plastic) so the pot needs replacing. I'm sure I'll get it through a local dealer or at least through Teac support.

So, I thought I should have a look at the power supply first and clean it up. It's not 100% perfect but it's ok for me. I'll settle for 90% ;) Have a look below or click on the images to find more detailed before/after shots.

before


after
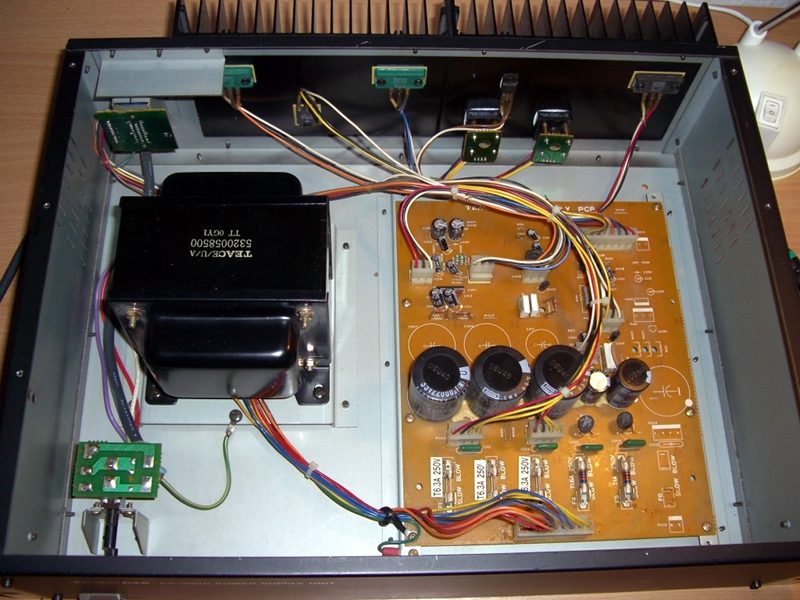


I wanted to check the voltages to see if something might be wrong with the PSU and almost all voltages (-15, +15, +12, +8, +40) were off (lower) by about 40%! :eek: So I checked my multimeter - a cheap Renkforce DMM 1900 - by just plugging it into the AC outlet. Surprise! Same 40% off. So... it could be I need a new meter, or I need a new battery. But how to measure the battery when you don't have a working multimeter lying around OR some batteries left? The battery passed the tongue test, but I'll get some new batteries and hopefully it's still functional. Otherwise I'll be on the lookout for a cheap fluke (110 anyone?) or an old bench meter like the 8050A. What do you think?

I've put up a site where I post photos and information like what capacitors might need replacing and will also try to update this thread accordingly. I've added a list of what caps are used in the PS-3500 power supply, too and I will post my voltage readings and o'scope graphs when I'm measuring ripple.

Cheers
Tim
 
Keep us posted, Tim (or at least me and anyone else that has a 3500 :D)

The dust/dirt in the PS is kinda nasty (I've cleaned out mine - I have two, one is a spare), but I will be curious if you actually end up doing and component replacement on a large scale.

I just had the board all apart over the holidays...spent a few days cleaning each 4-channel module, and trying to spray-clean the pots from the inside, as spraying from the top is a messy waste of time. I actually dabbed on the DeOxit to each pot, and let it soak in rather than spraying. It was not messy that way, and it appears the DeOxit managed to soak in-between the edges of the sealed pots.

Did the same with the Master bus section.

I got some spare modules and variety of parts that I acquired from a guy who broke up his 3500 not too long ago...but I'm curious about the need for actual component replacement, like re-capping stuff.
Everything works fine on mine, so I'm not quite ready to start re-capping, but I know some people do it just to "improve" sonic characteristics...though it's a LOT of work. There are a LOT of caps in one channel!!!
I think only some are critical for the sonic value - not sure which ones.

There was a guy on the Internet that I came across awhile ago (probably could find him again if I Google enough). I think he was in the NY area.
He completely rebuilt his 3500...all high-Q caps, ICs...yada, yada, yada...but it cost him a fortune...both time and $$$, and one has to wonder if it was worth it.
He claimed that his 3500 was on the very high-end of console quality after he finished...but he also admitted it was a crazy project, and he ended up with a "white elephant" that he can never sell (who would pay the money that he invested into it).
I'm just looking to keep my 3500 operational...which is why I have the spare parts and PS....until one of these days I run across a good deal on a used Trident or Amek....or ???

:)
 
Hi miroslav,

yeah, we'll see if something needs replacing. I'll be able to get some new batteries for my multimeter tomorrow but the caps all looked very good so I'm confident nothing needs replacing. I'll measure the voltages and ripple nevertheless.

Nice work with the cleaning, I did the first quadro channelstrip and a fader module today and I can relate to that now. Although I guess my board was a little messier than yours. I suspect it hasn't been cleaned for years. I've documented what I did again at another site and will post some pictures and essentially what I wrote on the site here, too.

If you could find the guy again that would be great! I'm really interested in that stuff although I won't go into those extremes. Still, such things make an entertaining and interesting read!

So, here it comes.

There are all together 542 small parts to clean. Every channelstrip has 2 faders and 14 knobs. The master section consists of 8 bus faders, 4 aux return faders, 1 stereo fader and 17 knobs.


Now, if you lookup the term “lazy” in a thesaurus, you will most likely find my passport photograph right next to the definition. 542 small parts to clean, a toothbrush and me don’t mix very well so it’s going to be the dishwasher with the parts in the compartment where you put knife, fork and spoon. I did all parts at once 40°C “express mode” and put half of one of those dish washer tabs in. Almost all parts were clean but some had still some muck on it that went away when I dried them with a kitchen towel. I think I could have run the dishwasher a second time since “express mode” doesn’t last very long but I just went ahead with the drying.

I cleaned the console surface with a wettish lint-free cloth and off the shelf dish liquid. To make cleaning easier and to allow access to the pots and faders, I removed a quadro-channelstrip module and an 8 channel fader module. The knobs had already been removed, so you just need to remove all the nuts from the pots, disconnect the line faders from their respective PCBs and you’re good. Now you can clean the surface, and treat the pots and line faders with DeoxIT Fader Lube. In addition to that I treated every switch / latch with contact cleaner. Fitting the cover over the pots and switches was quite difficult. You need to be very careful not to bend or break something. Maybe it would have been easier to completely remove the channelstrips from the console and pull one PCB at a time working from the bottom instead of the top.


On the last picture above you can see where the 8 faders are attached to the console. You need to disconnect them by pulling the sockets to the front while applying a little pressure from the right side. It should not be difficult. If you can’t get them loose easily, you’re doing something wrong and might damage the connector or PCB. Anyway, cleaning the 8 channel fader module was a lot easier than the channelstrip module although you need to be careful removing the 16 screws that attach the faders to the cover. You need a small philips screwdriver. Be careful not to ruin the heads, some screws may only unwillingly come loose.


After removing anything that doesn’t belong in the fader housing (see last picture of the following three to see what can be found inside the faders’ housing after some 15 to 20 years of use), you can apply a short burst of DeoxIT Fader Lube onto the “runway” and move the fader back and forth to distribute it.


Proceed with the remaining 3 fader modues, 7 channelstrip modules and the master section in the same manner and the console should look and feel almost as if it were new ;-) Please have a look at the before / after shots.


Cheers
Tim
 
Keep us posted, PS....until one of these days I run across a good deal on a used Trident or Amek....or ???

:)


A local studio had a Amek Angela. I didn't care for that sound at all.

It has been said the a Tascam M3700 is sonically similar to the Neve V. But how about a Toft atb ? Ie: ATB= 80b. It's a great console for the money.

Danny
 
I guess my board was a little messier than yours.

Looking at your pictures...yeah, yours had a lot more grunge! :D

Hey...on that Fader Lube...I was told by both Caig and TASCAM...NOT to use the Fader Lube!!!
The Alps faders do not use any lubricant (like some do).
Caig recommended their D-100 formula...which is the 100% pure cleaning solvent version of their D-5 (only 5%, the rest is propelent).

I just used a Q-Tip dipped in the D-100, then I wiped the carbon tracks, and also the rails...then one pass with a dry Q-Tip, as you don't want to leave too much of a film on there.
The D-100 will provide enough lubrication on it's own. The Fader Lube might be OK at first, but it might gunk up even quicker.
 
A local studio had a Amek Angela. I didn't care for that sound at all.

It has been said the a Tascam M3700 is sonically similar to the Neve V. But how about a Toft atb ? Ie: ATB= 80b. It's a great console for the money.

Danny

I was looking at an Amek Big...not sure if they all sound the same.
I like my 3500...so I'm not too concerned, but I would upgrade to something that had more channels (my 3500 is only a 24)...more Aux options (stereo would be nice) and a better EQ section than the 3500 has, though it's not a bad sounding EQ.
I don't use my 3500 pres hardly ever, since I have outboard stuff...but if I had something like a Trident...that would change. :)

The Toft boards are nice...but still, not that cheap for a large one.
I'm not looking to sink a small fortune in a different board...and whatever I was to get, would also have to be a *significant* improvement to the 3500.
 
Hey...on that Fader Lube...I was told by both Caig and TASCAM...NOT to use the Fader Lube!!!
The Alps faders do not use any lubricant (like some do).
Caig recommended their D-100 formula...which is the 100% pure cleaning solvent version of their D-5 (only 5%, the rest is propelent).

So, that's what you get when you want to do the right thing... :confused: I should have listened to my gut feeling when I applied it to the first fader and I thought how this mess is going to improve things. Very "luby". If it turns out bad I'll clean it up again (at least on the faders). I also tried it on the pots and we'll see how that turns out. At the rate this stuff is sold, I'm not too sad that I need not use it. I have some testanol t6 contact treatment spray left, I think I'll do some more digging first or try the D-100.

Thanks for the input!
Tim
 
I am not alone...

I feel like I'm watching my own thread on an M-3500 that I don't own.

You're freaking me out, Tim.

Nice job.

BTW, at least on the older ALPS pots on my prototype mixer and back in the M-500, M-300, M-200 etc. era there is grease applied to the pot shaft to seal out dust from above. You start trying to soak cleaner through the top of the pot and you are surely leeching greasy dirt into the pot. Plus, the resistive element typically faces the bottom of the pot so I ask how can we expect to get cleaner on the resistive element by going in from the top anyway?

I put up a thread awhile ago about my thoughts about cleaning pots and I tend to do what I have to do to gain access to each pot body so I can turn the pot sideways and jet cleaner in through the holes in the pot body, sweep the pot and another jet to rinse. You want to get any crud off the wiper too...ain't gonna happen trying to get cleaner in from the top.

Excessive? Sure, but I was repulsed at the idea of doing the work to try and get the stuff in there and have it not take, and that was my experience doing it the other way with my M-520, which is what led me to my current methods.

Caps...you're not asking but here are my thoughts after recapping a whole bunch of stuff...on a board the age of the M-3500 I'm not sure I would recap anything except for the PSU (it is responsible for ensuring clean power to the rest of your mixer, and dirty or unstable power is hard on everything else downstream...I have no quantitative data to back this up, okay? But clean power has been demonstrated to have meaningful advantages), -OR- if you are having problems and it seems cap related. But I'd recap the PSU. I use Nichicon PW series caps. Affordable, reliable, well-made and readily available. Cheap quick job to recap that PSU.

Could you hear the difference if you did the whole board? Maybe, but I'm telling you I couldn't do it...I'm tired of recapping, and I've never done anything as big as that mixer. That's...a...lot...of...caps. I love your idea and highly recommend the "do a couple channels and A/B them" plan. Very revealing.

Those are nice faders.

Betcha for certain Teac in Montebello, CA. has a replacement for that busted pot.

Wow...the guts of that M-3500 look so much like the 388's guts...of course the 388's guts are far less complex, but that's neat. Makes me like my 388 even more. The M-3000 boards are really nice. I've gotta piece of that nice in my little 388...

Hey, Tim, have fun okay? Take it from me...eventually the fun of the refurbs gets cold...not that it can't warm up again but I took too many refurb projects on at once and it spoils things.

You're doing a really nice job tho'. ;)
 
Hey :)

BTW, at least on the older ALPS pots on my prototype mixer and back in the M-500, M-300, M-200 etc. era there is grease applied to the pot shaft to seal out dust from above. You start trying to soak cleaner through the top of the pot and you are surely leeching greasy dirt into the pot. Plus, the resistive element typically faces the bottom of the pot so I ask how can we expect to get cleaner on the resistive element by going in from the top anyway?

Yeah, I figured that, so I didn't try to soak it through the pot shaft but instead tried to soak it through what I think might be a small but accessable gab between the plastic body and the metal cover. I don't know if it took but I do hope so. In the picture you can see where I tried to get it in.

tascam-m-3500:m-3500-potshot.jpg


I put up a thread awhile ago about my thoughts about cleaning pots and I tend to do what I have to do to gain access to each pot body so I can turn the pot sideways and jet cleaner in through the holes in the pot body, sweep the pot and another jet to rinse. You want to get any crud off the wiper too...ain't gonna happen trying to get cleaner in from the top.

Excessive? Sure, but I was repulsed at the idea of doing the work to try and get the stuff in there and have it not take, and that was my experience doing it the other way with my M-520, which is what led me to my current methods.

I don't know if I read that thread. Did you desolder and open the pots? I dreaded desoldering and opening the 14 pots per channel which would have been 56 pots per quad channel module or 448 pots alltogether not counting the master section. Maybe I'll do it, if a pot really resists and can not be cured by that method. Then again I could just order that pot and replace it.

Caps...you're not asking but here are my thoughts after recapping a whole bunch of stuff...on a board the age of the M-3500 I'm not sure I would recap anything except for the PSU (it is responsible for ensuring clean power to the rest of your mixer, and dirty or unstable power is hard on everything else downstream...I have no quantitative data to back this up, okay? But clean power has been demonstrated to have meaningful advantages), -OR- if you are having problems and it seems cap related. But I'd recap the PSU. I use Nichicon PW series caps. Affordable, reliable, well-made and readily available. Cheap quick job to recap that PSU.

That's exactly what I was thinking. I don't want to "overdo" it. The pots (even those in the PSU) look still nice enough and the console is not that old. I'll measure the PSU and then maybe I'll change those electrolytics or I'll do it just to be on the safe side and get some soldering practice again, but I won't do the board as it is really loking good. I'll keep you posted ;)

Could you hear the difference if you did the whole board? Maybe, but I'm telling you I couldn't do it...I'm tired of recapping, and I've never done anything as big as that mixer. That's...a...lot...of...caps. I love your idea and highly recommend the "do a couple channels and A/B them" plan. Very revealing.

I don't think I could do it either. Maybe some differences when you change decoupling caps in gain stages of a very simple HiFi tube amp. I used some different caps in my tube amp project and thought I could hear a difference. But I also thought I could hear a difference with different rectifier tubes. People tell me that's to be expected, but I'm always inbetween "can't measure, can't tell" and "believe it sounds different". Maybe it's a psychological thing like washing your car and feeling it runs smoother afterwards ;) Some day I'll pull the opamps though and A/B them. You said the board might be loaded with 5532s but I couldn't find them. All I found were JRC 4558D which are one of the most common type of opamps I think. There are some myths about that chip especially in Ibanez Tube Screamer pedals (The original 808 had that chip and a lot of people mod their modern TS-9 pedals to use that chip along with different resistors in the output section).

Hey, Tim, have fun okay? Take it from me...eventually the fun of the refurbs gets cold...not that it can't warm up again but I took too many refurb projects on at once and it spoils things.

You're doing a really nice job tho'. ;)

Coming from you that means a lot! Thank you! I'm trying to keep the balance. It's not easy, especially when you're inbetween jobs and have a month of spare time... Poor me ;)

Cheers
Tim
 
I finally got around to measure the voltages of the PS-3500.

nominal | measured
==================
+15,00V | +14,96V
-15,00V | -14,99V
+12,00V | +11,87V
+08,00V | +08,04V
+48,00V | +47,89V


I couldn’t notice any 50Hz ripple as there was too much HF (in the range of about 20mV) from my computer and possibly other stuff around that triggered the x-pos. I had removed the cover of the PSU’s housing so maybe it just wasn’t shielded enough. Maybe I should consider buying one of those so called power conditioners. Would that take care of the HF?
 
Tim

I take it you have a schematic...or are you working "blind". :eek:

I see you took off the top panel from the 4-channel modules...I didn't go that far. I just flipped them, and then, using a small, long art brush, I would dab some deoxidizing solution on the back of each pot, working into whatever crack there was. The long brush allowed me to get in-between the PCBs without having to take apart the 4-channel modules....but then, your board was certainly in need of more "aggressive" cleaning! :D
I guess I would have done it too if mine needed it.

Oh...as an aside for all the 3500 users, I also have the LA-3500 balancing conversion kit...though I've never gotten around to installing it. :p
I obtained it a few years ago on eBay...mainly 'cuz I know they are harder to find than hen's teeth (got it for about $100 only!!!)...
..but I've been running my board without it for so long, just didn't see the need to convert it to a full balanced setup.
If I did, I would then have to rewire a good deal of my patchbays...and make some other changes...etc...so I've let it go.
If I ever land a 24-track 2" that's full-balanced...then I will probably make the switch.

Yeah...like sweetbeats said...TASCAM (up until a couple of years ago) was still most stocking parts for the 3500 boards...so check with them before you get something generic.
I found you can get the Alps Faders from Mouser Electronics...but they ain't any cheaper than what TASCAM charges.
Since you are in Germany...you can also try: http://www.newark.com/
They are here, but pull from their European sources, and they too carry Alps faders last time I checked...a bit cheaper too!

Oh...here's the link to the guy who went nuts on his 3500 with upgrades:

M-3500 Upgrade
 
I didn't try to soak it through the pot shaft but instead tried to soak it through what I think might be a small but accessable gab between the plastic body and the metal cover.

Ahhh...I see. The pots are different. That looks like a good spot...wherever you can get the cleaner in without going through that shaft is good methinks. Miroslav has got the goods with what he is saying AFAIC.

I still would probably be jetting the cleaner in however I can tho'...it'd make a mess but just leaving time for everything to dry.

I don't know if I read that thread. Did you desolder and open the pots

Oh no-no-no. Only if I'm repairing a pot. I'll fnd that thread so you cxan at least see what I'm talking about.

You said the board might be loaded with 5532s but I couldn't find them. All I found were JRC 4558D

Seriously? So you look at all those 8-pin dip chips on the channel strip and they are all 4558's?? The 4558 was a reliable workhorse predecessor to the 072...just more self-noise, distortion, and "slower", but I'd be REALLY suprised if that was true that that is what the board was loaded with...the 4558 went out of common use in the Tascam boards in the early 80's and was replaced byt the 072 and then the 5532 in their higher end boards...the M-300 boards were loaded with them and they predate the M-3000 boards by years...

Huh...

I finally got around to measure the voltages of the PS-3500.

nominal | measured
==================
+15,00V | +14,96V
-15,00V | -14,99V
+12,00V | +11,87V
+08,00V | +08,04V
+48,00V | +47,89V

Lookin' good BUT measuring the voltage is really only going to reveal if there is a catastrophic issue with a rail...the oscilloscope reveals the truth.

Do you have an HF filter on your scope and do you have a ground clip for the probe?
 
Hey again,

Seriously? So you look at all those 8-pin dip chips on the channel strip and they are all 4558's?? The 4558 was a reliable workhorse predecessor to the 072...just more self-noise, distortion, and "slower", but I'd be REALLY suprised if that was true that that is what the board was loaded with...the 4558 went out of common use in the Tascam boards in the early 80's and was replaced byt the 072 and then the 5532 in their higher end boards...the M-300 boards were loaded with them and they predate the M-3000 boards by years...

Huh...

I thought I had seen them but it looks as if I might have "interpreted" the number and morphed it into what chips I already knew ;) Actually there are JRC 4580D chips in it. I don't have the console opened anymore so I'm relying on the images of the preamp and eq section here.

Preamp:
tascam-m-3500:m-3500-channelstrip2.jpg


EQ:
tascam-m-3500:m-3500-channelstrip3.jpg


I read that those chips were/are very cheap so they were used almost everywhere. So an upgrade should always improve things. In believe JRC used 4 digit date codes on the chips in the 80's and most had a "shiny" finish but my op amps have a matte finish and a 5 digit code with the fifth digit being a letter. I know that changed from the 80's to the 90's at least with the "original" 4558D (which I mistook my 4580Ds for) and their reissues in the 90's.

Lookin' good BUT measuring the voltage is really only going to reveal if there is a catastrophic issue with a rail...the oscilloscope reveals the truth.

Do you have an HF filter on your scope and do you have a ground clip for the probe?

I don't have an HF filter. Are you talking about the ground clip that's attached to the probe? I clipped that to the corresponding 0V rail when measuring. The first 0V rail is for +/-15V, the second is for +12V and the third is for +48V an +8V. Is there another spot where I should get my ground? Now that I think of it, back in the days when I serviced my tube amp I always clipped the ground to the housing and did the probing. Don't know why I did it different now. Maybe I'm just a little out of practice...

Cheers
Tim
 
I take it you have a schematic...or are you working "blind". :eek:

Hey miroslav, yes I have the schematics. It's a printed version of a PDF which I got from German Teac support. I was a little disappointed by the quality but it's better than nothing. I sent a PM to Studio Dweller at gearslutz forum because he mentioned he wanted to sell his M3500 with manual and such and I asked him if he would part with the manual if it is an original version. So far I have not received an answer.

Oh...as an aside for all the 3500 users, I also have the LA-3500 balancing conversion kit...though I've never gotten around to installing it. :p
I obtained it a few years ago on eBay...mainly 'cuz I know they are harder to find than hen's teeth (got it for about $100 only!!!)...
..but I've been running my board without it for so long, just didn't see the need to convert it to a full balanced setup.
If I did, I would then have to rewire a good deal of my patchbays...and make some other changes...etc...so I've let it go.
If I ever land a 24-track 2" that's full-balanced...then I will probably make the switch.

Sounds a lot like what I would have done, had I had the possibility to get my hands on an LA-3500 conversion kit. Can you tell me a bit more about those conversion kits? What is modified? Tape Ins, Line Ins? D. Outs? Groups? Aux? What do these kits consist of?

I looked into using the Tascam LA-80/81 or LA-40 line driver units but they're quite expensive and so far I have missed all the auctions where those units were sold used. They're quite expensive when new (EUR 399 for 8 channels one way or 4 channels two way). My ATR-60/16 has only balanced IO and I want to hook it up the right way, so I'd need four(!) of those units. That would be an additional EUR 1,600 and I surely don't want to spend that much money. I could have bought a 3.000ish board right from the start then but I wanted the M-3500. It had to be the M-3500.

Yeah...like sweetbeats said...TASCAM (up until a couple of years ago) was still most stocking parts for the 3500 boards...so check with them before you get something generic.
I found you can get the Alps Faders from Mouser Electronics...but they ain't any cheaper than what TASCAM charges.
Since you are in Germany...you can also try: http://www.newark.com/
They are here, but pull from their European sources, and they too carry Alps faders last time I checked...a bit cheaper too!

Thanks for the link! I'll definitely check them out if I need something.

Oh...here's the link to the guy who went nuts on his 3500 with upgrades:

M-3500 Upgrade

Wow, great read! I read the other parts, too. Quite entertaining (the technical parts, not the "disagreement"). Here are all three links.


Nice way to put it miroslav, so the "guy who went nuts on the M-3500" is Ted Spencer. After reading his posts I hold him in very high regard due to the accuracy with wich he did his tests. He summed up the reasons why he did the mods and what the mods consisted of as follows.

Ted Spencer on rec.audio.pro said:
The original 4580s (22 cents apiece) were *very* loose in the low
end, and had quite high distortion especially in the upper mids and highs, but
could be whipped into sounding pretty good if you knew how to work with them.

It should be noted that Jim (Audio Upgrades) also redesigned parts of the circuit, removing a few components he deemed unnecessary or deleterious and adding some additional very high quality caps and other parts. Among other things, this redesign shifted the eq's shelving center frequencies up from 10K to 12K and down from 100 to 80, and moved the upper sweep mid eq's top freq to 20k from 11k. I like these parts of the mod.

Maybe I'll contact Jim from Audio Upgrades and ask him about a "kit" for the M-3500 without the op amps as I want to be free and experiment on them. There is quite some talk about the newer op amps oscillating madly at 1 or 3 Mhz and I'd like to know if Jim did something to prevent that, like some additional caps or something. The EQ mods sound very promising, too (at least to me). I'd want to do the modifications just for kicks on a 4 channel module and A/B them. I think it will be fun.

Cheers
Tim
 
Can you tell me a bit more about those conversion kits? What is modified? Tape Ins, Line Ins? D. Outs? Groups? Aux? What do these kits consist of?

You get Balanced I/O on your lines.

Here's a quote from waaaaaay back in 2005 off the TASCAM Analog Forum (boy, I havent been there in a long time! :eek:) posted by BRDTS...it gives you the details and some pros/cons of the LA-3500:
Each multipin connector handled groups of 8 channels i/o at the points of channel line ins and ....via an extra plate opening for a circuit card ...group outs. That extra plate/connection point was usually found on the back of the console where channels 1-8 are.

The kits were about $1200 each and not worth it in my opinion.

Once installed, you then had pins that could route to your own custom built balanced snakes. The pins were routed to handle inputs and outputs as +4 balanced. Which was a bozo idea for an internal mod because all your meters were still factory referenced to -10 for optimal gain staging.

In reality, the kits were too expensive...not necessary..and mostly not bought by the public as there are plenty of ways to get in and out of the 3500 (or 3700 for that matter) in a balanced method. Especially the brilliant way Tascam structured the gain and levels for the xlrs that are already on each channel ..where balanced mic/line inputs are most useful.

Another negative for the kits was....once activated, the circuits disabled some of the quarter inch/rca connections... which was real inconvenient. And of course one had to build the multicables and xlr connections.

What mostly happened was that people stayed away from the kits and would instead buy a rack mount balance convertor (Tascam made a bunch of those over the years) and then run the existing outputs of the 3500/3700 to the convertors...which had xlrs and quarter inch....and then on to the Studer machines or whatever. No signal loss, rugged, convenient, no extra cables/connectors to build.

AFA the board "upgrades", a lot of the mods are going to give you rather subjective results as demonstrated by the Ted Spencer chronicles. :)
It's like anything audio...everyone hears things just a little differently, so my attitude is not to mess with anything unless you're really hating some aspect of the board.
 
I just had to clear my head a little from all the thinking I've been doing around my "complex basement studio" thread, where I'm pondering how to utilize two rooms for control and tracking. There's nothing better suited for clearing the head than a little console cleaning. All those nice contact cleaner smells... So I attacked the master section needing to do something instead of the planning and thinking.

The master section is a little different to remove than the channelstrips since the faceplate is not only fastened to the PCBs by the nuts on the pots but also with four L-brackets from the underside of the panel. Otherwise the pots in the lower area would provide too little hold fot the PCBs. Have a look at the photos. It's all coming together nicely.

tascam-m-3500:m-3500-master1.jpg

tascam-m-3500:m-3500-master2.jpg

tascam-m-3500:m-3500-master3.jpg

tascam-m-3500:m-3500-master4.jpg


Here are some more before / after shots.

tascam-m-3500:m-3500-cleaning7.jpg

tascam-m-3500:m-3500-cleaning8.jpg

tascam-m-3500:m-3500-cleaning9.jpg

tascam-m-3500:m-3500-cleaning10.jpg

tascam-m-3500:m-3500-cleaning11.jpg

tascam-m-3500:m-3500-cleaning12.jpg

tascam-m-3500:m-3500-cleaning13.jpg

tascam-m-3500:m-3500-cleaning14.jpg


Cheers
Tim
 
That was a lot of funk on those knobs and faders before you scrubbed them. I know what kind of a job that was. I recently did mine. I only had half the work though as it's only a 16 channel.

I did 188 knobs and eight faders.
 
Oh, I didn't scrub them, I put them in the dishwasher :D Honestly, it was more then 500 knobs / fader-buttons, and I really didn't want to use a toothbrush on them. I figured it would turn out ok, since I have seen people clean their computer keyboards in the dishwasher (only the plastic housing and keys, not the electronics ;)). Maybe the salt is an issue, if you do this a lot, or increased temperatures but the machine has a so called "express mode" that doesn't last that long and which is only 40°C. The removal of the various face plates is tedious nevertheless.

Cheers
Tim
 
Update on the M-3500 refurbishment: progress is slow but steady. I finished cleaning the faders and decided to remove the Fader Lube stuff from the faders that I had it applied to again, as they began to crackle a little. The lube had begun to congeal where the faders were resting most of the time, so I removed the lube with a clean Q-tip and used another Q-Tip soaked with different tuner/contact cleaner to remove the lubing stuff. Then I carefully removed the cleaner with a clean, dry Q-Tip. For the untreated faders I used just a soaked side of a Q-Tip to clean the fader path and the clean, dry side to remove any excess cleaner. I cleaned some more crackling pots on the channel strips and gave those faceplates a good cleaning, too. Still some more channelstrips to go on this 32 channel board. For just a brief, weak minute I wished I had bought the 24 channel variant, but I got over that pretty quickly ;) Cleaning cleaning cleaning... It's necessary though, if you had a look at the before/after pictures above.

Cheers
Tim
 
Back
Top