Studio Cabling

  • Thread starter Thread starter frederic
  • Start date Start date
You also asked the question: what input and outputs go to the patchbay? The short answer: *all* of them. This photo shows the back of my board- I haven't built the monitor bridge yet. You can see all those multipair cables: *every* input and output on the board is occupied, and is routed over to the patchbay. That way, I can get access to e.g. "insert 14" without having to dig in the back.

Same thing applies to all the fixed outboard gear: all inputs and outputs show up at the patch field. Once I finish installing a piece of gear, I never want to see its backside again.

So: board direct out 1 goes to the patch bay, where it is normalled to multitrack in 1. Multitrack out 1 goes to the bay, where it is normalled to the board's tape monitor in 1. The mics and lines are normalled to their sources around the room. The master outs are normalled to the 2-track ins, the monitor outs are normalled to the playing-position distribution amp. Aux out 3/4 are normalled to the main reverb in left and right. Its outputs are normalled back on the board's aux return A left and right. And so on, yadda yadda. Everything is connected where it needs to go, *by default*: and then, any desired exception can be made by just sticking in a patch cable.

But *first*, you need a very solid idea of where everything needs to go for your desired working style. Which takes some time, planning, and a few hard knocks.

And that red tee-shirt is my "I heard the future" Ampex ATR124 shirt: from 1980... Damned if the future didn't get here, and it's one hell of a lot different than I expected...
 

Attachments

  • im000060a.webp
    im000060a.webp
    31.7 KB · Views: 200
Last edited:
Here's the wall directly behind/under the board, where all that stuff pops up from all the playing positions. I custom-fabricated those plates from Hubbell 4-gang stainless blanks. Power comes in along the footer plate from the lower left, all signal connections come in from upper right...
 

Attachments

  • im000062a.webp
    im000062a.webp
    32.8 KB · Views: 197
Last picture: the wallplate from the living room, which is essentially underneath the piano. This varies from the downstairs plates, because I also ran foldback speaker lines up (the little Sampson power amp right below the patchbay is used for this foldback). Works great for using the living room for piano/vox and the downstairs just as a separate control room...

It's nice, because it take 5 mintues to completely strip all the recording stuff out of the living room, and you'd never know about its alternate life!

I also ran 2 runs of Cat5 into that box, in case I someday needed Ethernet direct to the studio, and there's als a run of RG6 coax in place as well (but not terminated- just curled up in the box on each end). Look at it this way: wire is _cheap_ when the walls are open. Once you seal them up, wire gets very expensive indeed...

Standard disclaimer: There are a lot of folks here who know more about building studios than I do. I've put this stuff up, not to show "how it should be done", but rather to illustrate one way that it _can_ be done. Your mileage will certainly vary, just as your working style, your musical needs, and your room will vary from mine...
A lot of the things I do might not work for you: take what you want, and leave the rest...
 

Attachments

  • im000063a.webp
    im000063a.webp
    6.8 KB · Views: 208
Just had an email from Mr.Patchbay:
Hey Sjoko,

I read through the last page of the thread and I am now trying to register for the second time. However, it seems not to be working correctly. The server is not pinging back.
Keep up the great work and stay in touch.

Sincerely,
Bobby Hickey
phone: 817-294-4091
http://www.flash.net/~motodata

He'll try again. In his email was some great info, I really hope he'll be able to join us. If not I'll ask his permission to post some of it here.
 
Hey, you look just like me! (;-)

Thanks for the kind words. I got that digital camera for my wife for Christmas, and I always figured it would be good for more than just taking snaps of the cats... it just took me a while to get around to try it. Maybe posting those shots will kick loose some ideas for some folks, though- especially if they are building up a space from scratch.
 
Skippy, you've done it again! 1st with advice on Fostex D160s and now on wiring.

Just to clear another point up, in regard to mic ins............I presume you run from the XLR sockets at the wall to your patchbay, (which is either normalled or half-normalled) and at this point would convert to 1/4in TRS jacks, and from the patchbay to the XLR mic ins on the desk. Line ins would receive the same treatment too.

Let the river of knowledge continue to flow..............

ChrisO
 
I pretty well skirted the issue of mic lines in the patch bay, trying to keep it a little simpler. The short answer is "they don't go there": my TRS patchbay is all line-level-signals only. All the mic patching I handle separately, because I don't believe in putting phantom power on TRS jacks, telephone or otherwise, unless I absolutely cannot help it. I sure don't want such a thing to be part of my basic default setup...

TRS jacks momentarily short tip, ring, and sleeve as they are disconnected. That makes for an easy way to blow up both mics (NEVER hotpatch a ribbon mic...) and phantom supplies, not to mention the damage to the monitors if the gain is up when you hotpatch: the resulting pop can and will put your cones in orbit. Hotpatching mics is a crime against nature, but in the heat of the moment, it's going to happen.

It also ain't much fun to mistakenly patch a mic input with +48v phantom onto another line input with raw opamp inputs powered by say, +-15v. The input protection diodes go, and you just killed that input... Not good. So I eliminate that hazard by not *allowing* it to happen, except in very limited extreme situations.

The mic lines from the various playing positions are hardpatched to their respective mic ins at the board, XLR to XLR (you can see those mic lines as the separate black XLR cables on the "behind-the-board" picture). That accounts for only 6 of my 16 mic inputs. The others are run to a separate 1u rack strip with XLRs, where I also bring up the other spare lines from the play positions. So I can run other mics without digging behind the board- but I *don't* get that flexibility from the TRS patchbays.

And even that is a lie: on two occasions so far, I've needed 4 mics up in the living room. So two go on the XLR mic lines, and I repatch two line sends with TRS/XLR kluge cables on each end. But I do not do that except when I absolutely have to, and when I know that the talent will not "try to help" by randomly plugging this into that. And I cringe the whole time anyway. Old habits die hard.

That 1u XLR strip is also a good place to put a few "telephone saver" patch points: regular stereo-headphone style TRS jacks. This allows your basic beaterbox guitar cord to get plugged into a jack that it won't hurt. It's always nice, time and space permitting, to have some "access points" like this, including XLRs, to interface the various random stuff that tends to float through a room during its life... Matter of fact, that's why it wasn't in the rack when I shot those pictures: it's out in the shop growing a few more connectors. Nature abhors a blank rack panel, and I ain't gonna show it to you until it's done... (;-)
 
I think there is a lesson in Skippy's last post - always run MORE of everything then you expect to need. That is true in my dayjob (I'm an IT guy and have done data network drops) and it is here. If you think you'll always need two mic inputs somewhere, drop 4. If you think you'll need 4, drop at least 6. It is MUCH cheaper to do them all at once then to do them later.

And yes, Skippy, I do look like you :)... but I'm fighting to get to 250+ posts so I can stop. Instant plastic surgery :D
 
Skippy,

If you were looking to give us some new ideas for studio wiring, you can rest assured you've given me a whole new world to think about. Up until now I've ONLY concentrated on the construction of my studio, and I'm just now starting to think about the actual audio wiring aspect of it. Where do you live again? I'd LOVE to have someone like you who knows what he's doing come look at my studio and give me some pointers as to how I could wire my studio properly.

I'm just glad that nothing is sealed up yet in the ceiling. I just knew there was some reason we had been putting off the ceiling, and this is it. I thought I had all the conduit I was going to need run, but now I think I may need some more. I'm using 1 1/2" conduit... two going to the live room and one to the vocal room, and a 3/4" going to the room I don't think we're even going to use for recording, but just in case... I've learned to think ahead and always plan ahead from my job.

This whole "normal" stuff has got my head spinning! I really have to figure out what I need for wiring. Maybe you can help. I've got a Layla going into my computer, and 16 channel mixer. With JUST that equipment what wiring would you suggest? For example: If I were to bring all the wires coming from the live room/vocal room into the control room, would I, at each end of the wires, terminate the wires into male/female XLR plugs? That way THAT much is hard-wired and on each side I just plug into that plug what I need. Up to that point I'm right on... right? Then from there what would I do?

I'm just trying to REALLY understand the theory before I commit to wiring, and before adding more equipment I'd like to understand the theory.

Later,
-Brian
 
Good idea- let's do a simplified example (although this stuff never really gets _simple_!). I don't know what board you have, so for the purposes of discussion, let's assume it is something like a Mackie 1604: 16 mic pres, 16 separate line ins, direct outs on channels 1-8, 4 submix outs, a master stereo pair out, and a control room monitor section that lets you monitor either the main stereo mix or the "tape return" stereo pair. For the moment, let's just ignore the aux sends and returns.

I'm not that familiar with the Darla, but it looks like it has 8 line ins and 10 line outs- the extra two presumably being for monitoring a stereo pair. Cool.

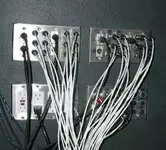
With this rig, I'd start with 3 52-point Switchcraft telephone-style patch strips: 156 points will certainly get you going. We won't use them all in this example, but I'm recommending getting at least that many for expansion room. Each strip will give you two rows of 26 jacks, or 26 jack pairs: an output on the upper, and an input on the lower.

Let's take the basic line-level setup, one channel at a time. Because the Mackie is not an inline-monitor board, I'd probably do a default setup with 8 channels dedicated to input (the board is designed for this, with the direct outs on 1-8), and 8 to monitoring the Darla's 8 tracks: treating it like a good old 8-track tape machine, and ignoring its internal mix/monitor capabilities for this example. You may choose to do this differently, of course, but that'd be my normal setup. Let's call board channels 1-8 the "input" channels, and 9-16 the "monitor" channels (you can always override this later by repatching- don't panic!).

On the top patch strip, I'd run the direct out on board channel 1 to the top jack of the first pair, and the line in 1 on the Darla to the bottom jack. I'd then set up that jack pair as half-normal (tip on the top to tip-switched on the bottom, and the same for ring). That way, with no patch cord in place, the board's direct out 1 is normalled: connected straight into the Darla's input 1. I'd do the same thing for the next 7 jack pairs, until I had direct out 1-8 normalled to Darla in 1-8.

I'd then go down to the next patch strip. On the first 16 bottom jacks, I'd put line inputs 1-16, in order. I'd leave the top jacks for 1-8 unused for the time being, and then on the top jacks for 9-16 I would put the Darla's line out 1-8. I would then half-normal Darla out 1 to line in 9, and so on up to Darla out 8/line in 16. This way, with no patch cables in, the Darla outputs will show up on the board's line inputs 9-16 by default. And you're ready to track: run your inputs into 1-8, do a monitor mix with 9-16, everybody's happy, and there's not a single patch cable in place: the normalling does the connections for you. But you can still repatch anything to anything else: all signals are right there for your use.

Let's make it more interesting. Still on the second strip, let's put the Darla's output 9-10 on two top jacks, say right next to its 1-8 outputs. Then, on the corresponding bottom jacks, connect the mixer's "tape monitor in" left and right, and half-normal them. This creates a default route from the Darla's internal stereo mix back to your monitoring section in the board: you're basically making 9-10 into a 2-track deck. And what the heck: right beside those, run the "control room out" left and right from the board to a set of upper jacks, and the monitor power amp left and right inputs to the corresponding jacks right below, and half-normal them. This creates a default route from your board's monitor section to the monitor amp. See where I'm going with this? Everything comes in to the patch bay, and the normalling routes it to where you want it to go, by default.

Finally, on the third strip, I'd do 16 insert pairs. You'd run a single cable from each pair of jacks back to the corresponding channel insert on the board, essentially "extending" them all to the patchbay. Connect ring on the insert to tip on the upper (output) jack, tip on the insert to tip on the _lower_ (return) jack, and then half-normal them. Connect ring on both the upper and lower *jacks* to ground via 600-ohm resistors, making a pseudo-impedance-balanced connection out of the basically single-ended inserts. That'll give you best noise performance when patching balanced gear onto the inserts. You certainly can just short the ring to ground, and it will work, but this is Art, and I'm a well-known turd-polisher. Anyway, when nothing is plugged in, insert out is routed right back to insert return: just as if nothing was plugged into the insert jack at the board at all.

However, the inserts are now set up for a slick thing: because they are half-normalled, you can use them as direct outs. Stick a cable in the upper jack, and you can steal the signal from a channel without breaking the normal insert-to-return path. Ditto with a direct out, or a Darla out: Plugging into the *output* side of a half-normal pair does not disturb the default route, and gives you maximum flexibility.

With all this half-normalling, you can always override the normal connection to an input: you could take Darla output 9, for example, which is normally tape monitor input L the way we set it up above, and stick it into line input 9. That would *replace* Darla out 1 (which is normally there) with Darla out 9: patching to the *input* side of a half-normal pair breaks the normal. Or, if you put your 4 submix outs on some top jacks somewhere, you could grab submix 1 out and patch it into Darla input 7, for example- for bouncing, or just tracking a mix.

Another example: you can record a guitar track direct in, clean and dry, on track 1- by simply plugging a mic into channel 1 on the board. And if you wanted to play around some, you could steal channel 1's insert out, run it off to a reverb or a Pod or whatever, and then route it back to Darla input 2: viola', clean guitar on track 1, dirty on 2, and only 2 patch cables used.

The point being that you _can_ do all this exception-making stuff, but you don't _have_ to: pull out all the patch cables, and you're normalled up and ready to track.

Inline-monitor boards (like the Alesis Studio 32, or the Soundcraft Ghost) are much nicer for complex recording setups, because they provide a separate set of tape monitor inputs. This allows you to do multitrack monitor mixes *without using up your main line inputs*. If you have an inline board, you'd change the example above to use them- which would leave all 16 line ins for input use at all times. It is awkward, but still very doable, to do multitrack recording with a straight board, but it gives me hives because of all the repatching. You may well end up doing essentially all your monitor mixing in the computer, and just outputting a stereo pair back to the board- who knows? Develop a working style, and then heat up that soldering iron!

So much for line ins. You'll probably find that you use the same mic lines to the same locations for almost every tracking session- so those, I'd just hard-patch from the wall to the mic ins on maybe 4-5 channels. The other mic ins I'd run to an XLR patchbay so you can redo them without crawling behind the board. The mic patching is going to be very style-dependent, though.

The bottom line is that with a non-inline board, you'll be doing much more repatching than with an inline board, and monitor mixes (the bane of my existence!) are more of a chore- or reduce the number of available inputs...

Lotsa words. Hope that helps a little bit, anyway.
 
Last edited:
Cool. That is similar to my setup (except I've only got 4 in/4 out analog (delta 66)) and gives me some ideas on how and whether to incorporate a patchbay into my setup. I definitely think I'm going to have to now... more money and time to spend but not yet - gotta get going with what I have first
 
skippy man! thats all good! do you know you've just written a book?
 
That's what happens when you get a wordy bastard like me going... (;-)

It's not the first time I've started out explaining something and ended up writing a book. Sorta comes with the territory, I guess!
 
Greetings,

I'm very happy I started this thread. The amount of information you guys posted, including pictures, has been tremendously helpful. I've tried to keep quiet in the background to learn as much as possible, and now I think I've reached a point where I can more accurately share what I will be doing with my new studio, starting in May after moving into the new house.

First, I do agree that Microphones should never be wired to a TRS patch bay - they do in fact short the TRS connections upon insertion of the plugs, which will make your woofers to "fwup" and possibly damage the microphone.

Second, Skippy - your pictures were very welcomed. I have built studios before mostly as a "construction guy" therefore was basically handed the materials to do the job (mostly soldering, at least for me) so between everyone's advice and posts, and your information/pictures, I believe I have enough information to do this entirely myself with minimal outside assistance (other than large friends who can hold heavy things up, like sheet rock ::G::).

Anyway, I used Visio to design my console room floorplan, then export to HTML for your viewing pleasure. Here is the floorplan of the console room and the one upstairs vocal booth:

http://xephic.dynip.com/xsp/studio/studio.html

Anyway, I have figured out the cabling I will be using. Since I primarily will be hooking up outboard effects and rackmount midi modules, samplers and the like, I will be using three 58 pair balanced cable from the center located console table soldered to ADC patch bays, run under the floor to the right to the tall 42U racks of outboards and midi gear. On the rack side of things, you guys almost convinced me to use ADC patch bays again, however the overall cost will prevent dollars being allocated for other items, like an additional TMD4000. So, I will cheat, at least temporarily, and use the large box of 110 punchdown blocks that I have. I agree it might not be ideal, and if I do get static and noise, I will definitely replace them with more ADC patch bays. Behind the racks (on the wall) will be a “backboard”, which the punchdown blocks will be mounted to. If this doesn’t work out, I’ll rip out the punchblocks and purchase angle brackets for 2U of space, and mounted two ADC patch bays and solder the snakes to them, disabling all the normalling function of course. 52 jacks per bay @ 2 bays results in 104 connections. Right now, that’s overkill, and I will still have a third snake in the floor ready for future expansion, god forbid I should need it.

I agree, run more cable than necessary, just to be safe.

The cabling going down from the console table to the racks located at the bottom of the diagram will simply be fiber optic cable (multimode fiber), with toslink connections for the ADAT compatible Akai DR8s. I sold all my adats since I did this diagram, so I really don’t need all those racks, but I’ll build them anyway since I have the material and rack rails, and worse case I can use them as cabinets and/or future expansion. The back racks will be bolted to the wall/floor joists so I might as well do all the tougher construction at once.

Well, again, thank you all for the advice, pictures, and discussions!!!!

Frederic@xephic.dynip.com
 
whoah...

Ok... I'm reallllly sorry, but everything you wrote was so over my head I couldn't comprehend any of it. It may have something to do with the fact that I've been sick all day and I've got a bad headach right now...

I seriously think I'm going to have to talk to my friend Jason at Full Compass who knows about all this stuff. I have to bring him to see what I've got going on here, and buy him a few dinners for his help. I just don't think anyone here can put this stuff in terms a person who knows nothing could understand. You're using the "normal" terms to explain new stuff to me and I still don't even understand the normal stuff.

So, I thank you for your help. You've made me realize that I NEED HELP!! This is stuff I totaly didn't even think about.

But... If I were to: Wire up two boxes from my live room, each with 8 XLR inputs, and some 1/4" inputs for headphone useage, and hardwire them to a box with the female end of those same cables in the control room... and do the same for my vocal room, so both my live room and my vocal room are hardwired so later when I figure all this normal stuff out and this patchbay stuff... at that point I'll be safe right?

oh GOD!
 
Don't stress, dude. Nobody was born knowing this stuff. Wait until you feel a little better, reread it, take it slow- it will soak in.

Realistically, if you put enough wire in before you seal everything up, what you put on the *ends* of the wires won't matter much- and you'll almost certainly want to change it several times as your working style evolves. Certainly, putting a patchbay in the middle of your wires is not a requirement for survival. It can just make life easier later, at the expense of making it harder in the planning and design phases.

I've lived with this stuff, on and off, for over 20 years. So my explanations may leave a lot to be desired. I probably take a lot for granted in my descriptions and my choice of language. C'est la guerre...

In the fullness of time this will all make sense, I think. It may be that you need to do what I did- which is to do it the hard way for a while. Nothing wrong with that: shoot, it took me _years_ to figure it out. It gives you a much greater appreciation for doing it the easy way later. Anyway, if you have a studio-tech-savvy buddy over at FC, buy him a dinner or three and a lot of beers, and absorb what he has to say about this at your own rate, and in the comfort of your own space.

Ahh, wires. what a pain in the ass they are, eh?
 
grr

Wires aren't the confusing part. I work with so many wires at work it could drive a man mad, but I keep it allllll straight. I was wiring a peice of machinery for 3 weeks with no power on and no way to test it, and when we finally powered it all up everything I did worked. And that's stuff that's going through relays, prox switches... you name it. So, wires don't confuse me, they're the least of my worries. It's just understanding all the audio stuff. I'll be honost, when it comes to audio equipment, I've got little knowledge... all that aux in/out crap... once someone starts talking that jive my mind cuts my ears off and I don't hear a thing. I think it's because I don't anything to hook up to the aux in/out... what am I going to use it for? I've got a mixer and an amplifier, what more do I need? grr. right.

I know I'll get it, and with the help of people who have "been there done that" I'll figure it out a lot faster than I would without their help.

Later,
-Brian
 
Brian,

A patchbay is nothing more than a break in the signal. You can think of it kind of like a "water valve" that allows you to divert the signal.

I just built a patchbay (man those newer Neutrik 1/4" TRS connectors were a BITCH to get used to soldering up! but now I love them.) that goes from my insert points (1/4" TRS) to a rack panel that's mounted with all my gear...so if I want to put something in the channel, I can just hook cords from the insert panel to one of my outboard panels, or to my recorders....I don't have an inline mixer (just a Mackie 1604 VLZ Pro) so I put muy recorders in via the TRS insert points.
Now, I can patch a compressor or noise gate inline, without crawling around behind my gear with a flashlight trying to patch stuff up.

I like to slap the idiot who decided to put inserts on TRS! ARGH!.

Anyway, the Panel that I built eliminates "Y" cords.

Tim
 
a patch bay is nothing more than a row of jacks, that your cables terminate to, and in some cases, have "default" wiring patters, which is what normalling is.

Normally (hence the word <G>), the top row of jacks connect to the bottom row of jacks, so whatever you plug into the top (on the back of the patch bay) "normally" connects to whats connected on the back of the lower row of jacks. This way, if you do nothing, the top connects to the bottom.

If you patch in say, a compressor on the front side, then the compresser is inserted between the back cable to the top jack, and the back cable on the lower jack.

This allows you to change the audio wiring at the patch bay, rather than climb behind your racks and move wires around. Typically studios have more input devices than they do channels, and use the patch bay to swap inputs around. THis is done because generally one doesn't use all their gear at the same time, and of course, input channels on the console are expensive :)
 
Back
Top