Relapping Heads

At the going rate....

Note to self: send head-stack to Ethan when due for a lap. ;)

----

I'll take payment in tape! You are very kind, thank you for the complement.

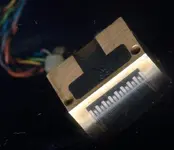
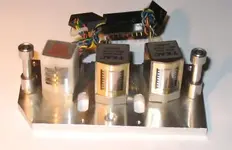
Here is a final photo.

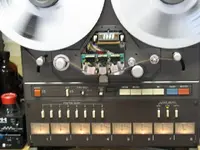
I think it is time to call it quits and perhaps tackle the other head after work tomorrow. Then back into the deck and calibrate it up. The deck might have some record problems in the form of cold solder joints but that is for another day.
 

Attachments

  • tsr8-final.jpg
    tsr8-final.jpg
    53.6 KB · Views: 152
A thing to behold

Not sure I'll have time to move forward on this as that we have a research cruise starting Tuesday and so much to do till then (like a long weekend)!

Got the other head lapped and assembled the headstack. Just a visual alignment at the moment. The proof in the pudding will come when I get it in the deck and aligned. I do suspect something else going on in the record electronics but that is just time.

Anyway here is the photo.....
 

Attachments

  • IMG_1914a.jpg
    IMG_1914a.jpg
    16.9 KB · Views: 142
wow.....! :eek:

Ethan...that looks...fabulous.

How do you ensure that the work on the nose is perpendicular in a plane with the base of the head...? I mean it looks fantastic, and yes the proof will come when you do the alignment...if it wasn't shaped perpendicular that would effect the zenith right?

I know you said you flip the head 180 degrees during shaping, but even at that I can't understand how you would control the end result, especially if there was a pronounced keystone...

Nice work.
 
Frequent inspections

wow.....! :eek:

Ethan...that looks...fabulous.

How do you ensure that the work on the nose is perpendicular in a plane with the base of the head...? I mean it looks fantastic, and yes the proof will come when you do the alignment...if it wasn't shaped perpendicular that would effect the zenith right?

I know you said you flip the head 180 degrees during shaping, but even at that I can't understand how you would control the end result, especially if there was a pronounced keystone...

Nice work.

You are quite right that there is no tilt (zenith) adjustment on the 38 (or TSR-8 so it appears). The head and head holder are machined to have 0 degrees tilt.

During lapping I frequently inspected the wear pattern on the nose of the head to be sure that the upper part of the nose and the lower were getting the same degree of lapping. Plus the frequent inspections when along with rinses of the head, abrasive and work surface to remove "debris".

It was not too hard to keep the upper and lower nose equal. These are the areas above and below the gap where the tape does not make contact.

Additional clues are the width of the slots. Keep the slots widths equal top to bottem and keep the slot centered on the gap line.

Lastly, once you have the head out of the shell you will be able to see the gap depth as that the face of the head is in brass and the epoxy . This can be best seen in the side view photo in posting #6. That is also a good way (or so I think with out knowing) to fiqure our how much gap you have left.

Long answer. THe short answer is to take care, think it through and go slowly.

--Ethan
 
Update on install and cal

I got a little time to work on the 38. I had a few (well 6) bad bulbs in the meters so I took the time to pull out bulbs from some other 38 meters that have been sitting around to go into DIY mic pre's. Now I have 8 working meter lamps.

The actual voltage measured was 7.5 VDC. Next time I'm in there to replace bulbs I'll install some LED.

I installed the heads on the headstack baseplate and manually adjusted tangentcy using a foot or two of tape pulled tight. Also I checked to be sure that the tape contacted the heads at a right angle. Looks good to within a few degrees. I'll keep track of the initial wear pattern to make sure that i'm getting an even wear pattern.

I de-magged and cleaned then put in a blank tape. I striped SMPTE on all 8 tracks for a gross test. No problem recording and playing it back on the sync head but channels 1,2,4,6,8 on repro did not have a signal. Moving the sync head connector into the repro position did not change anything. So that means the head is not the cause. This got tracked down to the repro head to motherboard connectors. Not cold solder as I suspected, just connectors needing cleaning. Now all tracks record and playback.

From here I put in my MRL and adjusted azimuth on both heads. So far so good. To make the long story short(er) I ran out of time before getting to the record calibration. I did get the playback calibration done on both heads. This includes unity gain through the deck, level set and EQ adjustment.

My MRL is a 7.5 ips NAB tape so I needed to use the correction table that I posted in another thread. It is now cal'ed for 15 ips IEC1 with +-2 dB from 63 to 20 kHz.

I would say that the relap is a success! Just gotta get the record cal'ed up.

As a side note: the MRL has a 16.5 kHz tone at -10 VU. In playback at 15 ips I get -18 VU. Sounds bad? No not at all. THis deck plays back 33 kHz tones!

Here is a photo of the deck with the recorded SMPTE being played back....

Regards
 

Attachments

  • IMG_1796.jpg
    IMG_1796.jpg
    42.5 KB · Views: 129
Does anyone have a good rule of thumb re: hours on heads. Someone is selling a 1/2" 16tr with 3000-4000 estimated on the heads. Seems a bit well worn but any thoughts?
 
Have a look at what you can do if you learn relapping DIY style...some more of Ethan's handiwork. Details of the arrangements are in the posts so I'll not duplicate here, but I'll cut it short by simply saying thanks for taking the risk (hint: the posts are related to Tascam BR-20T and 388 heads...both rare...), and I am certain I will be trying this myself at some point...just awesome.

Tascam 388

Tascam BR-20T
 
Back
Top