A
AnalogApples
Member
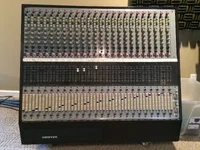
I thought I'd update you guys on a recent development at my private studio. I just got back to Madison WI from Nashville with a 24 channel Neotek Series III console that's been converted into a side car. He basically sold it to me for a song. It's totally wired up to a punchblock and patchbay, with cables coming from the punchblock that go to all my gear. My first observation, this thing is enormous. Everything is double the size of my Tascam M3500. Looking at it is messing with my mind because photos make it look like a modern, compact console, but in person it's huge. One fader panel barely fits in my hand. The knobs are huge, the pots feel totally different, like I imagine big gears underneath turning as I rotate the knob. So strange! The appearance just screams "REAL professional console'
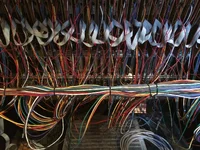
My second observation is that the wiring is humbling. It must've taken a team of technicians an entire week to run wires from the channels to the punchblock-to the patchbay. Hundreds of pounds of copper bundled in rubber so thick it looks like fire hoses coming from the console. I can see how the cables cost $thousands to purchase, and additional thousands to connect.
Also, patch bays are a new frontier of mystery for me. Normalled, half normalled? Good grief. I have many questions, and since large format consoles are not as common as my Tascam, educational material is limited.
Right now it's set up so that you use 2 of the 24 busses as a master 2 mix. There are no master channel cards. The only card that isn't an input module is a reverb return module, which i'm guessing outputs it's signal to the patchbay--but how that ends up back into my 2-mix--i'm going cross-eyed.
Right now I'll be using it to preamp and EQ my mics before my tape machine, a Tascam MS16. It's a +4 console, so I think I can use the XLR ins/outs of the tape machine. There's a switch in the tape machine that changes the operating volume so I have to check if that needs to be switched. Then I'll run the tape machine back through the console to mix, out to busses, and into my Tascam M3500 so I still have master channels and VUs of my 2-mix signal.
Long term, I'm on the hunt to buy all the channels that would make it a factory complete Series III. I THINK I just have to wire the master channels into the patch bay, and I'll be good to go. I'll be adding on to its wooden frame to create a spot for the meter bridge, and for all the remaining master channels. The console wiring appears simple enough. I'm really hoping the master channel PCBs have labeled solder points for wires.
I am so excited to get this into factory shape so I can sell or donate my Tascam M3500 32 channel. There's too many huge consoles in my house right now.
Has anyone tried restoring the master sections of a sidecar console? Was it a wiring nightmare, or pretty straightforward Inputs and outputs, power etc?
Interesting: He says he paid $10,000 for the console, and another $7,000 to wire it up back in the late 80s. I paid him 12% of that amount, so you do the math. Like I said, a song.
2nd photo is the rear of the console, so you can see it looks deceptively simply wired. I'm hoping the master cards have similar simple wire ins/outs.