cjacek
Analogue Enthusiast
EDIT!!!!!
Thank God the 'edit' button is still active. Anyway, what I decided to do is get to the 'guts' of the article and thus I edited out all the non-related stuff, presenting the article as I initially had intended. [If you want the full scope of the article, by all means go the the link but it's all here, the most important stuff].
Note: make your purchases locally, rather than shipping and buying sight unseen. Also, whatever is said in the article goes for any brand / make of recorder but of course a manual, specific to your machine, is critical.
Here's the exact link and below is the full article [edited now, to be more relevant], with the appropriate images [attached at the very bottom]:
http://emusician.com/daw/emusic_joining_reel_world/index.html
Joining the Reel World
Mar 1, 2007 12:00 PM, By Eddie Ciletti
[First part, edited out]
What follows is a list of steps you can take to assess the operating condition of an open-reel machine and diagnose any problems along the way, as well as an overview of what's involved in setting up and maintaining a trustworthy analog tape recorder.
No Pain, No Gain
When EM's editors asked me to write about analog tape machines, I was in the midst of restoring a mint-condition Fostex G16S, a ½-inch 16-track recorder. You might be wondering, why is it necessary to restore a mint-condition machine? As with any vintage item, time takes its toll on parts, often in very subtle ways. And few other pieces of audio gear are as finicky as vintage analog tape machines.
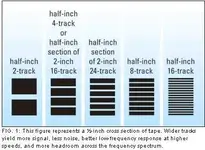
FIG. 1: This figure represents a ½-inch cross section of tape. Wider tracks yield more signal, less noise, better low-frequency response at higher speeds, and more headroom across the frequency spectrum.
As you might expect, a 2-track deck will be somewhat easier — and consequently less expensive — to calibrate and maintain than a multitrack machine. It can be a challenge to get all 16 or 24 tracks working equally well at the same time. That's why I recommend buying a used tape deck from a company that specializes in machine restoration. No tape recorder that is 20 years old or more can be counted on to be fully functional all the time, no matter how nice it looks.
Of the original manufacturers that still exist, few can provide support and parts. However, a remarkable amount of support is available on the Web, including third-party vendors that are making parts for the most common machines (see the sidebar “Resources for Analog Recorders”). No matter which track format you choose, the goal is to be able to record with confidence and know that you are getting the best of what analog tape has to offer (unless, of course, you are looking for a “broken” sound).
Expect Obstacles
On a 24-track pro machine that uses 2-inch tape, three tracks take up ¼ inch of space (see Fig. 1). On a semipro, narrow-format machine, you will have four or eight tracks for every ¼ inch of tape. The more tape real estate each track uses, the better the overall audio fidelity.
As an example of the kinds of problems you may find in a used recorder, let's look at a Fostex narrow-format multitrack recorder.
On the upside, a fully functional G16 or G24 has features like looping, built-in synchronization, and noise reduction. The transport is fast and responsive, and the front panel serves as the remote and offers metering. Squeezing up to 24 I/O cards into 19 inches was possible thanks to early surface-mount technology.
The downside is that surface-mount capacitors from that era are particularly prone to failure. So what may have started out as a $450 eBay deal could turn into a $2,000 project — either you're cool with that or you're not. But it's still a deal if you consider the original price of the recorder and the value of this machine in general.
Whether semipro or professional, nearly every multitrack is a similar investment. For instance, a 2-inch head assembly could easily run $2,500 per head, a true reality check if you paid as much for the recorder itself.
When service is required, narrow-format machines like those from Fostex, Otari, and Tascam can be shipped, though not necessarily to the manufacturer (with the exception of Tascam). On the other hand, a professional-grade 2-inch-tape machine by Ampex, Otari, Sony/MCI, or Studer requires that you either have it restored in advance, be willing to crate and ship it both ways to a repair shop, or be able to import a technician. These options depend, obviously, on your location and budget.
Nonetheless, the essential accessories for any tape machine include a service manual, a head demagnetizer, a dedicated set of nonmagnetic tools, and a test tape for playback calibration. A service manual will help you do the simple stuff, whether you're a geek or not. (Some manuals are actually a treasure trove of information.) At minimum, you'll need to know how to remove the head assembly so it can be shipped out for evaluation, restoration, and alignment.
Check Your Heads
Heads — electromagnetic devices that get signal to and from the tape — are the wear item on a tape machine. Like brake drums on your car, heads need to be resurfaced, contoured, and polished (the process is known as lapping) to maintain optimum performance. I can't emphasize enough that heads in good condition can minimize the more finicky aspects of tape head alignment.
To do any work in the head area, you will most likely need a hex key set. The recorder's country of origin will determine whether SAE (the United States) or metric (everywhere else) tools are used. You'll also want #1 and #2 Phillips screwdrivers, preferably in new condition, made from an extradurable alloy. Screws that are tight will require downward pressure so that the driver does not slip out and damage the screw head or the driver tip.
The capstan is the rotating shaft that maintains constant tape speed, and the pinch roller is the rubber tire that presses the tape up against the capstan. Know what a pinch roller costs and where to get one, and have a spare. Reel table clamps (for 10.5-inch reels) are becoming scarce, especially for machines like the Tascam MS-16. When the manufacturer cannot supply what you need, eBay (www.ebay.com) is a good place to search.
Basic Maintenance
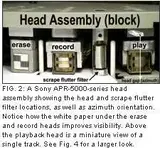
It's important to have a good visual view of the head area when doing maintenance. That is especially true considering the amount of oxide old tapes can shed. For best viewing, the deck should be horizontal. Place a piece of white paper in front of the head stack to reduce glare (see Fig. 2). Clean the heads with an alcohol-dampened cotton swab, using 99 percent (anhydrous) isopropyl or denatured alcohol. Do not use rubbing alcohol, which is 30 percent water.
FIG. 2: A Sony APR-5000-series head assembly showing the head and scrape flutter filter locations, as well as azimuth orientation. Notice how the white paper under the erase and record heads improves visibility. Above the playback head is a miniature view of a single track. See Fig. 4 for a larger look.
Note that pinch rollers can turn gummy due to many factors, not the least of which is age. Whether it is real rubber or synthetic, the pinch (and other rubber-clad rollers such as the tachometer) will react to chemicals in the tape as well as in various cleaning fluids. For this reason I recommend cleaning all “rubber” immediately after a recording project is completed — not when starting one — so that the tape chemicals will not have a chance to be absorbed by, and do damage to, the pinch roller material. This will make the cleaning process easier, require less chemicals, and minimize the aging process.
Because it is likely that you will be buying a new pinch roller, the manufacturer will recommend (and I suggest that you purchase) its product-specific cleaner. For example, Athan's pink cleaning solution is water based, while MDI PrecisionMotorWorks' Head, Red & Roll cleaner is a more volatile, quickly evaporating elixir. Both are equally effective at cleaning their respective rubber products and most likely will not do damage if applied to another manufacturer's products. That said, if there is any doubt, consult the manufacturer.
To clean original rubber parts, start with a cloth dampened (not soaked) with a water-based product such as Windex, Fantastik, or Formula 409 (which also works well on ceramic capstan shafts). Wipe a second or third time with a water-dampened cloth to remove any residual dirt and soap. Do not allow liquid to go down into the capstan shaft, or the bearing and motor will be damaged. Avoid using consumer-grade rubber cleaners.
Demagnetize
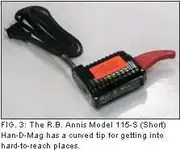
There is only one head demagnetizer to own: the R.B. Annis Model 115-S Han-D-Mag (see Fig. 3). A demagnetizer with a switch is dangerous and should be discarded or repurposed to the school science lab. Note that powering a demagnetizer up or down in close proximity to recorders and tapes can do more damage than residual magnetism from the recording process ever could. If the following exercise does not yield results, do not demagnetize your recorder without help from someone experienced in tape machine maintenance.
FIG. 3: The R.B. Annis Model 115-S (Short) Han-D-Mag has a curved tip for getting into hard-to-reach places.
All tools should be tested and demagnetized before coming in contact with the heads. If a screwdriver can pick up a razor blade, one or the other is magnetized. (The residual magnetism on the heads is far less and can be measured only with a very sensitive magnetometer.) Plug in the demagnetizer at least 3 feet away from tools, tapes, and machines, then practice by slowly moving the demagnetizer toward the screwdriver and then slowly away. Do the same with the razor blade and then confirm that the screwdriver can no longer pick up the blade.
The tape machine must be powered down before demagnetizing the heads, or you'll risk damaging a preamp. Power up the demagnetizer away from the machine, then slowly position it toward the erase head, moving up and down to cover the top and bottom tracks. While maintaining the up-and-down motion, slowly move the demagnetizer away from one head and toward the next. Also demagnetize the surrounding components — guides and lifters — although these are not typically made of magnetic material.
Check Your Parts
Using a tape machine requires a certain amount of electromechanical awareness. Each component in the recording and playback process — from the iron particles in the tape to the preamp required by the playback head — contributes to noise. For that reason, all tape machines boost treble when recording and use an inverse equalization curve during playback. The standard curves are AES, NAB, and IEC (formerly CCIR).
While some machines have all of these options, others have none. You need to know which curve you're working with before buying a test tape. For example, semipro machines are typically fixed for IEC EQ. Pro machines running at 15 inches per second can be either NAB or IEC. At 30 ips, AES is the standard EQ curve. EQ adjustments compensate for tape, electronic, and mechanical variations.
In addition to optimizing the signal-to-noise ratio, EQ adjustments compensate for tape and day-to-day electromechanical variations. The most obvious compatibility issue is a tape recorded on one machine and played on another, but even when a tape “lives” on a single machine, the performance can vary with temperature throughout the day.
Rolling
Considering the high cost of a test tape, do not attempt a playback calibration until you are sure the machine is operating properly. Here are a few DIY tips to determine whether a machine is in good working order.
Thread up a noncritical tape — but one that doesn't need to be baked — making sure the tape is wound snugly around the reel hub before pressing Play (see the sidebar “Baking”). Careless threading can stretch tape as well as bend or break guides, tension arms, and rollers.
Before it will do anything, the machine must recognize the tape's presence by using either a mechanical arm and a switch or an optical sensor. Some machines have mechanical brakes, while others use an electronic system. Once the tape is threaded, the brakes may release and the transport controls may be activated, or you may be required to press the Stop button. In the case of the Ampex ATR-100-series recorders, you will need to nudge the reels while pressing the Stop button.
Press Stop, then Play, then Stop: the tape should move forward and come to a gentle halt with no spillage or tension arm dropping. Next, fast wind to the middle of the reel from either end and press Stop. The tape should smoothly come to a halt in about the same amount of time in either direction. Any suspicious or dangerous behavior is reason to investigate or to consult a professional.
Now press Play and pay closer attention to how the tape passes through the guides, over the heads, and around the capstan on its way to the take-up reel. There should be minimal up-and-down tape movement and no tape-edge curling at the guides. (Use reels that are not bent or warped, so the tape edge doesn't scrape on the flange.) Some manufacturers, such as Otari, provided reel table shims to compensate for reel thickness or poorly adjusted reel table height.
Several mechanical issues can affect and exaggerate tape path problems: uneven tension on either side of the capstan, how “square” the capstan and other rollers are relative to the deck plate (the surface of the machine), or a pinch roller that has lost its shape. (Shimming the capstan or adjusting anything other than head azimuth is not for the squeamish or impatient.)
Any of these issues can cause the tape to skew up or down, and when things are really bad, the tape will curl and migrate out of the guides. Consult the manual for tension-measuring tools, techniques, and procedures. Fortunately, part of the head-lapping process includes a full mechanical alignment of the head assembly.
[continued below]
Thank God the 'edit' button is still active. Anyway, what I decided to do is get to the 'guts' of the article and thus I edited out all the non-related stuff, presenting the article as I initially had intended. [If you want the full scope of the article, by all means go the the link but it's all here, the most important stuff].
Note: make your purchases locally, rather than shipping and buying sight unseen. Also, whatever is said in the article goes for any brand / make of recorder but of course a manual, specific to your machine, is critical.
Here's the exact link and below is the full article [edited now, to be more relevant], with the appropriate images [attached at the very bottom]:
http://emusician.com/daw/emusic_joining_reel_world/index.html
Joining the Reel World
Mar 1, 2007 12:00 PM, By Eddie Ciletti
[First part, edited out]
What follows is a list of steps you can take to assess the operating condition of an open-reel machine and diagnose any problems along the way, as well as an overview of what's involved in setting up and maintaining a trustworthy analog tape recorder.
No Pain, No Gain
When EM's editors asked me to write about analog tape machines, I was in the midst of restoring a mint-condition Fostex G16S, a ½-inch 16-track recorder. You might be wondering, why is it necessary to restore a mint-condition machine? As with any vintage item, time takes its toll on parts, often in very subtle ways. And few other pieces of audio gear are as finicky as vintage analog tape machines.
FIG. 1: This figure represents a ½-inch cross section of tape. Wider tracks yield more signal, less noise, better low-frequency response at higher speeds, and more headroom across the frequency spectrum.
As you might expect, a 2-track deck will be somewhat easier — and consequently less expensive — to calibrate and maintain than a multitrack machine. It can be a challenge to get all 16 or 24 tracks working equally well at the same time. That's why I recommend buying a used tape deck from a company that specializes in machine restoration. No tape recorder that is 20 years old or more can be counted on to be fully functional all the time, no matter how nice it looks.
Of the original manufacturers that still exist, few can provide support and parts. However, a remarkable amount of support is available on the Web, including third-party vendors that are making parts for the most common machines (see the sidebar “Resources for Analog Recorders”). No matter which track format you choose, the goal is to be able to record with confidence and know that you are getting the best of what analog tape has to offer (unless, of course, you are looking for a “broken” sound).
Expect Obstacles
On a 24-track pro machine that uses 2-inch tape, three tracks take up ¼ inch of space (see Fig. 1). On a semipro, narrow-format machine, you will have four or eight tracks for every ¼ inch of tape. The more tape real estate each track uses, the better the overall audio fidelity.
As an example of the kinds of problems you may find in a used recorder, let's look at a Fostex narrow-format multitrack recorder.
On the upside, a fully functional G16 or G24 has features like looping, built-in synchronization, and noise reduction. The transport is fast and responsive, and the front panel serves as the remote and offers metering. Squeezing up to 24 I/O cards into 19 inches was possible thanks to early surface-mount technology.
The downside is that surface-mount capacitors from that era are particularly prone to failure. So what may have started out as a $450 eBay deal could turn into a $2,000 project — either you're cool with that or you're not. But it's still a deal if you consider the original price of the recorder and the value of this machine in general.
Whether semipro or professional, nearly every multitrack is a similar investment. For instance, a 2-inch head assembly could easily run $2,500 per head, a true reality check if you paid as much for the recorder itself.
When service is required, narrow-format machines like those from Fostex, Otari, and Tascam can be shipped, though not necessarily to the manufacturer (with the exception of Tascam). On the other hand, a professional-grade 2-inch-tape machine by Ampex, Otari, Sony/MCI, or Studer requires that you either have it restored in advance, be willing to crate and ship it both ways to a repair shop, or be able to import a technician. These options depend, obviously, on your location and budget.
Nonetheless, the essential accessories for any tape machine include a service manual, a head demagnetizer, a dedicated set of nonmagnetic tools, and a test tape for playback calibration. A service manual will help you do the simple stuff, whether you're a geek or not. (Some manuals are actually a treasure trove of information.) At minimum, you'll need to know how to remove the head assembly so it can be shipped out for evaluation, restoration, and alignment.
Check Your Heads
Heads — electromagnetic devices that get signal to and from the tape — are the wear item on a tape machine. Like brake drums on your car, heads need to be resurfaced, contoured, and polished (the process is known as lapping) to maintain optimum performance. I can't emphasize enough that heads in good condition can minimize the more finicky aspects of tape head alignment.
To do any work in the head area, you will most likely need a hex key set. The recorder's country of origin will determine whether SAE (the United States) or metric (everywhere else) tools are used. You'll also want #1 and #2 Phillips screwdrivers, preferably in new condition, made from an extradurable alloy. Screws that are tight will require downward pressure so that the driver does not slip out and damage the screw head or the driver tip.
The capstan is the rotating shaft that maintains constant tape speed, and the pinch roller is the rubber tire that presses the tape up against the capstan. Know what a pinch roller costs and where to get one, and have a spare. Reel table clamps (for 10.5-inch reels) are becoming scarce, especially for machines like the Tascam MS-16. When the manufacturer cannot supply what you need, eBay (www.ebay.com) is a good place to search.
Basic Maintenance
It's important to have a good visual view of the head area when doing maintenance. That is especially true considering the amount of oxide old tapes can shed. For best viewing, the deck should be horizontal. Place a piece of white paper in front of the head stack to reduce glare (see Fig. 2). Clean the heads with an alcohol-dampened cotton swab, using 99 percent (anhydrous) isopropyl or denatured alcohol. Do not use rubbing alcohol, which is 30 percent water.
FIG. 2: A Sony APR-5000-series head assembly showing the head and scrape flutter filter locations, as well as azimuth orientation. Notice how the white paper under the erase and record heads improves visibility. Above the playback head is a miniature view of a single track. See Fig. 4 for a larger look.
Note that pinch rollers can turn gummy due to many factors, not the least of which is age. Whether it is real rubber or synthetic, the pinch (and other rubber-clad rollers such as the tachometer) will react to chemicals in the tape as well as in various cleaning fluids. For this reason I recommend cleaning all “rubber” immediately after a recording project is completed — not when starting one — so that the tape chemicals will not have a chance to be absorbed by, and do damage to, the pinch roller material. This will make the cleaning process easier, require less chemicals, and minimize the aging process.
Because it is likely that you will be buying a new pinch roller, the manufacturer will recommend (and I suggest that you purchase) its product-specific cleaner. For example, Athan's pink cleaning solution is water based, while MDI PrecisionMotorWorks' Head, Red & Roll cleaner is a more volatile, quickly evaporating elixir. Both are equally effective at cleaning their respective rubber products and most likely will not do damage if applied to another manufacturer's products. That said, if there is any doubt, consult the manufacturer.
To clean original rubber parts, start with a cloth dampened (not soaked) with a water-based product such as Windex, Fantastik, or Formula 409 (which also works well on ceramic capstan shafts). Wipe a second or third time with a water-dampened cloth to remove any residual dirt and soap. Do not allow liquid to go down into the capstan shaft, or the bearing and motor will be damaged. Avoid using consumer-grade rubber cleaners.
Demagnetize
There is only one head demagnetizer to own: the R.B. Annis Model 115-S Han-D-Mag (see Fig. 3). A demagnetizer with a switch is dangerous and should be discarded or repurposed to the school science lab. Note that powering a demagnetizer up or down in close proximity to recorders and tapes can do more damage than residual magnetism from the recording process ever could. If the following exercise does not yield results, do not demagnetize your recorder without help from someone experienced in tape machine maintenance.
FIG. 3: The R.B. Annis Model 115-S (Short) Han-D-Mag has a curved tip for getting into hard-to-reach places.
All tools should be tested and demagnetized before coming in contact with the heads. If a screwdriver can pick up a razor blade, one or the other is magnetized. (The residual magnetism on the heads is far less and can be measured only with a very sensitive magnetometer.) Plug in the demagnetizer at least 3 feet away from tools, tapes, and machines, then practice by slowly moving the demagnetizer toward the screwdriver and then slowly away. Do the same with the razor blade and then confirm that the screwdriver can no longer pick up the blade.
The tape machine must be powered down before demagnetizing the heads, or you'll risk damaging a preamp. Power up the demagnetizer away from the machine, then slowly position it toward the erase head, moving up and down to cover the top and bottom tracks. While maintaining the up-and-down motion, slowly move the demagnetizer away from one head and toward the next. Also demagnetize the surrounding components — guides and lifters — although these are not typically made of magnetic material.
Check Your Parts
Using a tape machine requires a certain amount of electromechanical awareness. Each component in the recording and playback process — from the iron particles in the tape to the preamp required by the playback head — contributes to noise. For that reason, all tape machines boost treble when recording and use an inverse equalization curve during playback. The standard curves are AES, NAB, and IEC (formerly CCIR).
While some machines have all of these options, others have none. You need to know which curve you're working with before buying a test tape. For example, semipro machines are typically fixed for IEC EQ. Pro machines running at 15 inches per second can be either NAB or IEC. At 30 ips, AES is the standard EQ curve. EQ adjustments compensate for tape, electronic, and mechanical variations.
In addition to optimizing the signal-to-noise ratio, EQ adjustments compensate for tape and day-to-day electromechanical variations. The most obvious compatibility issue is a tape recorded on one machine and played on another, but even when a tape “lives” on a single machine, the performance can vary with temperature throughout the day.
Rolling
Considering the high cost of a test tape, do not attempt a playback calibration until you are sure the machine is operating properly. Here are a few DIY tips to determine whether a machine is in good working order.
Thread up a noncritical tape — but one that doesn't need to be baked — making sure the tape is wound snugly around the reel hub before pressing Play (see the sidebar “Baking”). Careless threading can stretch tape as well as bend or break guides, tension arms, and rollers.
Before it will do anything, the machine must recognize the tape's presence by using either a mechanical arm and a switch or an optical sensor. Some machines have mechanical brakes, while others use an electronic system. Once the tape is threaded, the brakes may release and the transport controls may be activated, or you may be required to press the Stop button. In the case of the Ampex ATR-100-series recorders, you will need to nudge the reels while pressing the Stop button.
Press Stop, then Play, then Stop: the tape should move forward and come to a gentle halt with no spillage or tension arm dropping. Next, fast wind to the middle of the reel from either end and press Stop. The tape should smoothly come to a halt in about the same amount of time in either direction. Any suspicious or dangerous behavior is reason to investigate or to consult a professional.
Now press Play and pay closer attention to how the tape passes through the guides, over the heads, and around the capstan on its way to the take-up reel. There should be minimal up-and-down tape movement and no tape-edge curling at the guides. (Use reels that are not bent or warped, so the tape edge doesn't scrape on the flange.) Some manufacturers, such as Otari, provided reel table shims to compensate for reel thickness or poorly adjusted reel table height.
Several mechanical issues can affect and exaggerate tape path problems: uneven tension on either side of the capstan, how “square” the capstan and other rollers are relative to the deck plate (the surface of the machine), or a pinch roller that has lost its shape. (Shimming the capstan or adjusting anything other than head azimuth is not for the squeamish or impatient.)
Any of these issues can cause the tape to skew up or down, and when things are really bad, the tape will curl and migrate out of the guides. Consult the manual for tension-measuring tools, techniques, and procedures. Fortunately, part of the head-lapping process includes a full mechanical alignment of the head assembly.
[continued below]
Attachments
Last edited:

")


")
 :rolleyes:") ].
].