If you run out of gain mixing tracks , should you compress it for more volume?

LazerBeakShiek

Rad Racing Team
My latest attempt is less than spectacular. Trying to mix 8-10 tracks with a voice . It is a battle for position in regard to volume. When I run out of gain, my natural progression is to compress the sound tighter to increase its appearance in the mix. Is this the right path? Because if you hear the drums become harsh and thumpy. The cymbals lose their splash. If you don't compress the drums and bass disappear. Specially behind a distortion guitar.

Want to hear? G'n'R did a cool version of this back when. So the Beak had to take a shot.


I need to make more projects covering different soundscapes. Experience. No substitute.

Thank you, ADA, for making the best guitar amps ever.
 
To me, if I understand correctly, this is where you go back and reduce your other tracks, use EQ to get a particular frequency to punch through, etc. If you push a track more, you are only going to have issues again. You will need to sort out what needs to be clearer, not what track needs to be louder.

Just listening to a few seconds of your recording, your vocals are way buried. You could not touch channel volume (just as an example), go find what frequency your vocals are, and cut those frequencies in those instruments/channels that are competing with your vocals, like guitars, snare, to see what happens.

I think chasing volumes in channels will make it harder to mix. EQ can be your friend in many ways. Also, you might want to look at cutting frequencies that a particular channel really doesn't need, like guitars in the bottom range (your mileage may vary), below 800ish. Just to reduce build up.
 
A healthy cut at 2k or 3k, or maybe higher I'm not sure on the electric distorted guitars, which the guitars badly need will make those vocals a lot more apparant. If it sounds weird mid boosts 400-800hz or so to bring back some of the warmer thicker tone. Turn the vocals up probably 3db or more. You shouldn't be running out of headroom, you should ideally have all of your tracks routed to main faders, All Drums on a fader, All guitars on another fader, All Vocals, All Bass, All synths for example on their own faders, as long as none of those main faders are clipping you can select them all and pull them back 1db to get you your room back on the master fader while maintaining balance. I wouldn't compress to free up headroom although this naturally happens during the mixing process for me, but it's more so a byproduct of what happens when I want to smash the vocal with hard hitting serial compression, My first instinct is to pull back those main faders if I run out of headroom but this is so rare for me, normally I am gaining everything back up again where I GAIN headroom through compression/saturation. At a guess you are not level matching your plugins so they are similar level when bypassed, are you by any chance leaving (Auto Gain) activated when compressing? That thing can make each track 3-4dbs louder everytime you use a compressor, hence I always make sure that is not active otherwise I would probably run out of headroom pretty quickly too!

Definitely a good idea to make sure your individual track sounds equally as loud with your plugins active & bypassed. for 2 reasons, you will never run out of headroom. and you can actually hear if you are improving the sound with each process.

Oh and with each track on main faders you can very quickly and easily make space for everything to live by bulk EQing all of your main instruments together in big batches. I learned this one from Dave Pensado and follow a similar mixing template to his. And of course, you can nudge things into place in bulk using a single fader without destroying your carefully crafted reverb settings, parallel processings and other sends you may have going on.

Edit: Unless you mean the opposite and you have no room left on your fader to make something louder? If that's the case just turn it up via a plugin. Airwindows Bitshift Gain, and Airwindows Purest Gain are supposed to be the cleanest way to gain up a signal. But any plugin with an output is good enough really. I don't think it's a good idea to compress more, but if you followed similar to what I said above, you wouldn't run into this problem again. Take a look on your master, are you hot? Turn everything but vocals down, is your signal peaking too low on the master? Turn vocals up
 
Last edited:
I have all drums on a 'group' (folder) track, all instruments on another, and all vocals on a 3rd. Then sometimes, multiple instruments on their own sub-folder. Reducing those group faders makes it easy - you should not be mixing that hot anyway.
 
A healthy cut at 2k or 3k, or maybe higher I'm not sure on the electric distorted guitars, which the guitars badly need will make those vocals a lot more apparant. If it sounds weird mid boosts 400-800hz or so to bring back some of the warmer thicker tone
Like...draw a tit in the EQ GUI box? Cut at 4k, boost at 800?
Screenshot 2021-09-14 150508.jpg
by any chance leaving (Auto Gain) activated when compressing?
I do. Isnt that a great feature? I don't have to guess the make up gain to use.

: Unless you mean the opposite and you have no room left on your fader to make something louder? If that's the case just turn it up via a plugin. Airwindows Bitshift Gain, and Airwindows Purest Gain are supposed to be the cleanest way to gain up a signal. But any plugin with an output is good enough really. I don't think it's a good idea to compress more, but if you followed similar to what I said above, you wouldn't run into this problem again. Take a look on your master, are you hot? Turn everything but vocals down, is your signal peaking too low on the master?
Yes, the drums are always maxed out so I compress them again.
Turn vocals up
My vocals are garbage..
 

Attachments

  • Screenshot 2021-09-14 150508.jpg
    Screenshot 2021-09-14 150508.jpg
    101.7 KB · Views: 1
I have all drums on a 'group' (folder) track, all instruments on another, and all vocals on a 3rd. Then sometimes, multiple instruments on their own sub-folder. Reducing those group faders makes it easy - you should not be mixing that hot anyway.
My USB Apollo would throw a massive fit. It cannot handle a complex track lay out with multiple effects. It breaks up. I can record with the Apollo ASIO and switch to ASIO4ALL and do a bunch of VSTs. The Laptop does it fine. Most of my recording use a minimum of effects and VST for this reason.

Great idea , I d love to make some sub groups.
 
My latest attempt is less than spectacular. Trying to mix 8-10 tracks with a voice . It is a battle for position in regard to volume.
Go through your mix and lower the gain on everything - fade it all down - bring the drums up and get them sounding good - then the bass - then the vocals - then the guitars , then the keyboards and other sweeteners. It sounds to me like you have too much gain on everything.
 
Ok. How about if I should use the limiter on the drum track at least? The spikes will clip before the meat of it. If you have a drum VST use it, and apply a limiter in Reaper. Doesn't that sound right? People say t o use my ears , a limiter in the track sounds right and it helps catch the spikes.

Screenshot 2021-09-14 154921.jpg
 
Is make up gain a necessary thing? I always apply some to equal out the volume loss from using a compressor. Perhaps that is wrong.
 
that EQ is pretty extreme, and I am surprised the guitar sounds as harsh in the high end with an EQ like this? It must have been really bright to start with? You don't really need to high pass any higher than 150, anymore than that will destroy the body of the guitar, I think you could probably get a great mix and low end even with the hpf set as low as 80hz, this would be my starting point by the way, if I struggled too much to clear out the low end I would raise it to 100 and maybe a bit more if I wasnt satisfied, I could end up as high as 150 on some mixes but I don't think yours calls for it, but honestly. 800hz is far too extreme., if you have too much low end buildup do a wide bell cut so you have far more control, wiping out the low end is not necessary, but turning it down will be.

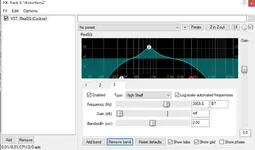
It's very typical to set a low shelf filter at 220hz, hpf at 80hz (steep), just listen to your low end and pull down the low shelf filter until you get a balanced low end. Don't HPF at like 220hz to achieve the same ish result because those frequencies are important to a good rhythm guitar sound. As DMC said above, cuts at the typical 350hz and 800hz are normally needed. You should be listening to your high end while you do this though to make sure that you dont end up with a harsh guitar with no body. If your low end feels right but your high end occasionally gets harsh. leave it where it is then control the top end (4khz high shelf filter De-essing) to duck it in when it gets too much.

Making sub groups like I and others here mentioned should save you computer power, and might actually help you. Everything can be done in batches if that is the case. You get the most amount of control this way without destroying any balances that you've worked for.

Make up gain is important! Use it to bring the track back up to the same volume as when the compressor is bypassed. But autogain? Forget it! It always ends up making the track 3-4dbs louder than it should be, going from 1 plugin to the next at a consistent volume IS gainstaging, and you will never run into headroom problems if you follow it through, it isn't even something I think about anymore. Just apply your makeup gain on compressors, I use Autogain on my Fabfilter Pro Q2 because this is actually pretty accurate, otherwise I would be turning the output up or down on a standard EQ so there is no obvious level change from bypass to active. If you are using a compressor for colour like in my Logic Stock Compressors, I sometimes do turn up the makeup gain way higher to get some saturation, but there is a seperate output control, and I would use that to turn it down to where it was before.

If I wasn't going to gain back up on my first plugin on a track which is normally an EQ, my signal would be peaking at -6dbfs (for arguments sake) but after I cut away all of the crappy low end, proximity effect and maybe scoop it a bit, my signal would be peaking at around -18 possibly? meaning I have already messed up! (especially if I am close miking a bassy guitar)

Like I said in other post to you the other day, I find I get really nice results by compressing the low end a bit aswel, instead of just cutting the low end with EQ and risk having your low end right in some parts of the track but a little too thin in others, a multiband compressor or dynamic EQ really helps you here. There is a good reason why you see pro mixers all the time smashing the low end with heavy compression and even limiting with fastest attack times, as you get higher up the spectrum you take much more care with the attack. The low end makes or breaks a mix and needs to be controlled carefully. If the low end is wrong your trebly instruments will cause havoc. You'll never get a balanced mix, you will be battling with harsh sounds, the mix wont translate, your vocals will sound harsh on a laptop but buried on a hifi. etc.etc. It's a nightmare. And not intuitive either sometimes.

Your vocals don't sound too bad (buried yes, but bad no). It's the high end of the guitars that don't work. (electric distorted guitars) especially the solo one. Play the track, disable all plugins and ask yourself if you made it better than the original, or worse. if worse, start again. Shouldn't take you long to try something else out and probably get better results each time

I use a limiter pretty much everytime on the drum buss, but that would be after I have a good mix going with EQ and basic compression. It won't really help you, and some would argue that using a limiter at all is a trade off with making something sound a tiny bit worse to squeeze a tiny bit of volume. Very insignificant in your point of the mix because you are not at that point of finishing up yet.

If you are done writing your drums, bounce it down, it will save CPU, better yet. Bounce it down like a real drum kit, this is what I do when writing stuff in EZdrummer. Then you can really dig into the tracks and mix it like a real drum kit, add your parallel compression track, automate each drum to flow with the song. and above all, PHASE! Especially if you have layered in another kick.

edit: Oh and if your drums are clipping, open up EZdrummer and turn the master volume of that vsti down. Let it hit at around -10, or -12. one all of your other tracks are balanced to the drums your master will probably have over 5dbs of headroom. But bouncing it down to each track similar to what your in-built mixer in the EZdrummer plugin has is definitely the way to go. If you can be bothered how to work it out in your DAW, otherwise forget it for now. it's not completely necessary. I just like that extra control. for eg: I cut lots of 110 and 350hz from the kick, if I was to do that on the track then I would destroy the snare drum by doing that. Then if I wanted to boost the top end of the snare, Hello washy cymbals. Etc. I mix drums to sound artificial and less organic, I prefer that sound. Compress the drum room mic and low pass to take the cymbals out of it, then I high pass the OH's so I'm pretty much leaving only the HH's and cymbals in and essentially use the OH mic as a cymbal mic. I would just be pulling my hair out if I had to do that all inside EZdrummers in built mixer. And it would be too intense on the cpu, even though I'm sure my computer would handle it.
 
Last edited:
If I ever get to the situation where everything is perfect but I have run out of fader travel, I just pop on a compressor, don't compress aaa all and turn up the makeup gain knob. I do this routinely on a couple of sample packages that have really nice sounds but only when played quietly - so the volume is very low. This solution works for me, and I don't actually add any compression.
 
Round 2

How do I see what frequency my vocal or guitar is at ?

Drums at -16 to -4 in this mix. The KNockinLoud was in the red side at +3.3 drums.
 
Last edited:
Try thinking in terms of what needs to be turned down instead of what needs to be turned up.
Yeah, but...It all sounds like crap.. So, shut it off? haha.

I turned the make up gain off in the above mix. That didn't help? Not as much as I wanted.

I waited a day, my ears still hear -16Lufs as quiet. Overly so compared to the -8 LUFs mix.
 
Last edited:
It just seems full, loud, squashed and heavily EQ'd. How do you mix? start with faders in a row, or start faders down? Do you balance each section - so do the drums - give them a group or VCA, then take whatever you have for the guitar and blend those, and do the grouping - repaet till your fader count is manageable. Then do you add the processing and effects, or has this been done way before this balance stage?

I just get the impression you are trying to fill up the sound stage from low to high and quiet to loud with everything full on and they're fighting to breath and fighting with each other. My friend does this - he has so many tracks on the go - each with little subtle stuff and then his mixes get messy because he's clever with the add ons, but missing out balance, blend and separation.
 
I just get the impression you are trying to fill up the sound stage from low to high and quiet to loud with everything full on and they're fighting to breath and fighting with each other. My friend does this - he has so many tracks on the go - each with little subtle stuff and then his mixes get messy because he's clever with the add ons, but missing out balance, blend and separation.
The tools I use are the SWS loudness analysis and scope visualizations. Keeping it at -16 lufs sounds too low. And I want big waves on the scope.

Effects are Reacomp and ReaEQ just for LPF HPF shapes. The instruments are recorded as they were played. The distortions in the ADA preamp are so awesome, shame they don't come through.

Gonna go back to 30 second projects to save resources. Don't need the whole song to practice mixing tracks. Wasting time.

I took the above mix -16lufturneddown, faders all the way down. Drums and bass, then guitars and accessories.
 
Last edited:
forget about loudness. your mix probably has not even got the potential for it yet, get the balance right first with EQ and compression and make sure it translates, and sounds good at low and high volume. Just having your vocal set at the wrong volume and buried in the mix will destroy any hope of you getting a loud mix that sounds good, it will sound worse for it even.
 
Back
Top