F
fitZ2
Banned
Hello again, well I'm "pooped out"(american slang for tired)  from work. My sister in law is my computer guru, and is sending me asap, a couple of power supplies. I should be back in business by friday. I need access to Autocad to do these drawings this weekend.
This is NOTHING!! When I design a kitchen for a woman, ha, there are a 1000 questions. Keeps me one step ahead of their changing mind.
(just kidding)
 :rolleyes:") Of course it has to be "custom" sawed, how else are you going to make all the pieces FIT the situation. You have to CUT them. Thats what the SAWS are for
Of course it has to be "custom" sawed, how else are you going to make all the pieces FIT the situation. You have to CUT them. Thats what the SAWS are for
Unless you are saying that the wood stuff has to be ordered from a SAW MILL(a mill is a lumber manufacturer). But even they have "nominal" sizes that they normally cut, and lengths that they normally cut, right? And then YOU cut the piece from the nominal lengths. Are you telling me there is no where to just purchase pre milled lumber? This may get a little difficult.
I don't want to sound condendsending but do you know what a "2x4" is? That is actually what "we" call a piece of lumber that is a standard thickness and width of a wall "stud". The term "2 by 4" means 2" thick, and 4" wide, which in reality is what we call NOMINAL SIZE. It by NO MEANS is 2" x 4". That is the size when they first "mill" or cut it from a log, or flitch. The lumber is "green" or wet. Once they cut it, it is air dried or kiln dried to a certain moisture content, and then "re-mill" it, or "S4S" it, which means they "surface(plane it smooth) on all 4 surfaces. Thats what S4S means. When they S4S it, now it becomes 1 1/2" x 3 1/2". Understand? So, I'm sure there is a "nominal" metric size for a standard stud, no? Here, 2x4's come in "nominal" lengths too. 8', 10', 12', 14' etc. You purchase the "nominal" lengths you need, and then cut them to what ever size you want. They even come in a standard "stud" length, for standard wall construction sizes so that 4'x 8' plasterboard will fit exactly, with a 1/2" layer on the ceiling, and a 1/4" gap at the floor. That way, you don't have to spend time cutting a 100 or so studs for a house. It is all standardized. Understand? But in your case, we will have to "CUSTOM" cut, from nominal lengths. EVEN METAL! And in the case of metal, every cut is a lesson in hindsight Unless you have the proper tools. Although some people prefer to work with metal framing, I prefer wood, because of trim, fastening things, etc etc. Plus, fastening it together is not a job for a beginner. You need special screws, etc. Although it may be better for you, I DON"T KNOW. You tell me. But I need to know, in order to draw it. And since this is precise layouts, I need to know the ACTUAL sizes of the members. I'm sure the dealer can tell you the actual dimensions in CM.
Actually, what I would REALLY like, is a PICTURE of each wall as an elevation. Reason is, I want to know EXACTLY what and where these electrical chases, outlets or whatever are. That way, we can plan on WHERE and HOW electrical whatever is going to penetrate the shell. I also want a closeup, of the door and jamb, inside and out. And dimensions of the jamb itself. I WANT THESE DETAILS in order to DETAIL the drawings correctly, dig? I have to know WHAT exists!
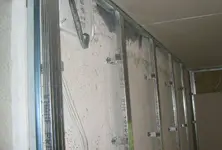
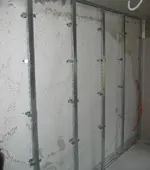
Ok, about the ceiling. I still have to post some pics of a couple of products I want you to see if they are avilable. But I have to fix my computer first to post them. Even the Knauf dealer might have some insight into these or where to get them, as they are related to metal framing. One is called "hat channel", the other is called RISC clips, or isolation hangers. The clips are a little "bracket" with a piece of rubber held in place in such a way as to fasten it to the ceiling, and then the "hat channel" fastens to the clip in another place, so the hat channel is isolated from the existing ceiling. Then the plasterboard is screwed to the hatchannel. You will see. No matter what, this
this is the type of connection we will have to design and custom build(we can do it!) if these are not available. We will just have to find other things to make it from. Ok? Ok. Just remember, two layers of plasterboard is DAMN HEAVY, so the connections and method of attatchment HAS TO BE STRONG, yet resiliant. Understand? Cool.
Ok, I'm still a little confused. I know you got rid of the "gates" that you called a "car door", right. And you filled it in with brick, or something. But you show a "man door" in one of the other walls. Is this where the new door and jamb are? And this leads outside to the yard in between your space and the neighbors, correct? Tell me about this door. Thickness, and a picture of the jamb. We will EITHER have to modify this door, and ADD Mass to it, or preferably, ADD another door to the whole thing. That means TWO DOORS. Otherwise, how do you seal your interior shell, at the door opening, dig? This is why.. your doors are the weakest link. There is NO sense, in building an iso assembly or shell with a SOUND TRANSMISSION CLASS rating of say 55, and then have a door with a rating of only 35. This will lower your whole thing to an average and seeing as the door is on the side facing your neighbors.......well, should I say more.
Ihave heard of some stuff to use as an alternative, and will find out what it is, but see, that doesn't mean anything if YOU CAN"T GET IT. Thats why I say, look for true, ACOUSTICAL SEALANT. Or something with a guarantee to stay resiliant for so many years. I have heard the BUTYL RUBBER based products are good too, but let me research that one. Another area of research for you is door seals(gaskets, foam weatherstripping, etc). Remember, to totally isolate this room to the point you are trying to achieve means that it is AIR TIGHT. Like a boat is watertight, dig? Also we have to look at the connection point BELOW the door, to "decouple, a threshold from the "floating floor", dig? NO RIGID CONNECTIONS whatsoever between the exterior shell and the interior shell, that is the GOAL!!!
Isolation doesn't know the difference. All this means is MASS AIR MASS. Concrete, air, Plasterboard....get it? The only difference is the distance from the plasterboard to the existing wall. When you build it normally, you would have an airgap the distance from the concrete, to the backside of the plasterboard, with studs within the airgap. You would place insulation in the cavitys of the studs, and actually, you could fill the WHOLE airgap, as I doubt if you would build this framing more than an inch from the concrete, right. Otherwise YOU TAKE UP INTERIOR SPACE, right?
But here is the deal. When you build normally, this airgap is about 5". This is filled with insulation, or rockwool. OF A CERTAIN DENSITY. THEN, you have to treat the interior of the room, with rockwool of a DENSER type.(3lbs per sq. ft I believe) which takes up even MORE ROOM, as you will need about 4" thick rockwool. So in light of the space limitations, I was trying to come up with a way to use the CAVITY between the studs as the TREATMENT space!
VOILA! Inside out wall!! You would STILL have to fill the gap between the plasterboard and concrete walls, with say 1"or 2" rockwool, but this area takes rockwool of a different DENSITY. Understand? I will find out these density requirements this weekend. I just don't remember them offhand. Anyway, after you fill the cavity between studs with rockwool, then you cover this area with FABRIC, stapled to the WOOD studs. Comprende' the use of wood. Thats why I suggest it. Ever tried to staple to metal? ")
But like I said, this is a matter of WHERE we use INSIDE OUT, and whether you can even GET wood, or GET the type of rockwool for this, or IF we use wall mounted absorbers as FIXTURES you build and APPLY to the wall, understand? LOTS of decisions are based on the AVAILABILITY of products. Also, the whole room would NOT be inside out. I am NOT sure of anything yet, untill I talk to some friends of mine about the dimensions of your FINISHED room, so we can calculate some things to find out EXACTLY what it is you will need. Understand this, SMALL rooms are a BITCH to absorb bass. And where does bass reflections and modes reside or build.....? CORNERS. All of them. At the wall to wall corners, wall to ceiling corners, and FLOOR TO WALL CORNERS. That is why I say, the design of the room as a STUDIO will be determined by FIRST......what you can get, SECOND, from that list, HOW we will use it, and that will be determined by room dimensions, ergonomics, connections, space between things, speakers, console or table size, NULLS and peaks, soffet or near field monitoring, lighting,.........is that enough?
Soooooooooooooo, maybe you understand now why I need all this information. Remember, I am a detailer, and I plan on DETAILING this so you can SUCCEED. PERIOD. If thats not what you want, then .......well, good luck.You asked for help, and I don't see anyone else posting any. Sooooo. What more can I say.
That is where I am coming from. Besides, good design and fabrication takes planning, period. Sooooooooo. I'm tired. Good nite Gracie.
fitZ")
from work. My sister in law is my computer guru, and is sending me asap, a couple of power supplies. I should be back in business by friday. I need access to Autocad to do these drawings this weekend.Thank god you arn't building a house.It seem staht the more i answer you, the more you ask me back
This is NOTHING!! When I design a kitchen for a woman, ha, there are a 1000 questions. Keeps me one step ahead of their changing mind.The election hasn't happened yet. I wish it were over. I'm tired of hearing both of these idiots. Neither of them have a clue whats really going on. BOTH of them are out of touch with reality. At least the working class reality. Thats because both of them have never had to work at a "real" job in thier life. Politicians are all out of touch. Thats why they are politicians. They don't have a clue to getting a real jobBy the way how are the elections going on there?
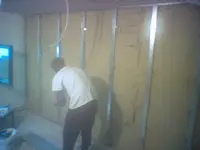
Good. Do you have any? Tell me what you have or have access to. Ever done taping and texturing on plasterboard? How about compound miters?About the working expirience. I am 23 but can say i know my way around tools.
(just kidding)Hmmmmmmm, "custom" sawed? What do you think you will have to do with metal? It ain't going to come in the size you need eitherI ask about the metal or wooden, because i get the metal form the knauf supplier. The wooden one would have to be ''custom'' sawed.
Of course it has to be "custom" sawed, how else are you going to make all the pieces FIT the situation. You have to CUT them. Thats what the SAWS are for Unless you are saying that the wood stuff has to be ordered from a SAW MILL(a mill is a lumber manufacturer). But even they have "nominal" sizes that they normally cut, and lengths that they normally cut, right? And then YOU cut the piece from the nominal lengths. Are you telling me there is no where to just purchase pre milled lumber?
This may get a little difficult.I don't want to sound condendsending but do you know what a "2x4" is? That is actually what "we" call a piece of lumber that is a standard thickness and width of a wall "stud". The term "2 by 4" means 2" thick, and 4" wide, which in reality is what we call NOMINAL SIZE. It by NO MEANS is 2" x 4". That is the size when they first "mill" or cut it from a log, or flitch. The lumber is "green" or wet. Once they cut it, it is air dried or kiln dried to a certain moisture content, and then "re-mill" it, or "S4S" it, which means they "surface(plane it smooth) on all 4 surfaces. Thats what S4S means. When they S4S it, now it becomes 1 1/2" x 3 1/2". Understand? So, I'm sure there is a "nominal" metric size for a standard stud, no? Here, 2x4's come in "nominal" lengths too. 8', 10', 12', 14' etc. You purchase the "nominal" lengths you need, and then cut them to what ever size you want. They even come in a standard "stud" length, for standard wall construction sizes so that 4'x 8' plasterboard will fit exactly, with a 1/2" layer on the ceiling, and a 1/4" gap at the floor. That way, you don't have to spend time cutting a 100 or so studs for a house. It is all standardized. Understand? But in your case, we will have to "CUSTOM" cut, from nominal lengths. EVEN METAL! And in the case of metal, every cut is a lesson in hindsight
Unless you have the proper tools. Although some people prefer to work with metal framing, I prefer wood, because of trim, fastening things, etc etc. Plus, fastening it together is not a job for a beginner. You need special screws, etc. Although it may be better for you, I DON"T KNOW. You tell me. But I need to know, in order to draw it. And since this is precise layouts, I need to know the ACTUAL sizes of the members. I'm sure the dealer can tell you the actual dimensions in CM. That still doesn't tell me anything. I can daisy chain a ground from outlet to outlet, and have it grounded at one point, but that doesn't mean it is a STAR Ground. More on that later. You may just need one outlet with an isolated ground, and run power strips from that, but we will deal with this later. It all depends on your equipment, your end result you are trying to achieve with recording, etc etc.About the grounding. all grounds are connected to a single grounding point
No he ddi not bring out the brick. Just a bit of concrete. an inch perhaps. Should i bother filling the gaps or what?
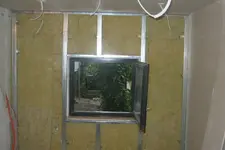
Actually, what I would REALLY like, is a PICTURE of each wall as an elevation. Reason is, I want to know EXACTLY what and where these electrical chases, outlets or whatever are. That way, we can plan on WHERE and HOW electrical whatever is going to penetrate the shell. I also want a closeup, of the door and jamb, inside and out. And dimensions of the jamb itself. I WANT THESE DETAILS in order to DETAIL the drawings correctly, dig?
I have to know WHAT exists!Ok, about the ceiling. I still have to post some pics of a couple of products I want you to see if they are avilable. But I have to fix my computer first to post them. Even the Knauf dealer might have some insight into these or where to get them, as they are related to metal framing. One is called "hat channel", the other is called RISC clips, or isolation hangers. The clips are a little "bracket" with a piece of rubber held in place in such a way as to fasten it to the ceiling, and then the "hat channel" fastens to the clip in another place, so the hat channel is isolated from the existing ceiling. Then the plasterboard is screwed to the hatchannel. You will see. No matter what, this
this is the type of connection we will have to design and custom build(we can do it!) if these are not available. We will just have to find other things to make it from. Ok? Ok. Just remember, two layers of plasterboard is DAMN HEAVY, so the connections and method of attatchment HAS TO BE STRONG, yet resiliant. Understand? Cool.
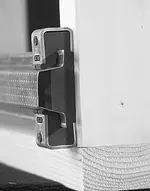
Well the old door is now forgotten and the opening filled up. SO are the jamb of it.As far as the new door is concerned it has a brand new jamb. I hope that is not a problem.
Ok, I'm still a little confused. I know you got rid of the "gates" that you called a "car door", right. And you filled it in with brick, or something. But you show a "man door" in one of the other walls. Is this where the new door and jamb are? And this leads outside to the yard in between your space and the neighbors, correct? Tell me about this door. Thickness, and a picture of the jamb. We will EITHER have to modify this door, and ADD Mass to it, or preferably, ADD another door to the whole thing. That means TWO DOORS. Otherwise, how do you seal your interior shell, at the door opening, dig? This is why.. your doors are the weakest link. There is NO sense, in building an iso assembly or shell with a SOUND TRANSMISSION CLASS rating of say 55, and then have a door with a rating of only 35. This will lower your whole thing to an average and seeing as the door is on the side facing your neighbors.......well, should I say more.
A product designed for acoustical sealing. It is guaranteed not to dry out. That is what you DON"T want. It needs to stay resiliant, and I have seen some of these so called "silicone based" caulks not only dry out, but MELT when rain hits them. What a joke some of them are. Pure silicone is not good for some things, like between the joints of plasterboard. Plus it STINKSWhat about caulk. What are you using?(me)
Mostly silicon based. Not good? What do you reccomend.
Ihave heard of some stuff to use as an alternative, and will find out what it is, but see, that doesn't mean anything if YOU CAN"T GET IT. Thats why I say, look for true, ACOUSTICAL SEALANT. Or something with a guarantee to stay resiliant for so many years. I have heard the BUTYL RUBBER based products are good too, but let me research that one. Another area of research for you is door seals(gaskets, foam weatherstripping, etc). Remember, to totally isolate this room to the point you are trying to achieve means that it is AIR TIGHT. Like a boat is watertight, dig? Also we have to look at the connection point BELOW the door, to "decouple, a threshold from the "floating floor", dig? NO RIGID CONNECTIONS whatsoever between the exterior shell and the interior shell, that is the GOAL!!!I tried to explain that earlier. I'll try again. Imagine your new wall with studs on the backside of the plasterboard, and an airgap or physical space between the new studs and the existing wall. Got it? Now flip that wall around so the studs face INTO THE ROOM. VOILA!! Inside out wallWhat is an inside out wall?
Isolation doesn't know the difference. All this means is MASS AIR MASS. Concrete, air, Plasterboard....get it? The only difference is the distance from the plasterboard to the existing wall. When you build it normally, you would have an airgap the distance from the concrete, to the backside of the plasterboard, with studs within the airgap. You would place insulation in the cavitys of the studs, and actually, you could fill the WHOLE airgap, as I doubt if you would build this framing more than an inch from the concrete, right. Otherwise YOU TAKE UP INTERIOR SPACE, right? But here is the deal. When you build normally, this airgap is about 5". This is filled with insulation, or rockwool. OF A CERTAIN DENSITY. THEN, you have to treat the interior of the room, with rockwool of a DENSER type.(3lbs per sq. ft I believe) which takes up even MORE ROOM, as you will need about 4" thick rockwool. So in light of the space limitations, I was trying to come up with a way to use the CAVITY between the studs as the TREATMENT space!
VOILA! Inside out wall!! You would STILL have to fill the gap between the plasterboard and concrete walls, with say 1"or 2" rockwool, but this area takes rockwool of a different DENSITY. Understand? I will find out these density requirements this weekend. I just don't remember them offhand. Anyway, after you fill the cavity between studs with rockwool, then you cover this area with FABRIC, stapled to the WOOD
studs. Comprende' the use of wood. Thats why I suggest it. Ever tried to staple to metal? But like I said, this is a matter of WHERE we use INSIDE OUT, and whether you can even GET wood, or GET the type of rockwool for this, or IF we use wall mounted absorbers as FIXTURES you build and APPLY to the wall, understand? LOTS of decisions are based on the AVAILABILITY of products. Also, the whole room would NOT be inside out. I am NOT sure of anything yet, untill I talk to some friends of mine about the dimensions of your FINISHED room, so we can calculate some things to find out EXACTLY what it is you will need. Understand this, SMALL rooms are a BITCH to absorb bass. And where does bass reflections and modes reside or build.....? CORNERS. All of them. At the wall to wall corners, wall to ceiling corners, and FLOOR TO WALL CORNERS. That is why I say, the design of the room as a STUDIO will be determined by FIRST......what you can get, SECOND, from that list, HOW we will use it, and that will be determined by room dimensions, ergonomics, connections, space between things, speakers, console or table size, NULLS and peaks, soffet or near field monitoring, lighting,.........is that enough?
Soooooooooooooo, maybe you understand now why I need all this information. Remember, I am a detailer, and I plan on DETAILING this so you can SUCCEED. PERIOD. If thats not what you want, then .......well, good luck.You asked for help, and I don't see anyone else posting any. Sooooo. What more can I say.
I don't know, will you? Hahahahaha! just kidding. Sure you will. Just don't get ants in your pants and get ahead of yourself. ONE STEP AT A TIME. Patience is a virtue, or so they say. Believe me, planning is a pain in the ass. But it is the means to building correctly the first time. Not the second time. Ever heard the saying: you have time to do it twice, but not time to do it right the first time?I like the idea of having the absorbrs you all talk so grand about, but in my case they will have to be DIY. Will i manage?
That is where I am coming from. Besides, good design and fabrication takes planning, period. Sooooooooo. I'm tired. Good nite Gracie.
fitZ