Going in Deep!

  • Thread starter Thread starter A Reel Person
  • Start date Start date
A Reel Person

A Reel Person

It's Too Funky in Here!!!
Q for you super techy types out there.

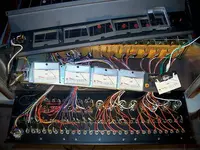
Can a defunct VU meter be fixed if it were to be removed from a mixer and completely disassembled?

That's what I'm looking to do. I'm not sure what I'd find in there, except some coil windings? I've done enough troubleshooting to determine that the VU meter itself is the problem. As luck has it, it's discontinued and no longer available from Tascam. It's the #1 VU meter on the M-35 mixer, the large-ish meter with the red OL LED portruding thru the front/right corner. The non-OL-LED VU meter is available for reasonable cost, but would require me to drill a hole to accommodate the LED, a very precise hole to drill that I'm not sure could be pulled off seamlessly.

The VU meter is a pretty essential component, as things go.

Any opinions from actual experience?

:spank::eek:;)
 
If you mean can you disassemble a meter mechanism and repair it....good luck.

AFA just drilling holes for LEDs and replacing the *complete* meter...not a big deal.

What exactly is wrong with the meter....dead...not reading correctly...???
 
Use the old meter's face plate which has the hole you need and put that onto the replacement meter. Drilling issue solved.

Cheers! :)
 
Yes,...

I'm looking to do either one or the other.

The only thing I'm worried about drilling a new meter to accommodate an LED, is the exact positioning and how clean I can drill the hole. I'd only have a hand drill and not a drill press. If I mislocated the hole even by millimeters, it could cause issues with mounting the meter properly in the chassis/vu meter mounting plate.

I guess I'm destined to find out, but what's inside a VU meter? Just some coil windings around a toroid and a swing arm for the needle? If there's no clear answer, I'll post back my findings if/when I'd go there.

I've thought about other solutions, such as the new VU meter and drilling the hole (leading solution so far), or sourcing a legit meter from parting out another Tascam (no clear source yet). I'm usually interested in fixing something if it can be fixed, or replacing something if it seems feasible. Drilling a hole may seem simple, but it's offputting for me. I'd much rather have had a fitting solution from Tascam Parts, but that's a dead end.

BTW, M-35 VU meter w/o LED aperture is a reasonable $36. However, I'm currently in an effort to sell equipment off for financial reasons, and putting more money into stuff wasn't part of the original plan. IF I were to source and replaced the VU meter at cost and effort to drill, I'd likely just keep the mixer for my own use at that point. All as yet TBD.

Thanks again.
:spank::eek:;)
 
Wow!

Jeff, you may have solved my dilemma! Of course, it still requires disassembling the meter to component level, but I'm going in deep anyway, regardless.

My troubleshooting involved swapping the Buss Master 1 and 2, to isolate the strip itself. I have also bridged with clip leads the VU meter signal off VU meter 1 to VU meter 2, and I could get VU meter 2 to deflect with #1's drive signal, thus verifying the wiring from the backplane to the meter. My next and last effort will be to apply a raw test tone (Fostex TT-15) directly to the VU meter input terminals, in an effort to rule out a cold solder joint from the harness wiring to the VU terminal lead.

Your ingenious suggestion would also depend on how hard or easy it is to separate the face plate from the VU meter body, but I'll find that out very soon.

Thank you!!!
 
....but what's inside a VU meter? Just some coil windings around a toroid and a swing arm for the needle?

Yeah...but that stuff is very delicate, not unlike a precision watch mechanism....so it doesn't take a lot of handling to completely whack it out of balance.
 
Yeah, the meter face card might be glued on which would pretty much destroy it when you pry it off. Hard to know until you actually try to take it apart.

Good luck!

Cheers! :)
 
Update...

Yes, the VU meter is completely non-working, but it bounces sporadically a very slight bit on the left side up to -10db, as if it's reacting to a scratchy static signal,... while the other meters read 0db, steadily on the nose. The Buss Master #1 passes signal and OL LED lights, and all is well for sound-ops itself, but no VU meter deflection except a static bouncing which is consistent.

I also opened it up and attached an external test tone to the VU meters in a powered off state. All the meters deflect except #1. I'm certain the fault is internal to the meter, itself. I've ruled out the card, intermediate wiring and cold solder to the VU meter lugs.

:spank::eek:;)
 
What about the VU meter's calibration trim pot? Maybe a quick exercise of that pot which needs a jeweller's screwdriver to adjust it?

Cheers! :)
 
Thanks Jeff, but...

I tried that already. It did effectively move the "home" position a little, but did nothing to "revive" the signal response of the meter.

NOTE: that this adjustment will move the placement of the needle a little bit up-then-down, as the pot (or inductor?) is rotated. Think of it as the "bias" adjustment is thoroughly explained,... as you rotate the bias adjustment the needle goes "up" to the right, peaks, and then drops "down" to the left again. That's what the adjustment does on the front of the VU meter.

Thank you!!!!
 
so you dont have an open coil. The issue is mechanical, probably the calibration is now lost. and you wont be able to make it read the right scale again. being pessimistic here
 
...

I've thought of doing what other users have done, by taking a short video clip of the problem/symptoms and posting it on Youtube, but I think I've described it pretty thoroughly.

All signal passes, there's no problem with audio anywhere on the board, the #1 OL LED will light, but as Meters 2, 3, 4, and AUX will sit neatly on 0VU, Meter 1 just sits on the left bouncing from oblivion up to -10dB, very sporadically as if it's reading common "static". I've verified everything down to the VU meter itself, and I've rotated the adjustment pot hoping it would help, but no. At a certain point I'll have nothing to lose but dismounting and disassembling the VU meter, down to it's internal components, as yet TBD. I'd much rather pop in a replacement, and the "drilling" thing might be the best way to go,... or at least spend the money and have it on hand if/when I disassemble the VU meter 1 and manage to destroy it in the process!!

:spank::eek:;)
 
...

so you dont have an open coil. The issue is mechanical, probably the calibration is now lost. and you wont be able to make it read the right scale again. being pessimistic here

Thank you for your response, but I disagree. I have test tone source, measurement tools, DVM, Oscope, etc, and if I can get it to pass signal I can easily get the meter back in Cal. It's a matter of getting the darn thing to respond to any signal.

I'm of the mind now to rotate and keep rotating the front adjustment pot, to make sure any dirt or corrosion is thoroughly worked out. I'll be bold enough to say the meter "looks" how a dirty pot "sounds" after years of non-use, (all scratchy and sporadic signal), and I know there are dirty pots on my other board that working the knobs thoroughly cleans it all up within a few minutes. It could just be a matter of that.

I agree though, the meter is not completele "dead" and the coil is not open, nor is there a breakpoint in the contacts or signal path. I disagree in that I don't think it's mechanical, I think it's electronic, but that's TBD.

Thanks again!!!!
:spank::eek:;)
 
The issue is mechanical, probably the calibration is now lost.

Yes....it's done.

I've had meters do this, most recently one of my MX-80 meters was acting funky...wouldn't read signal accurately.
I tried the front calibration screw, but that's only really used for "zeroing" in the meter, it's not really calibrating the meter for it's mechanical action.

I also tried "going in deeper" too...and the minute I started messing with the coil/pendulum action....it only made it worse, until there was nothing working. Luckily, I have a bunch of spare meters for the MX-80, so not a big deal.

They set those things up like a jeweler sets up a watch, and then "lock" all the tiny screws in place with paint...and you just don't mess with them. Even if you bring a magnetized tool near the needle, you can forever ruin it's action.

The one positive aspect is that it's already broken...so tinkering with it is not going to make it worse, so might as well have fun taking it appart. :D
 
True enough that I don't have much to lose in this case, but...

right now I have a 0VU signal passing and 3 of 4 meters sitting nicely on 0VU, so in my own confident arrogance I think I'll be able to get the cal back on the meter if I could only get it to deflect properly from test signals.

You guys rock, and I mean that!

:spank::eek:;)
 
The skill set required to overhaul moving coil meters is akin to speaker coil replacement or watch repair. Tascam meters are not generally thought of as rebuildable like a Simpson might me. Alot of those are heat welded and there is no good way to go about it. If in fact the meter moves slightly with a signal, the coil is probably not open. the power is transfered from the wires from the rear terminals to the two hair springs (called that for a good reason) to the coil itself. If you are elucky perhaps you will see a flaky solder joint there. The adjustment you mention is just the mechanical zero adjust on the front of the meter, whereas the electrical adjustment would be on the audio cards labeled something like "input cal".

Good luck!!
 
Yes, thank you again!

I see the entire mixer could use a touch up on calibration thru the entire signal chain, but it's all pretty close except Channel 3 needs about 50% of the trim adjustment as the other channels (trim/input running hot). However, that's the least of my worries and isn't that what knobs are there for,... to turn? (haha).

As far as the #1 meter goes, I rotated the front adjustment enough to successfully minimize that "bouncing" effect entirely, but the meter won't deflect at all. Seriously, I know there are very delicate components in there, tho I've never entirely disassebled a VU meter before, but I was hoping to get the shell casing off and find that "open" solder joint, just as you've described. However, it will have to wait for the time to actually go in "that" deep. I'm not sure I'm going there today. I might kick down the $36 for a new meter before I do any more disassembly, tho I'd probably have to drill it very precisely to make it fit.

As broke as I am, I think $36 would be worth it caus it's otherwise a very nice mixer. I could sweat the overall calibration of the unit later. In the process of fixing it and giving it such effort, I'd probably opt to keep it and use it properly as it's intended, rather than selling it at that point, as yet TBD. OR I could discount it $50 and let someone else sweat the issue entirely. I have no spare meters on hand ATM. Once I burst the meter guts open, it's probably a one way ticket!

:spank::eek:;)
 
Curiosity got the best of me!!!!

Ok,... here's the update. After finishing my beer and doing all the most basic things over and over again, I got the ol' screwdriver out and popped apart the entire M-35 meter bridge, mounting plate and everything, so I have 4 meters basically floating and Meter #1 in hand. I cut the sealing tape and pulled it apart. !!!

FIRST, the "zero-point" adjustment on the front is not a pot or inductor at all. It's a screw-top adjustment with an eccentric tit on it, which mechanically adjusts the "zero point" or "fine mechanical" adjustment of the needle. That's why when you turn it thru repeated revolutions, the needle goes up-then-down, as that's the entire sweep of the eccentric tit on the mechanical adjustment.

OKAY: I've never had the opportunity until now to say "eccentric tit" in any post, but I mentioned it twice since they usually come in pairs.
:eek:

NEXT: with the unit in an unplugged, disassembled state, I hooked the standalone test signal to the meter, and when I dicker with the positional adjusment on the front, it will hit a spot where the "static/bouning" thing takes hold again. Also, when previously testing the meter with it entirely assembled and the test signal hooked to the lugs, kind of depending on how I would hold or flex the lugs I might get a momentary "bounce". HOWEVER, internally to this meter it looks like mylar-flex-trace connections internally to the actual coil, with no discrete wires or sizeable connections to do anything with at all.

THE GOOD NEWS, is that the VU "faceplate" is a card that's glued on with 2 spots of glue at the bottom. I believe I can work loose and remove this faceplate card with the hole in it. ON the backing plate of the meter is a larger diameter hole, that the faceplate card goes over to succinctly locate onto the OL-LED. SO, I believe at this time I can get the new/replacement meter, remove the card on it, drill a gross/adequately located hole in the backing plate, and use the original faceplate/card to restore the meter to near-original and functional condition!

I really like this mixer, tho having it for many years and not having a chance to use it properly, but after putting so much effort into it I have to keep it and make sure to use it. Either that, or the selling price goes up dramatically, maybe $75 more than currently listed. $36 meter, plus shipping, and an assload of effort to restore that 1 funky meter. $75 bump is fair. Anyway, I'll need something left over to eventually revive my recording "career", and I've always liked having a diversity of equipment around. (I already sold my M312, in the process of selling most of the M30's I have on hand).

There are no user servicable parts inside this meter, as my friend succinctly stated above, but I now have a solid plan to revive this mixer in general, calibration further down the road TBA. Once I have the replacement meter worked up and installed/workng properly, I'll tear down into the guts of the bad meter just for fun. Pain in the Ass, is what it is!

:spank::eek:;)
 
Just called Tascam & ordered the part!

Now I'm unintended $45.37 in the hole on this thing, but I'll have a sense of satisfaction and accomplishment when it's a done deal. If I keep I'll be happy. If I sell price goes up accordingly. I'm only selling out of necessity to avoid financial disaster, not caus I enjoy selling my stuff. However, this may give me the push to pursue my many other fixit project as I originally intended years ago, and turn over some good dough in the process! I'm a simple gear purist. I hate when stuff doesn't work! It bugs me to no end!!! But,... necessity is the Mother of Invention!
:spank::eek:;)
 

Attachments

  • IM004254.webp
    IM004254.webp
    69.1 KB · Views: 41
I am thinking that an instrument repair company or a watchmaker may be able to fix this.

Alan.
 
Back
Top