Ampex MM-1000 Story...

Lukpac, that is a REALLY cool video! I love it!

TOTALLY appropriate to link here so thank you!

techno et al...kind of disappointed but content...owner of the 16 track machine had a change of heart and is planning on hanging on to the MM-1000. He would sell it but for more than it is worth in its current condition and more than I'm willing to pay. Who knows, either of those factors could change, and it may also be that somebody else comes along and wants to pay that amount and wants it fixed up or the owner may want to get it fixed up and in either case I may become involved from a service perspective.

Its always sort of a letdown when you start getting excited for something, but it really is for the best and I feel a sense of relief in a way...i don't really have the money, I don't really have the space, and I don't really have the time.

Back to Matilda.

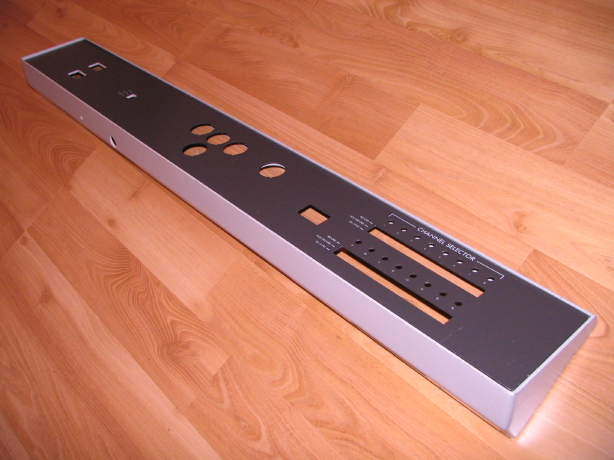
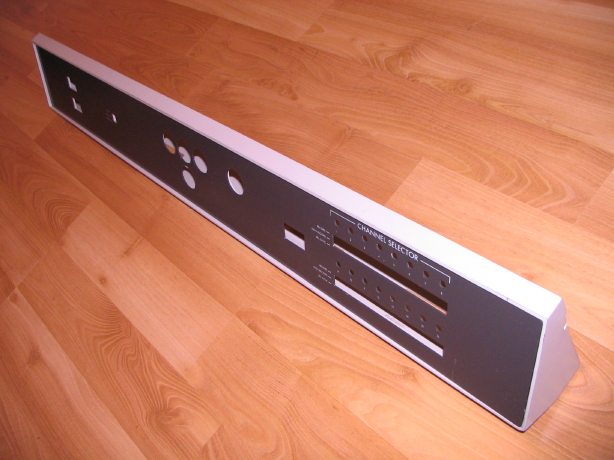
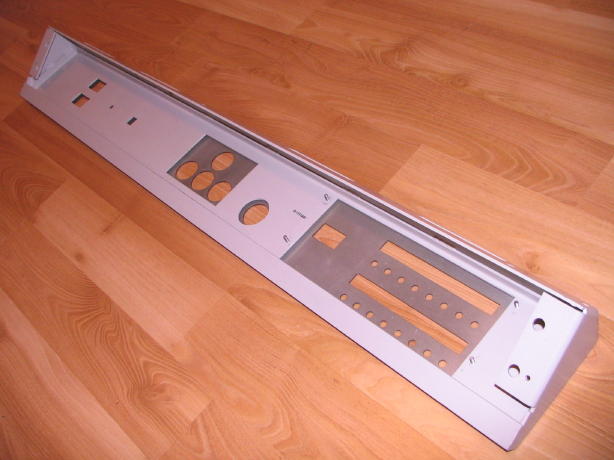
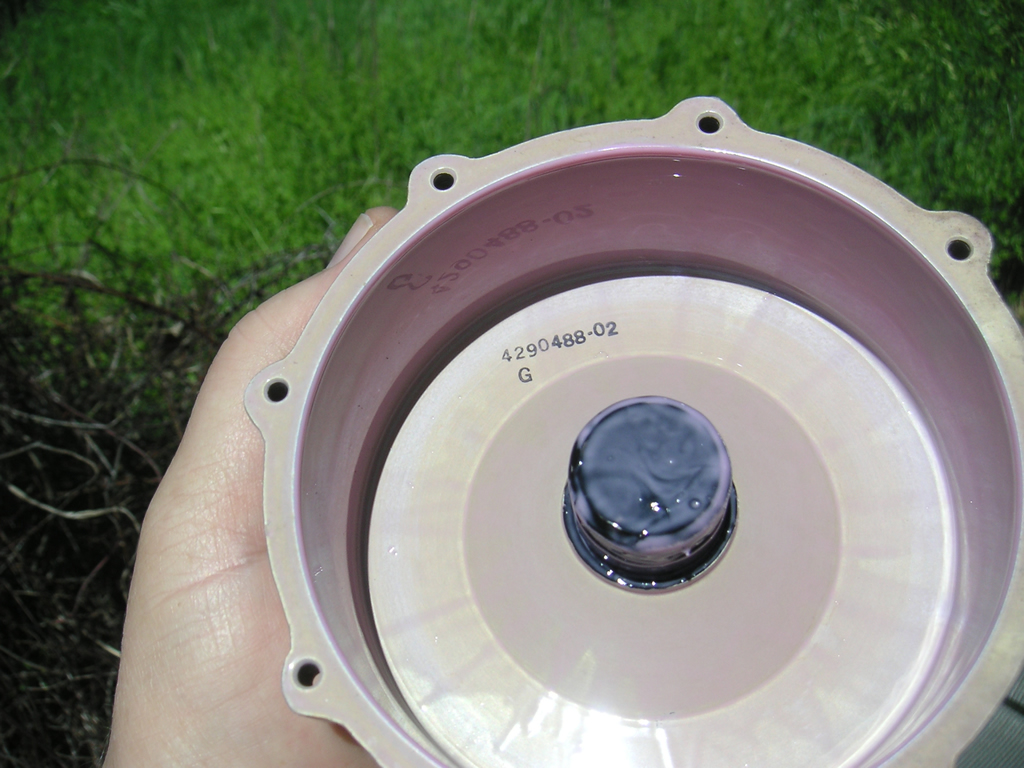
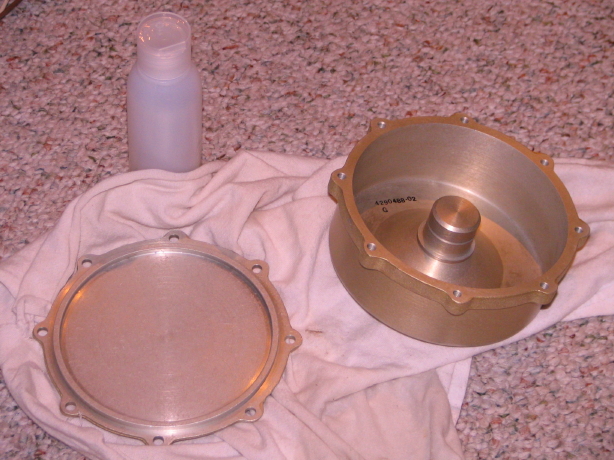
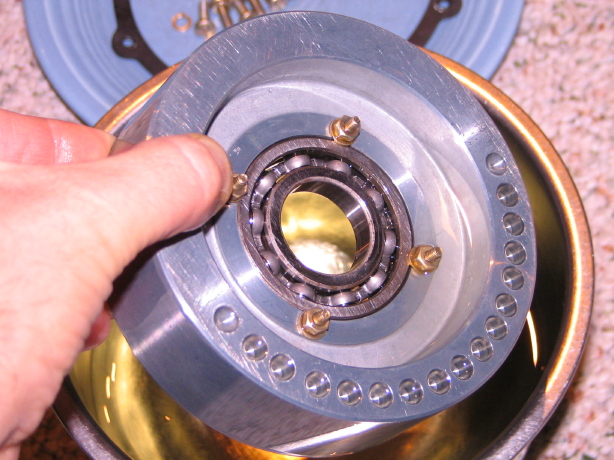
Next step is to sent my viscous-damped flywheel off to an Ampex List acquaintance who is qualified and has the equipment to vacuum treat and seal the housing and cover.

I'm probably going to pull my capstan assembly out again at some point to see what is so noisy...if it is the motor or the shaft. If it's the motor that's easy as I can replace the bearings. If it's the capstan shaft that will take some research to find the right shop...probably start with a couple of the folks that deal with the old quad decks. Its okay for now, but really, if I could have a capstan assembly that was quiet as the one on the 16 track machine it would be pretty nice...it would alleviate my concerns about having the MM-1000 in the same space in which tracking occurs.

And also i'm sure at some point I'll want to mod the harnessing so that the capstan shuts off when tape is unloaded. Mine runs all the time. That was a question I had early on as to whether or not its supposed to run all the time and the indication I got back is that it was normal, but the 16 track's capstan shut down when tape was unloaded and I consulted with another acquaintance who has a very similar (era) MM-1000 and he confirmed his also shuts off without tape loaded. T'would be nice. Pretty simple mod I believe, but i'm going to see first if that feature is pre-configured in the 16 track harness I have yet to put into Matilda.

First thing's first...get the flywheel to quit leakin' and get it back into the machine.
 
So here we go...Catching up on 3 months of activity in a posting blitz. I must say not much has happened.

The flywheel is still at my acquaintance's place for vacuum treatment. I'm not in a hurry and he's been busy. He's been very methodical and careful with the project since I'm sort of a guinea pig. He needs to find the right sealer and primer combination that will provide for a strong bond of the sealant to the flywheel housing, so he's been testing on scrap materials and corresponding with vendors and other contacts and pretty soon we'll be going live with a treatment of the flywheel which will involve several bouts in the vacuum chamber to draw out fluid that is soaked in the pores of the cast aluminum housing, and then coating with the sealant and then placing in the vacuum chamber to draw out air and then when the atomospheric pressure is applied after vacuum treatment the atmosphere drives the sealant into the pores of the casting. I consulted with Jay McKnight who was involved in the adoption of the flywheel design for Ampex audio machines and, based on the clearance between the outer housing and inner flywheel mass, and the importance of imarting a minumum of disturbance to that tolerance since that size of that void drives the compliance factor between the two parts via the silicone fluid, we need to ensure that the sealant memberane left on the interior of the housing is less than 0.002". Fascinating stuff. So all of you saying "sheesh, dude...it took 40 years for what fluid leaked out to leak out...why are you wasting all this time trying to solve the problem??" Good point. But it wasn't right in the first place, and I simply want to solve it because I can. It is my firm suspicion that, unless the flywheel has been topped up, every MR-70 and MM-1000 out there has the wrong fluid level in that flywheel, and Jay McKnight confirms that the flywheel does indeed provide an important mechanical filtration function in the tape path...and based on the common advisement out "there" about how the reel idler roller is supposed to behave that is why I believe most are not performing to spec...because when I filled mine to the proper level the idler roller did *NOT* behave to the common conception. The common conception has become just that simply because that's the way most of the systems out there behave. But I believe they didn't when new. I want mine to perform to spec and I want to rectify the less than ideal decision to use cast aluminum for that housing...because I can.

So here are pictures of my flywheel parts disassembled as I last saw them before the outer housing and cover were sent off:

The housing and the cover:

IMG_3226_11_1.JPG


The inner flywheel. Its been soaking in mineral spirits for the last 3 months.

IMG_3229_14_1.JPG


So stay tuned on this one. I figure in the next month or so the sealed parts will be back and I'll reassemble and start running my tests to see if it still seeps.

The other thing that I've sort of picked away at is 16-track conversion activities but verrrry little. The 16-track harness just sits there on the floor. I really don't want to deal with it. But I think I'm going to just get it done and get it in the machine once I get Tascam halftrack back together and off the floor. What a mess.

Along these lines (16-track conversion activites) I *finally* received a spare 16-track control panel assembly from a friend. We traded some parts. He's been really busy and its been a low priority for me, but he finally sent it off.

The deal here is that my control panel (with the mode control switches and transport controls) is punched for only 8-tracks of mode control switches. I actually have a NOS 16-track control panel faceplate that came with the MM-1000 and my plan was to pull mine apart, use spare mode control switching I also got with the MM-1000 and convert mine to 16-track. My friend said "I'll send you mine for x-y-z of yours" and I thought "that'd be sweet...no conversion...just plug and play." Well as details unfolded it wasn't that simple but we proceeded anyway because It would give me some spare parts, and when it arrived I was pleased with a couple things.

Here's what arrived:

IMG_3257_2_1.JPG


IMG_3259_3_1.JPG


The dress panel has been abused...scuffed and scratched with an extra hole drilled and record arm switch holes drilled oversized...bleah.

And check this out...TOTALLY funky wiring on the back. Story is that somebody was actually trying to make a remote control out of this thing and must have decided to use whatever connectors they had to which they could mate their cabling so bye-bye went the nice 19 and 27-pin Cannon mil-spec connectors and hello came...sheesh I don't even know what those blue things are...and the big cinch jones connector...and the vector board...that doesn't belong there. This thing is a strange concoction.

IMG_3261_5_1.JPG


So what IS the good news you ask?

Well, I have NO spares of transport switches and this is somewhat important because the internal stem that houses the lamp and holds the illuminated switch cover eventually breaks due to heat from the lamp...then the covers keep popping off. Mine are all good but eventually I'll need something I'm sure. So this came with 3 transport control switches. Only one has the stem intact but that's better than none, and the switch mechanism itself is good on all of them...and extra FWD, REW and PLAY covers are always nice especially the PLAY button because mine is ALL beat up. If you recall I had a problem with it not latching in PLAY mode requiring holding the PLAY button. Well this problem must have been around for awhile because it looks like a screwdriver was jammed in between the button cover and the escutcheon so its all scored and chunked up. No more. Got a nice one now. Sometimes its the little things. And spares of lamps and other function switch covers (as well as the function switches) were included...

IMG_3260_4_1.JPG


THIS is a big deal to me...record arming lamps...I have a total of 11 good ones: 8 on the machine currently and 3 spares...that leaves me 5 short for 16-track operation. You can still get these bi-pin Dialite lamps but A. they ain't cheap, and B. the ones you can get are taller...not low-profile like mine which are the early version. Some wouldn't care. Obviously the person why was violating this control panel didn't care...but I do. This spare control panel came with 13 lamps, 10 of which are good, and that includes the steel clips for them as well that fix them to the dress panel of which I only have 8...now I have 21 clips and 21 good lamps...

IMG_3262_6_1.JPG


The BEST part of the deal is that the control panel housing is in really good shape...mine is way beat up, but this one is going to clean up really nice, and the dress panel that will go on it is NOS...and I have plenty of mode control switching to choose from that are clean and look hardly used. So I'll be able to put together a really nice assembly without too much trouble.

Here is the housing after stripping the wierdness off of it...I like knowing this machine so well. Only took me about 15 minutes to strip it:

IMG_3263_7_1.JPG


That's it for now. ;)
 
Problem:

You have an early version Ampex MM-1000 in process of being converted to 2" 16-track but all you have for a remote are three late version 8-track carcasses...like, gutted. You could, with a lot of work, Frankenstein them together into a 16 track remote.

Secondary problem:

You really like stuff to match and prefer not to frankenstein something if you don't have to; the late version remotes have features that don't apply to your machine and it'd be a complicated project at best.

What to do?

Convince your late version MM-1000 ownin' buddy to trade. He wants a remote with the features that match his machine and he's bat$%1t crazy enough to do the frankensteining, especially since one of your remote carcasses has the uber rare varispeed panel. Your buddy's remote is THE REMOTE pictured in the manual for your early version machine, is fully functional and (with the exception of the transport control buttons and dress panel) is in pretty good shape.

Bonus: you get to keep spares from your remote carcasses like the near-new set of transport buttons from one as well as spare switches. You have gobs of spares of the mode control switches already.

Done. We ship our respective packages out Monday.

Here's a shot of what's headed this way. With a few quick parts swaps I think I'll have it 8/10 condition which is good enough for me. These things aren't exactly falling off of trees.

CIMG0343.jpg
 
Several updates...

The 16 track remote arrived and it looks great. Great potential.

I've cleaned up the 16 track control panel housing that I got awhile back. It really is in good shape. Way less scratch 'n' dent factor over what I currently have on the machine. Here it is clean and polished with the NOS dress panel in it. The dress panel has a couple scuffs from years of being shuffled around I imagine, but I can tell it has never been mounted which is why I call it NOS:

IMG_3350_2_1.JPG


IMG_3353_5_1.JPG


IMG_3354_6_1.JPG


Compare to the scunge factor seen in the partial shot of the backside of the housing:

IMG_3261_5_1.JPG


We're making progress on the sealing of the reel idler flywheel. I have to plug the guy who's working on it. He didn't ask me to but I just happened on his website and he's got some cool-cool stuff:

9er's Music Services

What we're up against is to seal the interior of the assembly with something that will play nice with the Dow Corning 200 Silicone fluid, and that will also adhere to the surface which is porous and has already been soaked with the Dow Corning fluid. You ever try to get something to stick to silicone? We use silicone spray to make things slippery. You figure out the rest! So this has been a process of purging what can be purged from the pores of the parts, and prime them with something to foster adhesion, and then, in the end, have a coating that is stuck fast that is uniform and less than 0.002" thick. There have been several trials along the way using scrap materials and finally some tests on the parts themselves and some redoing of some steps as a result of unknowns we had to face once we moved on to working with the actual parts...but it is looking very promising, and we should be able to stay within the constraints of the assembly as cautioned to me by Jay McKnight in terms of the coating thickness and consistency so as not to upset the dynamic properties of the assembly.

Here's a shot he sent me of the housing:

PICT0245.JPG


Stay tuned!
 
After several trials and tests the viscous-damped reel-idler flywheel housing and cover are back and hopefully sealed. I've got the assembly put back together filled with the silicone fluid and letting it sit to see if it still leaks...I'm going to leave it sit for probably a couple weeks and include some warming of the assembly in my trials since historically that has seemed to expedite seepage.

My partner in the sealing experiment, the guy that had the vacuum sealing/impregnation equipment and experience sent it back to me after the first trial and the coating was too thick so I sent it back and we tried again. This time it was thin enough. We both learned quite a bit in the process that could be valuable if he were to do this again.

In review, the challenges are that the porous aluminum casting becomes saturated with the the Dow Corning 200 silicone fluid. Ever try to adhere a sealant to something soaked with silicone fluid??? Impossible. So a sealant has to be selected that can bond to silicone and the surface/casting pores have to be treated. furthermore the final coating has to be around 0.001" or less in thickness. Tall order. I think he did it. At the very least I'm confident that the seepage will be significantly reduced. It took 40 years for 50-75% of the fluid to leak out of mine...even if that time span is doubled with the treatment, I'm happy. I think it will be better than that.

Again, also in review, this viscous-damped flywheel assembly is important if not critical to the MM-1000 operating according to spec. There are some common misconceptions about how it should behave (as current common knowledge of the assembly's bahavior is based on assemblies that are, at the very least, significantly low on fluid) and what it is supposed to do/how it works. Common report is that it allows faster startup of the transport by delaying the spinup of the primary mass inside the flywheel, and then provides damping of mechanical "noise"/oscillations from upstream of the reel idler in the tape path. I've often heard that you can tell if the assembly is working correctly if you spin it up, and then it keeps spinning even if you stop the roller and let go. All of these are incorrect. If the flywheel is filled to the proper level with the proper fluid, the inner flywheel (primary mass) and the outer housing are pretty much coupled all the time except for what sheer coupling properties the silicone fluid provides. So there is no delayed spinup of the primary mass, and if you spin it up and then grab the roller and stop it, when you let go its pretty much done. AND...its function is to provide damping of mechanical "noise" and oscillations between the assembly and the capstan shaft.

If anybody wants to challenge this I can provide documentation from Jay McKnight, who was at Ampex at the time this technology was incorporated into select audio tape transports, and is actually the one responsible for adapting the concept from the film industry for audio transports. Not trying to name-drop or shut the door on any discussion on the matter, but Jay is, AFAIC, inarguably an authority on this matter among many other matters.

Anyway, now in typical sweetbeats style, pictures!

Here are the sealed parts ready to receive the rest of the assembly:

IMG_3557_2_1.JPG


Annnnd a closeup of the housing:

IMG_3556_1_1.JPG


In goes the primary mass with bearing:

IMG_3559_3_1.JPG


In goes the super-kreepy fluid:

IMG_3560_4_1.JPG


Annnnd here we are all full-up:

IMG_3561_5_1.JPG


And the cover is back on:

IMG_3562_6_1.JPG


I torque the cover screws in steps leaving a day or so in between as the gasket settles and compresses. I think this is important. I've encountered two MM-1000's with loose and/or missing screws. This doesn't seem to contribute to leakage because the gasket adheres to the the mating surfaces over the years, but still...c'mon...I'd be more comfortable with the screws being there.

So that's the update on the flywheel assembly.

The other project I'm working on is a new cabinet cooling array for the MM-1000. The two fans in the floor of the cabinet aren't too effective in providing cooling, and the ones I got are downright noisy. I could throttle the rpm's on them, but then they'd be even MORE ineffective in cooling.

My plan is to put two triple-fan panels at the bottom of both rear racks, and load them with current technology low rpm high volume 120mm X 120mm computer fans. I may run them in series off the transport 24V power supply, or a may pick up a cheap Power One 12V dedicated supply for the array. I'm using OEM Ampex fan panels for aesthetics (as used on the MM-1100 and MM-1200), and I'll be using pre-fab filter assemblies to reduce dust infiltration into the cabinet. The panels will be mounted low and pulling air into the cabinet, and vented rack panels will be mounted at the top of the rear racks. With the way stuff is laid out in the racks this configuration should circulate air nicely; pulling cool filtered air in at the bottom near the floor and venting warmed air out the top. Preliminary tests reveal six fans move a lot of air, and since I'm mounting them using rubber isolators and they are purpose built for quiet operation and maximum air flow at low rpm, the array is super-quiet. Stay tuned.
 
Last edited:
Ahhhhhh yeah I've got one of those. :)

I will be doing some testing. I am quite curious myself as to what kind of improvement I can make on the fan noise.

Oh I forgot to mention earlier that I also picked up a set of rebuilt 2" rolling guides and found the last four plug-in octal socket bridging transformers that I needed to balance the input side of all the amplifier electronics (I had 12 of the 16 needed for 16-track operation...now I have all 16). And the rolling guides? That makes four that I have total. Two are NOS and two are these rebuilt ones. The grease has dried out in one of the bearings on one of the NOS assemblies, but I won't need it right away. From the factory the MM-1000 had two rolling guides. I common mod is to replace the static guides on the headblock. Most people don't mess with the guide between the play head and the capstan shaft because of the mounting constraints and the head gate spring. David Ollard (aka Thin Brown Line) has develpped some SWEET aftermarket guides that solve these problems for headblock mounting. Hope to use the guides I have and get into a set of those TBL guides somehow...eventually.

Anyway, point being the MM-1000 project is alive and well.
 
looking for some Ampex MM1000 parts

Hi ,
I'm looking for some Ampex MM100 parts , if any one can help please let me know ,
thanks, Matt.

need 16 channel remote and cable , speed selector switch cover , local remote switch cover , sync switch cover.
 
I was there. The AG-1000 had no head lift gates!!! LOUD!!!! The MM-1000 #1 was a clunk but worked. The MM-1000 24 track was a problem. Sel sync leakage and the worst was the overheating of the head stack. It had an 8 track side car and sat a few feet from the 16 track. Lived on those machines for two years.
 
The head overheating was related specifically to the erase stack...it'd overheat and crack. The solution was to split the stack into two staggered stacks. They dealt with the issue in other ways for the MM-1100/1200. It was only a problem on the 24-track and those were the more rare machines but it was a bonafide issue. And, yep...no lifters on the AG-1000.
 
The head overheating was related specifically to the erase stack...it'd overheat and crack. The solution was to split the stack into two staggered stacks. They dealt with the issue in other ways for the MM-1100/1200. It was only a problem on the 24-track and those were the more rare machines but it was a bonafide issue. And, yep...no lifters on the AG-1000.

I was kind of curious how they avoided the same problem in the narrowtrack headstacks. Lower operating level?
 
I was there. The AG-1000 had no head lift gates!!! LOUD!!!! The MM-1000 #1 was a clunk but worked. The MM-1000 24 track was a problem. Sel sync leakage and the worst was the overheating of the head stack. It had an 8 track side car and sat a few feet from the 16 track. Lived on those machines for two years.

That you, George?

Ack, so for some reason notifications got turned off and I hadn't been alerted to new posts for several months. Just happened to stumble by today. Good stuff...
 
Random post...I was out in the shop diggin' for something tonight and ran across one of my spare mode control switch assemblies (i.e. record arming/sync mode select switches)...this has got to be a rare bird as it is a 24-track assembly. I believe the 24-track MM-1000s were the most rare of the 3 configurations (8, 16 and 24-track).

IMG_0793.JPG
 
Back
Top