E
enferno
New member
Truss Rod Adjustment Tutorial & Intonation Correction
There comes a point in the evolution of every guitar player when knowing how to play the guitar is not enough. Sooner or later every serious player wonders, "How can I make this instrument work better?" This begins the first time you change your own strings, and for many of us, caring for the instrument is as much a passion as playing it. Like the automobile, it seems that guitars have an infinite amount of adjustments, and replacement parts. You use them, and they wear out. Take care of them, and they run better. For most players, the guitar's truss rod is an aspect of maintenance that is largely misunderstood. There often appears to be a dividing line between people who are terrified of the truss rod and people who believe it to be a magic wand…if adjusted often enough, it can solve all the problems in their tone.
The truth is that the truss rod is a simple device that basically has one purpose: to counter the pull of the strings. That's it. It isn't meant to adjust the height of your strings; you can't set your intonation with it; and with a little foresight, you aren't going to render your guitar useless by attempting to adjust it.
Tim Mchugh, a Gibson employee, applied for the first truss rod patent in 1921. Until then, guitars had bigger, often clumsy necks to handle the tension of the strings. To make matters worse, there was no such thing as "light gauge" strings. In its basic form, the mechanism is a steel rod with an anchor at one end and an adjustment nut at the other. It is inlaid (usually in a curve) into the center of a neck. Tightening the adjustment nut pulls the rod straight, thus straightening the neck. Loosening it allows the neck to move with the influence of the strings, consequently allowing the neck bow. To this day, most truss rods remain relatively unchanged. There are several versions of a two-way rod, ones that can move a neck both toward and away from string pull, but most are still just a version of the first, and that's what will be covered here.
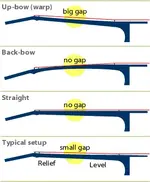
There are a few golden rules to obey when adjusting a truss rod. First, only use the rod to keep your neck as straight as it needs to be…do not use it to adjust your action! Second, only use the proper adjustment tool. If you do not know what it is, check with the manufacturer or visit a good repairman. Finally, do not force anything; an eighth of a turn can make a drastic change. The first step is to know when or in what way the neck needs to be adjusted. Start by sitting with the guitar in the playing position. Make sure it is in tune, and capo at the first fret. If you do not own a capo, you can simply fret the strings, but this may make things a little more difficult. Next, fret the bass string at the 14th fret. You are using the string as a straight edge to read the curve (referred to as relief) of the neck. Check the height of the string over the 6th fret. Gently taping the string to the fret makes the size of this gap clearer.
Figure: 1
The bigger this gap the more relief in the neck. It's a good idea to check the center strings and treble strings as well to give you an idea of the neck overall. It is possible to have a neck that is straighter on one side than the other. If there is no gap at the 6th fret, you are either dead straight or back bowed away from the pull of the strings. A buzzing of the strings open and within the first two frets is a definite indication of back bow. If you are touching at the 6th, let the string go and see if there is a gap at the first fret. The greater this gap, the greater the amount of back bow. Having a straight neck makes for a better playing instrument, but not all guitars and playing styles allow for a completely straight neck. Therefore, some relief is acceptable, and often necessary. Due to the elliptical vibration of a string, a little relief may prevent buzzing in the first and second positions. If you have a strong picking hand and tend to be an aggressive player, you can exaggerate the movement of the string and may need some relief, and higher action. Players with a lighter touch often have straighter necks with lower action. Electric guitars usually have straighter necks than acoustics, and basses typically have more relief than guitars. Be aware that straightening the neck may seem to make your guitar play worse. Tightening the truss rod straightens the neck and consequently lowers the strings, which can create string buzz. However, string height is controlled at the nut and saddle, not in the neck. Likewise, a straight neck may also make a poor fret condition more noticeable. Ultimately though, a good straight neck is the first step in a proper set-up and should help to make your guitar play better. If a straight neck makes the guitar play worse, the neck is either too straight for your playing style or it is a sign that more work is needed.
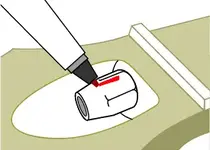
Once you have a picture of the neck as it is, you need to decide what way to turn the truss rod nut and how much to turn it. Remember in a single action truss rod: tightening the rod straightens the neck, loosening permits it to bow. Before you adjust the nut, make a mark on it that corresponds to a fixed point below it on the access channel to the nut. This will help you gauge how much you have turned and may help you get back to "0" if for some reason you get too far off.
Figure: 2
The first movement of an unfamiliar rod is always to loosen (counter-clockwise). This accomplishes two things: it gives you an idea of how tight the rod is already and tells you how smoothly it moves. If the rod seems sticky, back it out for removal while counting the turns. Clean it, oil it, and then return it to the original position. Q-tips and WD-40 or 3-in-1 oil are good for this. If you have a two-way rod, the nut is not removable. Most guitars only have a single action rod, and as long as you remember not to force anything, you run little risk of damage. To know for sure what you have, check with the manufacturer, or a good repairman. Loosening a rod won't cause damage, but if it seems very tight to begin with, and the neck has a lot of relief, tighten it gently or, again, seek the advice of a good repairman. It is possible to break a truss rod.
Once you are prepared to make the adjustment, keep in mind the gap you read at the 6th fret. The greater the gap, the more you will tighten the nut. If you had no gap you will be loosening the nut. Keep in mind that most good necks require no more than half of a turn in either direction. Using the mark you made to note the original position of the nut, start with an eighth of a turn, and check the gap again. Keep tightening or loosening until you can just barely see light through the gap at the 6th fret, but remember not to force anything. Stop if you are applying a lot of torque, and the neck still isn't going straight. The adjustment should be smooth and easy.
Once you have the neck straight, play the instrument and see what effect the adjustment had. If buzzing is apparent in the first few frets, try loosening the nut slightly and see if it helps. If you have buzzing consistently up the neck, you are most likely in need of a good set-up and/or fretwork.
The procedure outlined here is very basic. It is intended for the typical player, and could easily be much more in depth than this. A good repairman would be a lot more precise, while still following a similar procedure. However, from a maintenance standpoint, this is as technical as it needs to be. This same process holds true for any stringed instrument with a single action adjustable truss rod. As long as you follow the basic rules, and never force anything, adjusting a truss rod should be as simple and routine as changing your strings.
When I first began repairing instruments professionally, a great luthier told me "If you are working too hard, than you are most likely doing something wrong." This has held true on many levels, and if you keep this in mind while maintaining your instrument, you run little risk of damage. If you are interested in learning more about the details of the truss rod, or any aspect of maintenance and repair, there are many books available on the subject.
Personally, I recommend Guitar Player Repair Guide, or How to Make Your Electric Guitar Play Great, by Athens' own Dan Erlewine. And as always, you should never hesitate to seek the advice of a pro.
~*Sticky Perhaps?*~
There comes a point in the evolution of every guitar player when knowing how to play the guitar is not enough. Sooner or later every serious player wonders, "How can I make this instrument work better?" This begins the first time you change your own strings, and for many of us, caring for the instrument is as much a passion as playing it. Like the automobile, it seems that guitars have an infinite amount of adjustments, and replacement parts. You use them, and they wear out. Take care of them, and they run better. For most players, the guitar's truss rod is an aspect of maintenance that is largely misunderstood. There often appears to be a dividing line between people who are terrified of the truss rod and people who believe it to be a magic wand…if adjusted often enough, it can solve all the problems in their tone.
The truth is that the truss rod is a simple device that basically has one purpose: to counter the pull of the strings. That's it. It isn't meant to adjust the height of your strings; you can't set your intonation with it; and with a little foresight, you aren't going to render your guitar useless by attempting to adjust it.
Tim Mchugh, a Gibson employee, applied for the first truss rod patent in 1921. Until then, guitars had bigger, often clumsy necks to handle the tension of the strings. To make matters worse, there was no such thing as "light gauge" strings. In its basic form, the mechanism is a steel rod with an anchor at one end and an adjustment nut at the other. It is inlaid (usually in a curve) into the center of a neck. Tightening the adjustment nut pulls the rod straight, thus straightening the neck. Loosening it allows the neck to move with the influence of the strings, consequently allowing the neck bow. To this day, most truss rods remain relatively unchanged. There are several versions of a two-way rod, ones that can move a neck both toward and away from string pull, but most are still just a version of the first, and that's what will be covered here.
There are a few golden rules to obey when adjusting a truss rod. First, only use the rod to keep your neck as straight as it needs to be…do not use it to adjust your action! Second, only use the proper adjustment tool. If you do not know what it is, check with the manufacturer or visit a good repairman. Finally, do not force anything; an eighth of a turn can make a drastic change. The first step is to know when or in what way the neck needs to be adjusted. Start by sitting with the guitar in the playing position. Make sure it is in tune, and capo at the first fret. If you do not own a capo, you can simply fret the strings, but this may make things a little more difficult. Next, fret the bass string at the 14th fret. You are using the string as a straight edge to read the curve (referred to as relief) of the neck. Check the height of the string over the 6th fret. Gently taping the string to the fret makes the size of this gap clearer.
Figure: 1
The bigger this gap the more relief in the neck. It's a good idea to check the center strings and treble strings as well to give you an idea of the neck overall. It is possible to have a neck that is straighter on one side than the other. If there is no gap at the 6th fret, you are either dead straight or back bowed away from the pull of the strings. A buzzing of the strings open and within the first two frets is a definite indication of back bow. If you are touching at the 6th, let the string go and see if there is a gap at the first fret. The greater this gap, the greater the amount of back bow. Having a straight neck makes for a better playing instrument, but not all guitars and playing styles allow for a completely straight neck. Therefore, some relief is acceptable, and often necessary. Due to the elliptical vibration of a string, a little relief may prevent buzzing in the first and second positions. If you have a strong picking hand and tend to be an aggressive player, you can exaggerate the movement of the string and may need some relief, and higher action. Players with a lighter touch often have straighter necks with lower action. Electric guitars usually have straighter necks than acoustics, and basses typically have more relief than guitars. Be aware that straightening the neck may seem to make your guitar play worse. Tightening the truss rod straightens the neck and consequently lowers the strings, which can create string buzz. However, string height is controlled at the nut and saddle, not in the neck. Likewise, a straight neck may also make a poor fret condition more noticeable. Ultimately though, a good straight neck is the first step in a proper set-up and should help to make your guitar play better. If a straight neck makes the guitar play worse, the neck is either too straight for your playing style or it is a sign that more work is needed.
Once you have a picture of the neck as it is, you need to decide what way to turn the truss rod nut and how much to turn it. Remember in a single action truss rod: tightening the rod straightens the neck, loosening permits it to bow. Before you adjust the nut, make a mark on it that corresponds to a fixed point below it on the access channel to the nut. This will help you gauge how much you have turned and may help you get back to "0" if for some reason you get too far off.
Figure: 2
The first movement of an unfamiliar rod is always to loosen (counter-clockwise). This accomplishes two things: it gives you an idea of how tight the rod is already and tells you how smoothly it moves. If the rod seems sticky, back it out for removal while counting the turns. Clean it, oil it, and then return it to the original position. Q-tips and WD-40 or 3-in-1 oil are good for this. If you have a two-way rod, the nut is not removable. Most guitars only have a single action rod, and as long as you remember not to force anything, you run little risk of damage. To know for sure what you have, check with the manufacturer, or a good repairman. Loosening a rod won't cause damage, but if it seems very tight to begin with, and the neck has a lot of relief, tighten it gently or, again, seek the advice of a good repairman. It is possible to break a truss rod.
Once you are prepared to make the adjustment, keep in mind the gap you read at the 6th fret. The greater the gap, the more you will tighten the nut. If you had no gap you will be loosening the nut. Keep in mind that most good necks require no more than half of a turn in either direction. Using the mark you made to note the original position of the nut, start with an eighth of a turn, and check the gap again. Keep tightening or loosening until you can just barely see light through the gap at the 6th fret, but remember not to force anything. Stop if you are applying a lot of torque, and the neck still isn't going straight. The adjustment should be smooth and easy.
Once you have the neck straight, play the instrument and see what effect the adjustment had. If buzzing is apparent in the first few frets, try loosening the nut slightly and see if it helps. If you have buzzing consistently up the neck, you are most likely in need of a good set-up and/or fretwork.
The procedure outlined here is very basic. It is intended for the typical player, and could easily be much more in depth than this. A good repairman would be a lot more precise, while still following a similar procedure. However, from a maintenance standpoint, this is as technical as it needs to be. This same process holds true for any stringed instrument with a single action adjustable truss rod. As long as you follow the basic rules, and never force anything, adjusting a truss rod should be as simple and routine as changing your strings.
When I first began repairing instruments professionally, a great luthier told me "If you are working too hard, than you are most likely doing something wrong." This has held true on many levels, and if you keep this in mind while maintaining your instrument, you run little risk of damage. If you are interested in learning more about the details of the truss rod, or any aspect of maintenance and repair, there are many books available on the subject.
Personally, I recommend Guitar Player Repair Guide, or How to Make Your Electric Guitar Play Great, by Athens' own Dan Erlewine. And as always, you should never hesitate to seek the advice of a pro.
~*Sticky Perhaps?*~
Attachments
Last edited:
")
