Teac X10R

  • Thread starter Thread starter evm1024
  • Start date Start date
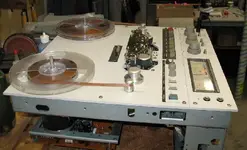
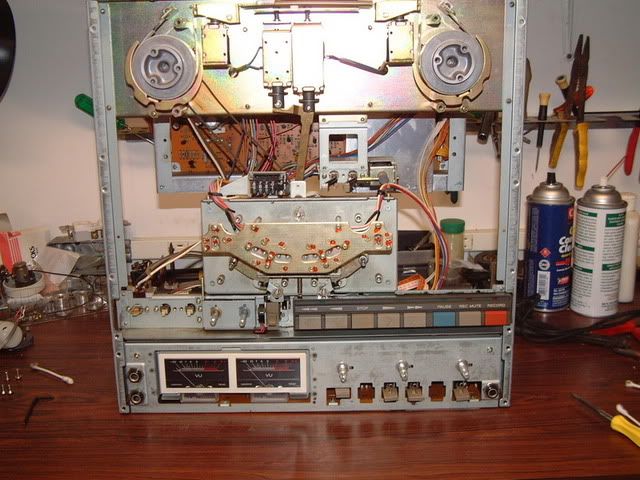
Carefully lower the whole plate down in a angle between the bottom section and upper pc-board and unplug the plastic connection plug for capstan-motor supply board:
TeacX1000RBeltchange009.jpg


Now the belt can be reached that probably is stretched or broken:
TeacX1000RBeltchange010.jpg


Both fly-wheels need to be taken off to reach the linkage controlling pinch-roller engagement that usually is gummed up and doesn't move properly when pressing play-mode.

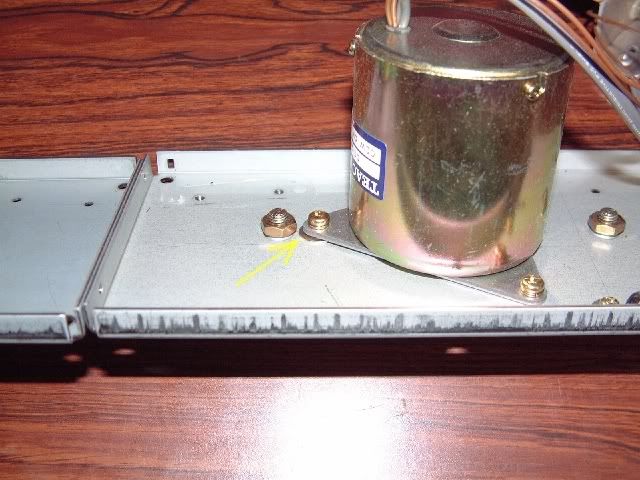
Take the head-cover off the front and you find a black plastic washer on the shaft on each capstan-arm, pry carefully off this washer and slide the Left fly-wheel out from the back at the same time, don't loose that washer now.
See red arrow:
TeacX1000RBeltchange012.jpg


Here is the L-flywheel with plastic washer next to it + old gummy belt:

TeacX1000RBeltchange014.jpg
 
And how it looks inside:
TeacX1000RBeltchange013.jpg


Do the same thing with the R-fly-wheel and carefully lift it out from the base:
Don't mix them up now, they are different making the belt change location on the fly-wheels when auto-reverse in engaged.
TeacX1000RBeltchange015.jpg


Now to the linkage controlling the pinch-rollers, see the bracket in the center, oil at the pivot-points with gun-oil or sewing machine oil.
TeacX1000RBeltchange017.jpg

Just a couple of drops on each point and lift the pinch-roller shafts from the front until they fall down without any resistance.
This can take a little time but be patient, 10-15 minutes and they will work like new again.


TeacX1000RBeltchange016.jpg
 
Now THAT'S what I call being helpful. GREAT POST Rolf (Vintage Texas)!!:):)
 
When linkage is working 100 % start cleaning following with head-cleaner:
Each surface on the fly-wheels, old belt-residue get stuck and will create problems later if not cleaned properly.
Wipe everything dry afterwards with a cotton-towl.
TeacX1000RBeltchange019.jpg


:)Same with the capstan motor pulley:
TeacX1000RBeltchange025.jpg


See how much black crud came of this pulley:
TeacX1000RBeltchange028.jpg
 
When both fly-wheels and capstan motor pulley is clean, its time to mount the fly-wheels back on.
Start with the R-one (backside) and carefully slide the shaft in thru the hole:
TeacX1000RBeltchange020.jpg


Before it's totally at the right position, you must slide the plastic washer back on, otherwise the whole headstack need to be removed, and we don't want that part:cool:
TeacX1000RBeltchange022.jpg


Slide the washer on all the way, and that will hold the fly-wheel in position until the assembly bracket is back on.
TeacX1000RBeltchange023.jpg


Do the same thing with the L-fly-wheel and now slide the new drive-belt on both fly-wheels, position doesn't matter.
In this picture is how the capstan-motor pulley is located on the drive-belt.
Have seen several decks with wrong belt and pulley on top instead, it goes from the bottom and up.;)
TeacX1000RBeltchange030.jpg
 
Before you mount the assembly plate back on, clean the old grease off each fly-wheel center shaft, and put a small amount of Lube-Gel on the steel-ball.
TeacX1000RBeltchange024.jpg


Attach the plastic connector back on the capstan-motor and slide the whole assemby-plate back in the same way it came out. Be careful so now wires are between and in the fly-wheels.
You need a long screw-driver or hook to lift up the drive-belt on to the pulley at the same time you guiding the plate back.
Also be sure the Timer function plate goes in the slot on top of the assembly plate.
This can be little tricky but have patience:

See here:
TeacX1000RBeltchange040.jpg


Attach the lower center screw on the plate first, but don't tighten it until all the other 5 is attached.
When it's all back in place, spin one fly-wheel both directions with your finger so the belt guide itself, and you can check how the belt changes position on both fly-wheels.

Attach new tie-straps on the right side + check so no wires are close to the fly-wheels.

Check the timer buttons on the front so they function properly.

Mount the pinch-rollers back on and put one small drop of gun-oil on each shaft, be sure you have those small black washers on each side of the pinch-roller.
TeacX1000RBeltchange033.jpg


Washer:
TeacX1000RBeltchange034.jpg


Covers back on the pinch-rollers, and check the movement up and down, should be smooth on both L + R.:)

TeacX1000RBeltchange035.jpg


Press Play in both directions and check the belt from the back and see how it behave.
Try this several times before you assembly the plastic cabinet back on.
TeacX-10R9.jpg
 
If you already took the capstan-motor off instead for the whole assembly plate, be sure you don't loose the small washer behind the motor to make it tilt for auto-reverse function on reverse play.
DSCF0007-6.jpg


DSCF0005-6.jpg


If the pinch-rollers are glazed or has small cracks they need to be replaced.
DSCF0010-5.jpg


Good Luck with the surgery:)
 
I spoke too soon (before you were done). Really GREAT work Rolf (Vintage Texas)!!
 
Thaanks!

Thanks for the photos. I noted the washers on the motor so I am good there. I see from your photos (whew great tutorial) the belt comes up from the bottom. I took the whole assemble out and pulled the pinch roller arms off and cleaned them individually.

Just waiting for parts to arrive for the rebuild.

Thanks very much!

--Ethan
 
That's great you already fixed the pinch-roller linkage and set to go when the parts comes in.
If you have any questions, just ask:)
 
Belts in

The belt and washers arrived today and they are niw installed, The deck functions all work. It plays well on some older tapes that I have around. The only problem now is that the supply side back tension needs to be adjusted. At the very beginning of a reel the tape tends to ride up and out of the left capstan/pinch roller. Slight pressure on the reel to add a touch of tension prevents this.

I do need to come up with the calibration procedures and a service manual but I'm happy that it is working.

Now all I need is a tube mic pre for testing tubes.
 

Attachments

  • x10-r front.webp
    x10-r front.webp
    32.5 KB · Views: 468
  • x10-r side.webp
    x10-r side.webp
    39.2 KB · Views: 475
Great you got most of problems fixed.:)
About the tape tension problem, first try swap the two pinch-rollers around.
If that doesn't take care of the problem do a small adjustment to the linkage:
The right solenoid over the headstack controls tape tension pressure on both pinch-rollers:
X-10R.jpg


On top you find 2 adjusting rods, the Left is Pause function, leave that alone, Right controls the pressure, adjust the nut clockwise 2 times and test with tape loaded on 3-3/4 playmode and try both reverse and forward play.
DSCF0011-3.jpg


Let me know how it goes:rolleyes:
 
X-10R belt replacement

That was great info on belt replacement. I took the capstain motor off the mounting plate and did not notice the washers. I found them but there was only a small one and a larger one. The parts breakdown show two small and one large one mounted as follows: large washer and small one on one screw and one small one on another screw and the last screw with no washer. Should there be 3 washers or was 2 correct in what was installed or am I missing a small washer? Thank You.
 
Thanks for posting all of this. I just replaced the belt on my X10-R and I had a difficult time finding out how to install the belt. The belt that came with the machine - as I bought it - had completely disintegrated into black goop, leaving no clues as to how it was originally situated.

I really wish I had found this post before I started! :)
 
Back
Top