Studio Cabling

  • Thread starter Thread starter frederic
  • Start date Start date
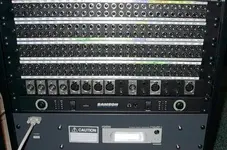
In case anybody is still interested in this thread- I finally finished up my mic/access patch strip and got it back in the rack.

What shows up on it are, from left to right: the 4 loose mic lines (the secondary mic lines to each of the 4 downstairs playing positions) on the 4 male XLRS, mic inputs for channels 8-11 at the board on the four female XLRs, and three access/multing points: one male XLR and two female XLRS that are multed to 2 or 4 regular 1/4" TRS connectors, so that people don't feel obligated to stuff their regular 1/4" plugs into my telephone-type patch strips...

A more elaborate or larger studio might do well to have a larger two-unit bay for this (or more): 4 pairs of XLRs for mic patching won't work unless you have most of your mic runs permanently dedicated to input channels, as I do (the fewer connections in the signal path, the better). My old room had 2 rows of 12 male and female XLRs for mic patching, and a separate 1-unit strip with a bunch of 1/4" TRS, RCA, MIDI, and other connectors cobbled onto it... But remember: XLRs do not have switching contacts for normalling, so any patching will require a cable.

Pix of my current (vastly simplified!) setup below.
 

Attachments

  • im000069a.webp
    im000069a.webp
    42.8 KB · Views: 179
Hell yeah I'm still interested in this thread. I went out over the weekend and bought three big books on this shit. I'm trying to soak up as much of it as I can. I didn't read anything new from what you told me, so consider yourself as having $80 worth of book-knowledge :D

Skippy, is that picture of the front or back of your patch bay?

I've come to the conclusion that if i really want to learn this stuff I'm going to just have to figure it out for myself... as in, learn it through the process of needing it.

I'm going to tour some studios in town here and get a glimpse at how they do theirs. Hopefully I'll be able to tour Smart Studios (Butch Vig's studio... drummer of Garbage). That's a world class studio right in my own town.

Later,
-Brian
 
That's the front (operator) side. The back of the bay consists entirely of cables terminated directly on solder lugs- there was a picture of the back side posted over on page 2 of this thread.

Some low-cost bays do have jacks both front and back: so you'd get a couple of 1/4" TRS to 1/4" TRS cables to get a signal from the source to the bay, and from the bay to the destination, and they'd plug in to the "back" jacks. Then any patching you'd do would occur in the "front" jacks- and you can set up a normal, or default, connection between the source and the destination so that no actual patch cable needs to be plugged in on the front to make it work. That photo shows my bay stripped down to the default: there are no patch cables in the front (no exceptions to the default connections), andt it's ready to track.

I don't believe in those "jacks-front-and-back" bays, but they are great for entry level setup and for working out your preferred bay arrangement: reconfiguring them means just unplugging this, and then plugging in that, on the back side. No soldering required.

I'm a traditionalist. All my patch stuff is wire-direct-to-jack on the back side, so that I cut the number of plug/jack connections by a factor of two. And that also allows me to cut the cables that go from my signal sources to my bay, and from my bay to my signal destinations, to exactly the right length, and terminate them with the right flavor and sex of connector (TRS, XLR, whatever).

You really just need to get into a well-set-up pro room, and spend half an hour laying hands on the rig with the resident engineer. Probably in five minutes of playing with it *in person*, you'll have all these concepts iced. It's definitely worth spending some time to see how some other folks do it: all this rot is just my approach, and it's optimized for instant setup and teardown: quick change as different artists come through. I'm not running a commercial room any more, but that's my working style, and I'm sticking to it!
 
I have to say Skippy, that you've given me more information about the patchbay theory than the books I bought did. You've also given me the most "new ideas" to think about since a year and a half ago when I read Acoustics101 from Auralex.

Where I was just over a year ago with learning about studio construction, is where I am with studio wiring. With construction I had some experience building rooms in my parents' basement, all I had to do was apply the "studio" theory to the construction methods I already had. And the same goes for studio wiring. I've already got extensive wiring knowledge, a TON more than most 22 year olds I can guarentee you that, and now all I have to do is apply the studio audio theory to the wiring methods I've already got.

Thanks Skippy,
-Brian
 
Auralex.

That will be stage two for my new studio :) Didn't even get there yet.

Anyway, I resolved all my cabling issues as I have the material, will be installing ADC patch bays both sides (thank you E-Bay!) and of course, snaking the cabling in the floor.

The front half of the room will have a second floor made of 2x4's with plywood on top of that, then a nice parque hardwood floor placed on top of the plywood. The cables will fit nicely in the 1.5" space between the plywood and the existing floor. The back half of the room (under the slanted ceiling and part of the normal ceiling) will be also increased in height, but instead of parque it will have heavy, thick carpeting. This should control some of the reflections off the slanted ceiling and the only thing in that area will be a drumkit, which carpeting helps keep in the same place :)

Already picked out my lenrds and other auralex items :)

Brian Grey said:
I have to say Skippy, that you've given me more information about the patchbay theory than the books I bought did. You've also given me the most "new ideas" to think about since a year and a half ago when I read Acoustics101 from Auralex.

Where I was just over a year ago with learning about studio construction, is where I am with studio wiring. With construction I had some experience building rooms in my parents' basement, all I had to do was apply the "studio" theory to the construction methods I already had. And the same goes for studio wiring. I've already got extensive wiring knowledge, a TON more than most 22 year olds I can guarentee you that, and now all I have to do is apply the studio audio theory to the wiring methods I've already got.

Thanks Skippy,
-Brian
 
Cableing options

I would recommend "pipeing" your cable runs. This consists of nothing more than running a large diamter PVC conduit (3 1/2 to 4 inches) to the areas you will need to cable to and from. This will allow you to upgrade, repair,change-out, or reconfigure your cable without tearing into walls, cielings, floors etc. at a later time. ( I know - I've been through it!!) After "pipeing" and finish work have been done to the studio-simply snake whatever cableing is necessary through the conduit.

P.S. One more thing, just remember to run enoungh pipe (parallel if necessary) to handle your possible future upgrades.
 
Re: Cableing options

I've got that covered Hamerhead, thanks anyway though. Just remember, I'm an electronics technician :) who runs conduit... ick.
 
Re: Cableing options

Greetings, its I, "Frederic", back under a new name.

Anyway, I agree with you that piping is a good way of protecting cables. I am thinking of using metal tubing as I can ground the tubing for extra noise suppression, however I don't have to make that decision just yet.

Finished moving into the new house (well, new 61 year old house) this last Monday, and after a little unpacking and some basic yard work (and light bulb replacement), studio construction will begin.

I was also thinking of building cable troughs, and lining them with thin steel for grounding purposes. The existing floor in the studio room will be untouched, but instead, a second floor built on top using 2x4's flat side down, with plywood over that. I intend to over-frame the floor for a more solid feel, then put hardwood parque on top of that. The cable troughs would need to be routed from the console table all the way to the left wall, to the recorders, outboards, and patch bays, with a second trough running straight back to the midi gear. I had originally had the reverse in the design, however I realized I have more "U" space requirements for midi gear than I do outboards and recorders. The side will be 64U total and the back will be 84U. Obviously, I will have a lot of blank panels mixed in :)


Hamerhead said:
I would recommend "pipeing" your cable runs. This consists of nothing more than running a large diamter PVC conduit (3 1/2 to 4 inches) to the areas you will need to cable to and from. This will allow you to upgrade, repair,change-out, or reconfigure your cable without tearing into walls, cielings, floors etc. at a later time. ( I know - I've been through it!!) After "pipeing" and finish work have been done to the studio-simply snake whatever cableing is necessary through the conduit.

P.S. One more thing, just remember to run enoungh pipe (parallel if necessary) to handle your possible future upgrades.
 
Brian'll tell you this, too: regardless of whether you use troughs, rigid metallic conduit, PVC pipe, or whatever: always run *2* pulling ropes through that you intend to leave there forever. Not one.

One of them, leave loose for pulling the cables you know you're going to add. The second one, secure on a nail or staple at each end, and tie it off. That way, when the main one gets broken on a snag, or some "helpful person" helps you tidy up the space by pulling that ugly greasy blue and white rope out of the wall behind the mixer, you still have a spare. It's easy to put in place up front, and a huge pain to do after the wireways are full of wire. Funny, that...

I *hate* having to use active cable to pull a new pulling rope through. Hate it. Argh. And, regrettably, most domestic partners were not born knowing why those ugly things get left around...
 
Not that having two ropes in the conduit is a bad idea, but havn't you ever heard of "fish tape"? It's what you use to push into the conduit and tie wires to to pull the in. I think I'm going to have plenty of room in my conduits, also, so pushing the fish tape in should be plenty easy even with cables already in the conduit.

I know what you're saying though, sometimes I leave an extra wire in a conduit to use as a pulling wire for future use. But in those cases, I know ahead of time the pull is going to be a bitch, with no extra room to spare. In the case of my studio I know I'll have room to spare.

Later expansion is also an impossibility since I'm already taking up my entire basement.

Later,
-Brian
 
Sure- fish tape is great, when there's enough room for it to go through without hanging up, and when there are few corners to go around or you're using real commercial-spec conduit, and when everything is perfect.

Problem is: I've never yet seen an installation of mine where everything _is_ perfect. I fish through my pulling ropes right at the start, and then the tape goes back in the toolbox: everything else, I pull. I don't push *anything* once there's more than one or two wires in a conduit. It takes way too long, and pisses me off way too much: especially in your average studio rig, where you have lots of wire of differing sizes run through lots of parallel too-small conduit runs that each have about 4 90deg turns in them, half of which don't have accessible pulling covers (like when people use PVC pipe instead of real conduit).

I hate pulling wires. But not as much as I hate pushing a fish tape through a nearly-finished rig! And it never fails that you need one more run of _something_, just after all the drywall mud has dried...
 
Don't forget to use lots of gorilla snot (hand soap) when pulling cables :)

(Seriously, it can help, but use it as a last resort... made the difference for me between getting the cables I needed to an projector or not getting them, but... yuck...)

Always run more conduit then you think you'll need. If you are using PVC, it is relatively cheap... if you are making cable troughs, same thing. If you end the job with a conduit completely unused, that is GREAT - it means when you want to run the latest and greatest spec wire, you can easily do it.

Oh, and while you are at it, why not consider running some MIDI cables between live room and control room. The local studio here I'm familiar with didn't do that and had a few weird situations where it would have come in handy (they ended up spreading midi gear all over the control room instead)

Wire cheap. Glass cheap. Conduit cheap. Re-opening walls - expensive.

r
 
I don't speak from studio experience, only through eletrician's experience. I've run plenty a wires through conduit, and through the years I've learned exactly how to run the conduit in a way that lends to easy wire pulling. That, combined with pulling gel, makes me pretty confident that I'll have no problem, whatever route I take.

Most likely I will pull in an extra wire, or something (a rope if you will) for future pulling.

ah ah ah ah stayin' alive stayin' alive... This thread just doesn't want to die does it?
 
That's where my wiring experience is from too, Brian - well, data networking anyways.

I have to say - I HATE pulling cable... glad I don't do that anymore. Well, much (I spent most of yesterday afternoon pulling cable, but that was the first time in months)
 
OldGrover said:
That's where my wiring experience is from too, Brian - well, data networking anyways.

I have to say - I HATE pulling cable... glad I don't do that anymore. Well, much (I spent most of yesterday afternoon pulling cable, but that was the first time in months)
Hey,
Any of you guys ever pulled a mandrill?
Hehehe. When I was about 19 I did it for months, clearing the lines in a brand new neighborhood that was based around a golf course.
Those kids in that neighborhood put EVERYTHING in the pipes, and man, I tore my hands all to hell doing that. On one run (several hundred yards), I thought I had a BOWLING BALL in there! Hahaha
It was a pair of softdrink bottles that were turned "neck to neck", and they would sort of "lock together" and bind up in the pipe.

Also, if you can't use fishtape, get an Air Compressor, and take a plastic bag and a roll of string.
Tie the bag to the string, and then blow it through the conduit.
You'll need to take a Rag and sort of stuff up the end that you're blowing through, so that you can build up pressure to push the bag.
We always just used duct tape, and a plastic peanut butter can lid with a hole for the string, and a hole for the airline's nozzle.

Tim
 
skippy said:
But remember: XLRs do not have switching contacts for normalling, so any patching will require a cable.

Pix of my current (vastly simplified!) setup below.
Skippy you have taught me a ton in following this thread. I read about this stuff a few times but never understood it. Now I am darn close but need a little help with xlr to mic pre's setup concerning phantom power etc etc.
I have one mic with three mic pres and a couple of compressors.

How do I have the same flexibility with xlr that I now have with TRS. ?

specifically how can i use the one cable coming from my mic to have the option to plug into either of my three mic pre's and then from that can I safely route those outputs to my trs patchbay for compression etc etc.

please help ... anyone ...
 
Back
Top