MCI JH-416 Story...

  • Thread starter Thread starter sweetbeats
  • Start date Start date
I've seen pictures of the original patch bays for this mixer and they all had really nice labels so you know what the heck was what! Your ADC units don't have this. Do you have a plan in place to label them up in a similar fashion to the originals?

And I don't envy you the task of rewiring all of that! Looks like a nightmare to complete. :(

Cheers! :)
 
You wanna share those pictures?

All my ADC patchbays have the same label blocks which are just an extruded bar screwed to the face of the module with a "U" shaped clear plastic strip that snaps over the bar. Your label gets sandwiched in between. It won't be much trouble to print up labels on any old computer with a word processor. It'll take a little hit and miss to get the proper font size and kerning but then I can just print and slice off the strips with my wife's paper slicer she uses for crafting.

I have to be honest...I'm really looking forward to getting into the MCI desk. As soon as the Tascam M-__ is sold that will open up a large rolling table in the shop for me to set the JH-416 frame which is presently next to that table on its side. I can start cleaning it up. I've grown weary of working on the M-__ console and my Soundtracs console and a big part of it is I don't feel the same kinship with those mixers. I've always enjoyed working on my Ampex MM-1000. I've been *discouraged* at times, and needed to take a *break* at times, but I just really like that machine and I feel the same way about the MCI desk...lots of room to work, lots of big chunky components...its just cool. A lot of the work I've done lately with these projects has been a push to get stuff working to get it sold or get things cleaned up or whatever; to get anything that *isn't* the 3M M-64, Ampex MM-1000 or MCI JH-416 buttoned up and out of the way in some fashion so I can just relax and enjoy picking away at one or more of those three projects.

I know what I'm in for with the MCI desk, but I think it will be worth it.
 
That's a hoot, Ghost...snagged from my own archives, BUT...that's not my model mixer. A technicality...its a JH-400 mixer but is either a JH-428 or 428B. Similar patchfield configuration though. The field pictured is 336 points...more points due to the higher number of input/output modules on the 428. I'll have the same number of jacks equivalent to the 416's 24 modules but I'll squeeze it into 4U rather than 6U.
 
That's a hoot, Ghost...snagged from my own archives, BUT...that's not my model mixer. A technicality...its a JH-400 mixer but is either a JH-428 or 428B. Similar patchfield configuration though. The field pictured is 336 points...more points due to the higher number of input/output modules on the 428. I'll have the same number of jacks equivalent to the 416's 24 modules but I'll squeeze it into 4U rather than 6U.

Gotcha! ;)

But the point of my bringing any of this up was just to shed some light of the idea of the ADC units perhaps not having as much available real estate on their face plate to accommodate as spacious a labeling scheme. If you've got a viable plan to deal with that, that's cool and good to hear. :)

Cheers! :)

ps; take a peek in the wallpaper thread when you get a chance! :D
 
That's the downside to the patchfield in the JH-400 mixers afaic...there's no way around it. They're all pretty dense. The helpful thing is that the first 3 modules on the stock patchfield are normalled sets for line out/tape in, tape out/line in, inserts, etc., and those are just 1~24 in accordance with modules 1~24, so not much labeling is required. That will be a bit different with mine. I'll have to figger it out. There are a number of ways that I could configure the jack blocks anyway if it becomes a problem having them so dense because the jacks in the 72-point blocks are basically the standard 2 x 24 normalled block sets with the additional non-normalled (independent) 1 x 24 set. I have the normal 2 x 24 mounting blocks so I could always change the 72-point modules to 48-point normalled for the first three bays with my nice newish jack sets and then another 48-point non-normalled and finally a 72-point with the 48 normalled jacks and the 24 non-normalled. That would give me 264 points total which I bet would be plenty. I haven't mapped it out yet. The point is that with 5 mounting panels on the way, a blank module panel and an assortment of the jack blocks that fit the mounting panels, I can pretty much set this thing up the way I want to set it up and tweak it to meet the connection requirements and labeling real-estate needs. In the end, clearly, connection requirements will trump, and if that means I have to have a cheat-sheet to identify what's what then I'll do that, though I'll not be deviating far from the original MCI layout for the most part.

Now to go peek at the Wallpaper thread!
 
So, okay...I was thinking I could flexibly reconfigure the jack sets in these 72-point blocks, but, duh, we can all see that there is a single cast part that contacts the shell of each column of 3 jacks...so, so much for that. But it should STILL work out pretty nice even if there isn't a lot of room for labeling and I'll probably just keep a cheat-sheet handy, and, really, the layout is going to be so logical anyway...the buss outputs will be normalled to the tape machine inputs and right below that will be the non-normalled jacks connected to tie lines to the DAW inputs...that's the first module. Then the next module is the tape returns normalled to the tape machine outputs, and right below that the non-normalled jacks connected to the tie lines to the DAW outputs. Then below that will be an insert I/O module, and the send jacks are normalled to the return jacks and *right* below those will be a set of non-mormalled jacks connected to tie lines to processing gear. Lastly is the module with all the master section I/O and there is a host of outputs and inputs there that are normalled and below that a set of non-normalled extra tie line jacks available for...whatever. Makes sense to me...which...is...uh...sensible...to me.

ANYway...

I got the custom patchbay module faceplates back from Front Panel Express and boy am I pleased with them...my measurments were quite correct. They fit on the jack blocks like they were absolutely meant to be there, and they look nice. They did a nice job.

Here is what you pull out of the package when it comes...they spare no expense to make sure that the plates don't get scratched up:

IMG_3442_1_1.JPG


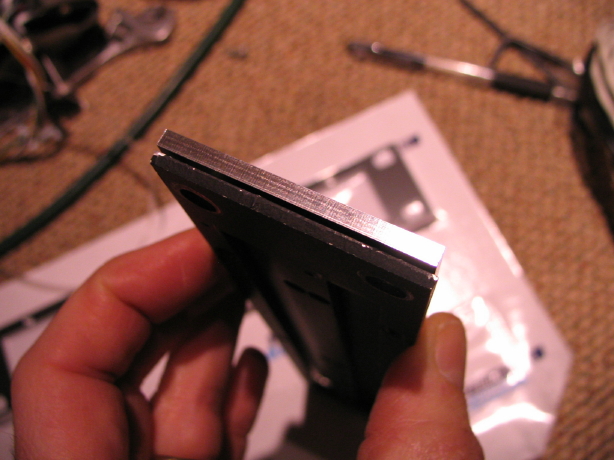
I got my plates a little thicker than stock. You can't hardly tell the difference from the front, and I figured for a few extra bucks it was worth the additional rigidity. Shiny edge is new plate, black edge is stock:

IMG_3447_6_1.JPG


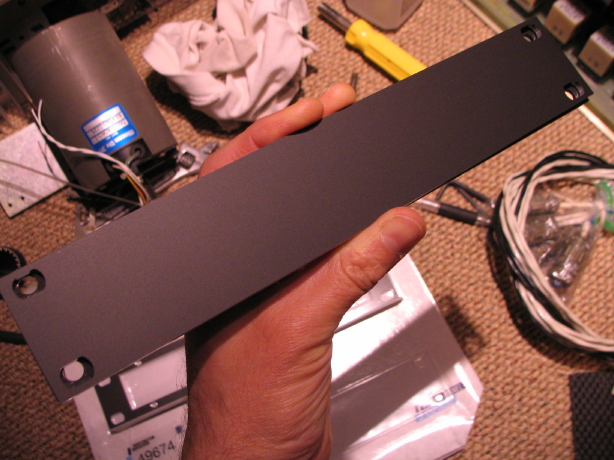
Here is the single blank plate I had made up and the stock plate is behind it...they are exactly the same size and the rack-mount holes are right smack where they ought to be:

IMG_3448_7_1.JPG


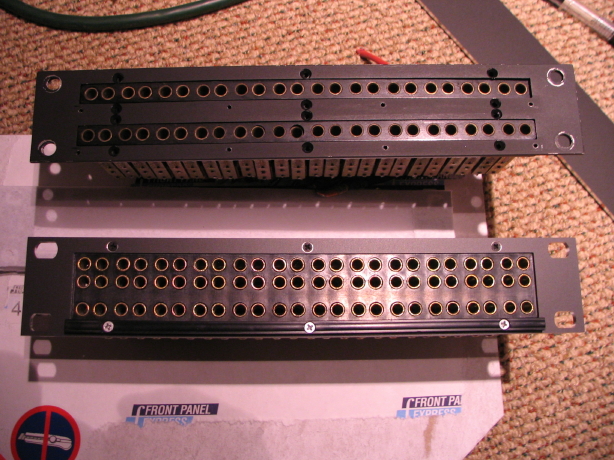
Here is a new plate mounted up to one of the jack blocks:

IMG_3453_10_1.JPG


And for comparison here is the stock module with the new one:

IMG_3452_9_1.JPG


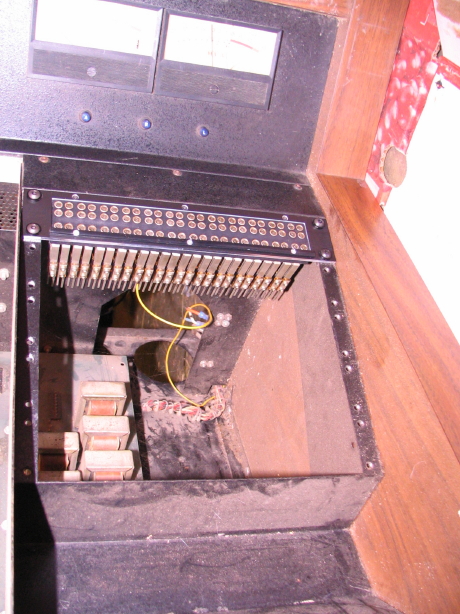
And who could resist doing a mock mounting of the new module in the (filthy) console frame? Not me.

IMG_3459_14_1.JPG


SO...

I can check "obtain missing patchbay modules" off the JH-416A project list. All I need now is a whole MESS of install wire...and a bunch of time, patience, and SOLDER!! I won't be getting to that phase anytime soon, but that's all that's left to resolve the nasty stock punchblocks, missing harnessing and missing patchbay modules.

ALSO...I now have a full set of (formerly) unobtanium JH-416A schematics which is an extreme plus for me.
 
Last edited:
I love my 428, exact same beast except for the lack of black overlay on the modules.. and 12 more input channels of course. Only use the input modules these days, but might get the whole thing back in mix mode one of these daze! My jh 16/24 still in the closet.. And an even more ancient jh 10 against the wall.. whew..That sucker was a piece of work.. but it DID work great in it's day.. AC transport etc..another project now..

Have you encountered the dreaded mix/monitor relay issue yet? I figured out a work around using off the shelf relays with some wierd pig tailing, but saved many hundreds of $ instead of buying old ones from Blevins..All of mine but a couple were shot, no amount of burnishing would keep them working for more than a few minutes.. These things sound great, and have HUGE headroom for modern DAW's if you need it.. Never used a 500, but much prefer the 400 series to the 600's.. primitive but right!

Mine had 5534's but I think they sound terrific, never did a head to head compare with the original op amps..

O and I would definitely go with the aftermarket Power One PSU's.. the originals are fairly bullet proof, but more expensive to repair than to replace, and the Power One's are certified for like crazy medical use etc.. Jeep was the man!
 
Hey thanks for posting!

I love my 428, exact same beast except for the lack of black overlay on the modules.. and 12 more input channels of course.

Actually there are quite a lot of differences between your 400 and my 400...your modules are much more like the 416B, but mine's an "A"...no channel mute function and different quad buss panning architecture...mid eq is boost only in stock trim on mine...no phase invert on mine either, or pad or lo-cut. But definitely more similarities than differences. And the 416's were 24 input/output frames...mine has all 24 modules so you're only up on my by FOUR modules!! :D

Have you encountered the dreaded mix/monitor relay issue yet? I figured out a work around using off the shelf relays with some wierd pig tailing...

I'm a long ways off from working through relay issues, but I'd LOVE to know more about what you did. My problem is exacerbated by the fact that my relays are sealed zetlers so even if I wanted to clean the contacts I'd have to bust 'em up to get to them. My plan is indeed to use a more standard off-the-shelf sealed relay, but I'd really like to see any pics or whatever you have of how you handled it. And ANY pictures of your desk for that matter. I think the 428A/440A desks are handsome looking pieces.

Do you know if the audio power rails on yours were globally scaled back in order to utilize the 5534's or were they modded at each module?
 
I had one of the input modules in hand and was reminded just how big the pcb is...found a scale reference for y'all. Here is an input module sitting on an Ampex 440 transport:

IMG_3488_1_1.JPG
 
Last edited:
Isn't it nice to have a big PCB with room to maneuver! :)


Imagine this but fully stuffed with electronics and four daughtercards attached, and you've got a 600 series module. Boy is your re-cap gonna be easy! ;)
 
Yeah...siiiiiiiimple, simple, simple.

Space efficient they are not, but easy and forgiving to work on.

Though the pcb's are smaller I can relate to your JH-600 experience a bit with my Tascam prototype console...6 cards per strip, 3 cards in 2 rows (making it a pita to deal with issues on either row). This is a pic of the card set for one input/output module:

IMG_0652_1_1.JPG


Blech! IIRC the JH-416A has 13 electrolytic caps per channel.
 
Last edited:
Yeah, now that's more familiar lol! Happily most of the 600's knobs are on the main PCB; removing the caps from the ones on the daughtercards is easy and no nuts to remove or anything. Looks like lots of knobs to deal with on the Tascam, and the wiring harnesses would drive me bonkers, there's something to be said about edge conns!


I'm glad to see you back in the 400, it's just too cool a console!
 
Yeah, on the tascam it helps that the main card with the edge connector on it (yes the modules ARE actually plugin type tho' its hard to tell with all the wiring there in the pic) is the only one with hard-wired harnessing. The rest of the cards interface that main card with mini Molex type connectors.

But still no comparison to the JH-416. Having so much room actually makes it easier to see what is connected to what compared to a dense cramped PCB.
 
I've nominated you for this years GFP award.(ie..Glutton for Punishment)

It comes with a two week, all expenses paid vacation on the bench at Foxcon


:D
 
HAHAHA!!

SWEET!!!

Do I have to bring my own iron or do they provide?

Ooooooo! Maybe I can snag a Foxconn ball-point pen and sticky-note pad while I'm there...i'm in!!!

:D
 
Do I have to bring my own iron or do they provide?
Iron? Hell, you'll get your very own... of the leg variety.. and a bamboo rug to sleep on...at the bench.


btw, this is Rick...over in Coos Bay. Enjoying the weather? Haven't seen a sunny day in 6 months. It's absolutely wonderful!!
 
I actually powered one of the four 24VDC supplies I got for this thing for the first time.

As you may recall, or as you may read in this thread, I got this MCI desk sans power supplies. It requires three separate bipolar supplies for the three power busses in the frame:

1. lamps
2. relays
3. audio

I tracked down one MCI supply that I believe is for a 400B desk (plan on using that for the lamp rail), and I found a good deal on four unipolar Power One 12A supplies that I'll wire back-to-back to make two 24VDC bipolar supplies, one for the relay buss and one for the audio buss.

Anyway, I got these things quite some time ago and never even powered one up. I needed an accessible 24VDC supply to run some experiments for a cooling fan array for my Ampex MM-1000 and one of the Power One modules was quite accessible.

Cleaned it up a little, modded a cable to connect it to building power, covered it all up and put on my ear protectors (in case something blew), and plugged it in.

No drama.

Connected my DMM to the output terminals, set it to DC and 'lo and behold its happily churning out 24.3VDC.

Set the DMM to AC volts to check for dirty power in the DC output:

WP_000450_1_1_1.jpg


That's 0.2mVAC. That's got to be the cleanest output from a regulated DC supply I've ever seen.

I'm excited for these things to power the MCI desk...lots of horsepower and its cleeeeeean.
 
Last edited:
Hi Sweetbeats: The audio voltage for the 416 & 428 consoles is +-22vdc. 24vdc on relay is correct. The 2001 opamps are Harris 911's, not the greatest but were OK for the time.

You ask: how do I know? I ran Console check out at the factory from early 72 to late fall 73; was also svc. mgr for Nashville MCI dealer 76 to early 78, when I opened up my own business.
 
Hey there thanks for posting!

Always excited to meet the acquaintance of those that were there!

I'm a member of the MCI forum as well so I've had the good fortune of interacting with Larry Lamoray...you likely know who he is.

With all due respect the audio and relay buss voltages are +/-24vdc and the lamp rail is +/-21vdc.

I appreciate your comments on the Harris opamps. By this time I'm pretty familiar with the details of the console including studying and comparing the opamps with all the "better" opamps available today. :)

I choose to look forward to how it will SOUND vs certain opamp specs...yes those specs do indeed drive certain aspects of performance and set certain limitations, but one thing is for certain: it will sound very different as compared to every other console I've owned or currently own. They are all transformerless opamp-based consoles with +/-15 or 17vdc audio rails, -10dBv internal operating level and all fashioned of nice little compact pots and traces and lots of caps etc., etc., etc.

By comparison the JH-416 is big and nasty with tons of PCB real estate with relatively large traces, mil spec pots, stepped eq controls, relatively few caps, tons of trafo iron, +4dBu operating level from beginning to end and replete with all the headroom that a 48 volt swing affords. I've had experience comparing today and yesterday with Tascam tape machines vs my Ampex MM-1000 and the audio electronics alone tell me I like this old stuff that was "good in its day" better than the more modern stuff. Being a hobbyist I have the luxury of not caring what others expect in the market.

So you would have been at MCI for the very beginning of the JH-416 eh? You remember anything about any 416's with discrete i/o modules?
 
Back
Top