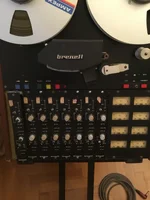
Brenell Mini 8 repair. Psu d sub cable pinout?

  • Thread starter Thread starter tedsorvino
  • Start date Start date
T

tedsorvino

New member
Hi everyone and best wishes for the new year.
I have a couple of questions regarding a pretty old British semi-pro reel 2 reel multitrack recorder (late 70s) the 8 track 1’’ model, Brenell Mini 8. At the moment I’m in the middle of repairing a unit.

I found in the allen & heath (parent company) technical database, an archive folder with some relevant documents and by following them I managed (nearly) to rebuild the long damaged - non existent power supply and oscillator unit. The company themselves couldn’t provide any more assistance since all their other documents are lost.

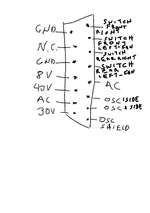
The problem is that my unit itself is powered by a 15 pin d sub connector coming from the external power supply unit. Some other similar units are powered by 2 different supplies (7+11pin I think???)
Unfortunatelly I find no pin diagram of the 15 multi-way connector and I can’t figure what pin carries what voltage etc. Finding the ground pins it’s quite easy. The ac motor lines seem not unmanageable to find but the 4 dc lines are quite hard.
By studying every page notes, it seems that the pinout diagram is in a schematics page that it’s not contained in that folder, so it’s impossible to make the new pin connections on the connector cable correctly and I can’t risk anything since it’s power related.

Also a photo (or list) of all the resistors and trim pots (values), of that original psu would really help, since there are a couple of resistors and a trim pot missing from the schematics. I find information and parts “here and there” but never had the chance to study the original psu a bit.

The documents that are included in the Allen & heath folder are very helpful but there are certain parts that are missing and some parts are just different. Apparently there was a mk1 and a mk2 models. The unit I’m repairing is a black Mk1.

So I would ask you if any fellow member could possibly help me with relevant info or direct me to somebody who may have such technical information (already contacted mr Jones who has plenty on hus dedicated vintage Brenell consumer reel site - no reply yet).

Thanks in advance
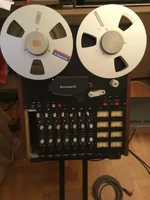
 
New psu built. Machine mostly fixed. It’s nearly ready. 85%. Just a control relay was needing serious cleaning and still it occasionally gives a couple of transport response headaches. But I know where to look at if it eventually becomes annoying.and track problems on the outer edge track. Track 1. Not transport geometry or heads. Problems with the actual track pcb. It will be fixed eventually.
Not a dead end since it’s an absolutely modular machine. Fixed and calibrated. Here it is.
 

Attachments

  • IMG_2133.webp
    IMG_2133.webp
    472.5 KB · Views: 282
  • IMG_2134.webp
    IMG_2134.webp
    409.8 KB · Views: 281
That's a nice machine - it was aimed at small studios, so was really professional users, just the smaller studios. Way too expensive for the likes of me and others with 4 tracks! The barrier between 4 and 8 track was massive. Glad you got it sorted. I take it the wiring got sorted somehow.
 
That's a nice machine - it was aimed at small studios, so was really professional users, just the smaller studios. Way too expensive for the likes of me and others with 4 tracks! The barrier between 4 and 8 track was massive. Glad you got it sorted. I take it the wiring got sorted somehow.
Actually it took a lot of research, work, advice from the very few who knew a lot of things about the machine (actually even people who were involved in its building) and I’ve got quite a lot of experience on building audio stuff and own some good tools. I guess I ‘ve learnt quite a lot about the machine so far.
I don’t think the cost of the complete machine repair and psu rebuild for someone not technical enough would be visible.
And as I said there are a couple of things remaining but music making and recording is a priority and it’s a good tool for that purpose.
Yes it can become better, like every other piece of studio equipment, with exotic components, superbly precise extraordinary calibration….but not for me.
 
Sure.
Here it is. Pin 5 and 2 are bridged. By having ac on pin 2 (+5) and 4 the front panel switch switches on the capstan motor and the spool motors (when the auto stop arm is activated). If the ac goes to pin 1 (+5) and 3 the motors are activated immediately by just switching on the machine (like bypassing the front panel switch).
I personally do the 2-4 connection and I keep the front panel switch always on.
In the original design the psu had no switch, It was straight mains ac to to the front panel switch.
 

Attachments

  • IMG_1871.webp
    IMG_1871.webp
    58.9 KB · Views: 262
Hey @tedsorvino this is kind of a long shot to ask, but a few months ago I too just got an 8 track Brenell taken over here to America from England and I have no idea what's wrong with it... I went to plug it in and the motors just spun out of control till I turned it off, still didn't stop after pressing the buttons. It's been sitting here for a bit and I would really appreciate your help since you are actually familiar with the machine : ) I honestly thought there were tape guys in the country that worked on Brenells before, but turns out it wasn't a huge success in the U.S. Sorry for the real late thread reply hahah
 
Hi MYQ.
I always like to be of help. I’m living in Athens Greece - EU so I haven’t got the slightest idea what goes on techs wise in the USA. In Canada there is a well known tech and I ‘m sure there are some really capable techs in the states too. Dare to say some of the best.
The best Brenell tech I know is based in the UK and a really excellent one is based in Hungary.
I’m very familiar with the machine, since I spent about 4 months working on and around it and I built the psu nearly from scratch. The European techs (especially the Hungarian one) really helped me with the non existent psu - that guy has designed a pcb for it.

The psu cable pinout is the one I provided here. 100% tested and working. If you can follow the voltages on ALL pins and they are all measuring fine then 100% your initial problems lie on the logic board. Before saying anything else, check the connector from the machine to that board. I are the contacts perfectly aligned? Is it clean and well fastened.

Another advice I give you if you can replace ALL Ics from it with modern equivalents (very cheap and easy to find- under 20 dollars for all) and of course replace All capacitors from the same board. Yes with a tester you can test them all. But they are simple hex inverters-flip flops etc. on sockets, so no need to care much about saving any.

Then check the continuity-resistance across the same board. Not greatly built pcb and traces can be damaged or making good contact. Follow the schematic as much as possible.

Then all the relays must be perfectly clean. They are contacts. They are expensive. They are all the same relays. Don’t replace them if they are not burnt (test them with 12v I think - maybe 24v- the schematic clarifies that). They are pretty rare and expensive. Nothing modern similar can be found as far as i know.

As soon as
the power supply,
the connector,
the unit on off switch,
the transport switches,
the speed switch
the motors are cleaned and working,
The brakes are good and firm,
the machine is very clean
and the logic board is ready and tested
and the connector for it is good and well fitted on the correct traces (I repeat please please take a very serious look at the contacts between the connector and the logic pcb. A wrong contact few millimetres to the left or right and many bad things can happen- seriously bad).
Then the motors will start behaving fine. The brakes are not fantastic but they work.

After fixing all that then you’re good to start checking the preamp pcbs. As long as you have a good one then you compare all 7 others to that.

And then you have to deal with heads and the whole transport geometry itself. A very very different story. Relapping all 3 heads must be high on your list. And if you don’t know how to align yourself forget about it.
It’s a difficult machine to do that on your own as a first machine. Especially without an mrl tape you have no chance. And believe me I’m a big lo fi - diy fan, into any kind of quick and dirty approaches to music.

Best of luck and hopefully you want break the bank to fix it. A very nice machine on what it does after it’s fixed.
 
Man you're a godsend for this ... I am in talks now with someone who's local to where I live, and although he hasn't worked on the Brenell before I definitely have to show him all the details that you've given me. It doesn't seem like replacing all the components is the tough part of the process, but more-so screwed up heads being the worst thing that could happen. I want to start using it before the end of the year and get it all working but not sure if that's cutting it too close, especially since you said the whole restoration took you a few months. The crazy thing is I bought it solely for the sake of the 1-inch width since it outdoes the performance of all the 1/2 inch and 1/4 inch "consumer machines" while still having that same compact size - there is definitely a returning interest in analog from artists like me who were born long after that time lol. I still like to ask engineers if they ever miss the era of tape and pretty much all of them I've asked said 'no not really!' I guess it's quite an expensive hobby.. I'm off to sleep but will pm a message as soon as I get up
 
Unfortunatelly I find no pin diagram of the 15 multi-way connector and I can’t figure what pin carries what voltage etc. Finding the ground pins it’s quite easy. The ac motor lines seem not unmanageable to find but the 4 dc lines are quite hard.
I don't know if you've solved this yet.
My suggestion for DC supplies is to buzz out the pins to likely looking big capacitors, then you can suss the voltage rating for the caps, and the polarity of the connections.
 
Another thing to keep in mind is not to replace any screw around the transport and heads with anything else of different measurements-profille. They are British screws and hard to find. But without them you’re in deep trouble and then you will have to deal with a very careful machinist. I learnt that the very hard way.
Time is pretty relative. If somebody works on it 10-15 hours a day with all the parts needed at hand and a great knowledge of all things reel machine repair then it may be a matter of few days.
For belts you only need good quality o rings. For logic modern stuff will. The preamps don’t need anything exotic. Simple electrolytics. The relays have to be taken with extra care. The same for the switches and connectors.
The psu is very important and then heads and transport will be as good as the person that take care of them.
I use the machine in a hybrid environment mainly for last step mixing (sending 8 mixed stems to it and then take them back for final balance - gain staging is the a-z for that job). It adds something that can’t be added with any plug in, or even the tape quality of seperate tracks when I was using my Revox 2 track machine for that.
Separate channels pass from tape sounds separate. The multitrack one gives that whole - glued sound. And 1 inch is better than 1/3. I guess 8 tracks 2 inch ampex or studer must be better. And yes…the Brenell transport is not flawless or great, but it works. My opinion is that it works better at an angle on a stand than vertical. Vertical feels like it makes the motors a bit erratic. Horizontal is great for transport work but I feel like it gives the old-connectors a bit of a hard time.
Speak soon.
 

Similar threads

Back
Top