Tascam 48-OB Story...

Okay...so my "next steps" were:
  • Finish the mechanical alignment including checking the pinch roller, brake and tape tensions.
  • Mount it in my refurbished CS-607 rack (which will be nice for tilting it and accessing the trimmers/channel cards)
  • Align/calibrate the electronics

Last night I did a number of things related to that first bulleted item:

  • Adjusted the brake linkages according to the manual. They were quite a bit off and the brake tensions were maladjusted to compensate.
  • Adjusted the brake tensions and in doing so noticed a kinked brake band, but it was due to a tweaked hanger...needle-nose pliers fixed that. The brake tensions were really high.
  • Adjusted the pinch roller tension...same thing...it was really high. BTW, I use a set of homemade spring guages to do the above, and there are several places in the manual for the above adjustments were things have to be adjusted to specific gaps (i.e. 1mm, 3mm). Get a set of metric automotive feeler guages for this. Works well.
  • I got into checking the tension arm alignment too...mind you this is not in the manual. They are fixed and there are no adjustments, but a minor knock can tweak them as has been discussed in the past by cjacek. I have a basic aluminum carpenters square to check them. I'll try and put up a short video of how I do it, but based on what I saw of the design last night when I took a closer look, the arm itself is sturdy enough, but the spindle that the arm mounts on is small in diameter. This is where the weak point is IMO. Look at the picture below. Part #20 is the tension arm, part #19 is the post or spindle on which it mounts. Fine for the rigors of guiding tape, but in a scenario where the deck is being moved and the tension arm becomes gets in between a solid object and the momentum of that 90lb. chunk and its going to be tweaked. So I checked each tension arm on two axis, and held the roller and tweaked by hand in a way that recognized what needed to give...the spindle. Again, I'll try to put something up later. The supply-side was fine, but the takeup side was pointing downhill significantly, and slightly toward the headstack. The downhill orientation explains why I had to adjust the takeup reel table height way out. Both tension arms are now square.
  • Did some more adjusting of the tape path since I read up on that section in the manual. Its been awhile...plus the straightening of the takeup tension arm changed things. ;)

Next up is the tape tension...this is nerve-wracking for me after what I went through with my 58 for those of you that have read that. Never could get the tensions right, so I'm hoping this time will be different with the 48. I'll be double-checking what I did last night first, but then its on to the tensions and then after that the tape-to-head contact...then azimuth. Its so refreshing approaching these tasks without having the multitude of questions. Granted it was a 2+ year process to get to this point of not having a slew of questions every step of the way, but this is the reward. ;)
 

Attachments

  • 48 Tension Arm.jpg
    48 Tension Arm.jpg
    56.1 KB · Views: 347
Ah, thanks for that Cory.

So you don't think it's the shaft which sticks out from tension arm but rather the part indicated by #19?

Which parts do you think I should be looking at then, as replacement, to cover all possibilities? Do I get both #'s 19 & 20, as indicated in the diagram?

It's actually interesting that you've found one of the tension arms slightly off, on your deck [was it the left side]? Mine was way off on the left so I just pulled it back to even it out. Several other users of the 48-OB model reported this type of issue, bent tension arms.

I wonder if someone can machine this same part but more rigid. If it is #19, that which is the weak link, it shouldn't be that difficult, I suppose.

----
 
So you don't think it's the shaft which sticks out from tension arm but rather the part indicated by #19?

I don't really know for sure, but that is my intuition at this point, especially with deflection toward the top or bottom of the deck.

I spent some time just gently pushing on one of the tension arms and watching the behavior, and the union at the tension arm spindle where it pivots just seems relatively flimsy, whereas the post to which the actual roller mounts is much thicker at the base, and the guage of steel that was used for the tension arm and it being a "U" channel with diagonal bracing makes for a pretty rigid piece. Plus, the tension arm actually floats on the pivot spindle. It rides on a coil compression spring and the floating helps to facilitate better tape handling in spite of minor descepancies in the tape path adjustment (i.e. it won't fight with the tape if it is not spot-on adjustment-wise), but that means it has play in it and the post is held to the tension arm backing plate with a relatively small diameter screw...that's it, and the arm is held to that with the adjustment screw which is a 3mm screw...so that's why I'm banking on that being the weak link at this point. I plan on completely dismantling a tension arm on my parts 48 this weekend and really getting to the bottom of it.

Which parts do you think I should be looking at then, as replacement, to cover all possibilities? Do I get both #'s 19 & 20, as indicated in the diagram?

#20 is actually a well-engineered piece IMHO. Not as impressive as the likes of the 58, but well up to task. #19 and its associated bits is where I'd be looking at modding/retrofitting/reinforcing, but why?

Like I said, I'm going to open one up all the way and have a look, but AFAIK mine are now square, and I'm certain that my takeup-side arm got tweaked as a result of some trauma. I think the reel table on that side of the deck was shoved in when I got it and the reel adapter was busted. With proper care and attention I don't imagine its going to go out again y'know? Unless I open it up and go "my goodness but that would be an easy/simple upgrade!", I'm not planning on changing anything that's there.

It's actually interesting that you've found one of the tension arms slightly off, on your deck [was it the left side]?

No, it was the right side.

I wonder if someone can machine this same part but more rigid. If it is #19, that which is the weak link, it shouldn't be that difficult, I suppose.

I think to really do it right you'd need to oversize the hole in the tension arm so that the spindle can be oversized and mount to the backing plate with a bigger screw.

I'll update after I've torn one apart and had a thorough look, and I'll also put up that video of how I manhandled mine to straighten it out and my methodology to check its alignment.
 
Cory, after this whole thing, your journey over the last 2 years, you're going to not only own a nice, analogue based studio but also will be able to service just about any tape recorder / mixer out-there!! I admire you for sticking it out, as I know how difficult it has been.. but I, for one, have seen, first hand, how immensely beneficial all of this has been, not only for you but for the potential hundreds if not thousands who read your most invaluable posts.

Keep it coming, man but for goodness sake, don't burn yourself out. It's OK to say 'NO' once in a while, ya know....;)

---
 
Aw, Daniel, I can't help it...like the tension arm thing...it is an issue y'know? At least until we know its not...I want to be assured myself that it is a non-issue or how to resolve it if it is an issue. I know there are others out there that can benefit, plus its pretty easy to check it out when you've got a parts deck accessible...its already opened up, and mechanical stuff is in my comfort-zone anyway. ;):)

Its been a ride, but the "ride" has taken me to this place that I had barely even dreamed of and there is music that needs to be shared.

Here is a song performed by a very good friend. It was a spontaneous 1-take tracking session wrought with glitches of humble reality (including the moths that kept trying to get through the visqueen :D). He was over sharing his latest and I convinced him to come out to the "studio". It was tracked digitally, but even with careful application of my gear and the mastering process I can still hear the converters squaring off the edge of his vocal chords...hard to explain but I've experimented with this and it is one of those digitalisms that jumps out to my ears and it is not the conversion to the 128kbit mp3 :eek::mad::( either...I can hear it on the 24bit 88.2kHz raw tracks as well...my analog experiments totally avoid this and I can't wait to capture audio to analog in the future.

Those Sergeant Pepper multitrack files...They've been digitized, compressed, packetized, reassembled, and decoded by the time I'm playing back on my computer, and yes I know they were tracked on 1" 4-track right? But they still sounds unbelievable. I like the Beatles, but I'm not a devoted fan or anything. I respect their place in shaping music history. Tremendous influence and for good reason, but those tracks sound just incredible. Analog, baby!
 
Now that's how its supposed to go!

Yeah...I'm anal retentive...somewhat obsessive compulsive...detail-oriented to the point that often I can't see the forest for the trees, but...tonight I experienced things the way they are supposed to go, unlike some of my experiences with my 58 (i.e. tape tension adjustments).

First off I double-checked the brake adjustments and tensions. Everything looked good except the brake tension was a bit high on the takeup side, probably related to the reel table adjusting I did after tweaking the tweaked tension arm.

Then I double-checked the pinch roller tension and it is still spot-on.

Then I double-checked that the tension arms were straight. Takeup side was a little off still so I resolved that.

Before I did anything else, I wanted to get the 48 mounted in the CS-607 rack, so I got some of the skin put back on, pulled the rack frame off the CS-607, laid it on the floor, and laid the 48 in the middle of it. Once I got the rack screws in I sequestered my #1 gear-mover-helper, my wife. ;) We got it up on the stand no problem. That CS-607 is a dream. So sturdy and well-designed. I really appreciate having it after dealing with the cheapy rack in which the invalid 58 presently slumbers.

Anyway, got it in the stand, loaded tape and proceeded with the tension adjustments.

Unlike the manual dictates, I started by checking that the voltage output of the tension sensors was correct. Here again the design engineering of the 48 is so cool. I removed two screws to partially slide the control PCB out to access the test points, and Tascam thought well on the 48 to put notches in the frame by the tips of the tension arms so there is no guess-work regarding the proper arm position when checking the voltages. Both arms were off in the center (horizontal) position, so I adjusted the tension sensors slightly, checked the voltage range, and then proceeded to check the tensions.

Started by double-checking the calibration of my Tentelometer...needed a little tweaking. The first step is to check the tension arm positions in repro mode, and both were off by quite a bit, but they responded so crisply to the trimmer adjustments. Sweet. Then I checked the tape tension in repro. Supply side was right on, but the takeup side was just below tolerance, so I repositioned the spring and viola! No problem...spot on...then I checked the tensions in FFWD and REW. Both were about half of spec, but again the trimmers brought about the right setting and quickly too. Very responsive.

I double-checked all the tensions again and the were, and are, spot-on. How refreshing!!!

That was the way it is supposed to go!

Tape packs look better.

The 48 runs relaxed and confident; the way it handles tape. Crisp but no drama. All business. ;)

The client that waited and waited for the 58 to be ready is coming tomorrow night to track scratch tracks. They'll go to digital, but drum, bass and guitar overdubs will be (if things keep progressing like this) tracked to the 48, and I plan on keeping the track count to 3 for drums, and one each for guitar so there is room to get the whole project on eight tracks.

This has been nothing less than refreshing.

Next up:

  • Fine tune the tape path alignment
  • check tape to head contact
  • check azimuth
  • begin electronic alignment
I did shoot some video of the tension arm issue, and I'll get links up to those in the next day.

;)

Tascam%2048%20in%20CS-607.JPG
 
Last edited:
48 Tension Arm Problem Videos

Here are a couple videos related to the Tascam 48 bent tension arms issue.

The first one goes over the tension arm parts and where I have concluded the weak point is. The bottom line is that I believe it is the actual tension arm member after all (part #20 in the exploded view a few posts back). The post to which the arm mounts is quite sturdy, as is the post to which the roller mounts, but the area of the arm to which the roller spindle/post attaches is just an 'L' channel and not a 'U' channel...you can see it in the video. My conclusion regarding mods to address this is that it would be dangerous to do so. If you were to mod the tension arm you are going to throw off the balance of the arm. The optical sensor is designed around the arm as is with the counter weight. I think it will effect the response of the tension system if you go messing with it. That's just my opinion, and when you add that to the easy "bend it back" fix it doesn't make sense to me to go to all the trouble. I don't believe it is through normal use that the arms become tweaked...I think it is secondary to trauma, so once you get your rollers square I think you are good to go as long as the deck remains well-cared for and you don't go beating on it.

Here are the videos:

YouTube

YouTube
 
Last edited:
I'm getting a tear in my eye... a tear of JOY this time! Well done Cory!!:D:D

I just viewed the videos in addition to your post and I'm amazed at the detail contained therein. You're awesome man!!:D You really went all out finding the cause and fix for that tension arm issue and such... Yeah, I completely agree as to your findings.

Also, awesome how the deck rests in that rack. I love it!

Keep us posted on your client's recording date and the sounds you get from the 48.

Guys, you gotta give Cory some more rep points as I'm out currently..:o

---
 
Awesome Cory! Interested in an Otari 4-track project? LOL just kidding man, I am waffling on my next step with the deck, but you keep inspiring me!


AK
 
Did a number of things last night.

My reel table on the left side is not flat...the rubber is higher on one side of the table than the other so the tape reel height fluctuates, which doesn't work when you are using precision reels because there is a lot less wiggle room flange to flange. I tried all of my spare tables (2 spares from the parts deck), and they all have this problem. I put the one that was the best on the deck. It was good enough, but I may order a new one at some point or find some other way to true them up.

Got out the super-bright LED flashlight, magnifying glass and screwdriver to do some fine adjusting on the tape path. I must say, that as long as the tension arms are straight, the 48 is a dream to adjust the tape path. The procedure in the manual is important to read because it includes some fine points that you wouldn't normally think to do and are critical to the process. Another advert to have/read/know the manual for your equipment...respect the deck.

The first thing you are supposed to is to pull the top cap off the left tape guide, and then adjust the left tension arm height so the tape just touches the base of the guide. I wouldn't think to pull the cap off. Then you set the right tension arm height so that the tape rides in the middle of the counter roller. Mind you that, because I'm using 6-screw precision reels on both sides, fairly minor adjustments in the tension arm height requires some adjustment in the reel-table height so I was kinda going back and forth on that. Now here's the trick...after I did the procedure in the manual (and it is difficult to determine if the tape is riding on the center of the counter roller...I was able to get the best view looking up from underneath at the bottom of the counter roller), the tape was still a little squirrely in the impedance roller and even on the counter roller when shuttling between FFWD and REW and REW and PLAY. The manual states to keep adjusting the right tension arm height if the "tape movement is inconsistent" during FFWD or REW modes; to adjust the right tension arm height until there is no fluctuation in movement. I didn't quite understand how to apply this information at first because, contextually, the test in the manual is referring to the tape behavior at the counter roller, but I was dealing with some of this behavior on the impedance roller as well and thinking I couldn't touch that now that the left side tension arm was set to the left guide. Well, here's how I ended up fine-adjusting my tape path (and remember to keep the reel table heights adjusted as you go if necessary in order to keep tape from rubbing on any reel flanges, and make sure your tension arms are square to the dress panel when checked side-to-side and up and down):

  1. Load yer tape and shuttle the transport to get about the same amount of tape on each reel.
  2. Execute the procedure in the manual, page 7-18 section 'B' "Tape Path", and reinstall the left tape guide cap.
  3. Shuttle back and forth between FFWD and REW (like, you don't need to let it spool up to speed...lettin' it go in REW for about 3 seconds maybe, and then hit FFWD, 3 seconds hit REW, etc...) and watch the tape on the impedance roller...is it sitting still (no fluctuation in tape height from the top to the bottom of the roller)? If it is sitting still, apply the procedure below to the counter roller and right tension arm (basically, skip to step 9 which applies the procedure written in steps 3 ~ 8). If it is not sitting still (if the tape height is fluctuating), put yer tweaker on the left tension arm height adjustment screw found just beneath the impedance roller and...
  4. Turn the screw a 1/4 turn either counter-clockwise or clockwise (I haven't gone to the trouble to try and figure out which direction does what relative to the behavior of the tape, so just turn the screw already, huh?).
  5. Tape behavior better? Worse? Can't tell?
  6. If it is better, but not quite there yet, turn the screw another 1/4 turn in the same direction.
  7. If it is worse, turn the screw 1/2 turn in the opposite direction
  8. If you can't tell, keep going in 1/4 turn increments in the same direction until you can tell what effect your tweaking is having.
  9. Keep doing the above steps until you can't tell if the tape height is fluctuating on the impedance roller, and keep in mind that when you do make adjustments to the tension arms, it is a good idea to shuttle the transport back and forth enough to get a few full wraps of tape on each reel at the new height adjustment so that when you check to see how the tape is behaving with the new tension arm position, the tape entering the tape path is consistent with the new tension arm position.
  10. Once the tape is sitting still on the impedance roller height-wise when shuttling the transport, move over to the right side and do the same thing but relative to the right tension arm and the counter roller
  11. Once the tape is sitting still height-wise when shuttling the transport on the counter-roller, go back and check to make sure the tape is still sitting still on the impedance roller...if it isn't, do the procedure again to get it sitting right (the tension arm height should be pretty close now though).
  12. Didja have to tweaker in the last step? If so, go back and double-check the tape behavior on the counter roller and adjust the tension arm height to stop the fluctuation.
  13. Keep going back and forth between the two rollers working the adjustments while shuttling the transport until the tape sits still on both rollers.
  14. Now, try going from REW to PLAY...it should look good on both rollers.
  15. Do the transport shuttle thingy (FFWD to REW, REW to PLAY and so on) and look at the tape behavior in the tape guides. It should also look good, like if you couldn't see the tape traveling you would have no idea that the tape is moving at all.
  16. Now pull the cap off the left tape guide, getcher bright flashlight and magnifying glass (we're going to double-check that the tape is just touching the bottom of the tape guide...it should be). Turn the adjustment screw for the left tension arm in 1/4-turn increments counter-clockwise. You should see the tape ride up off the bottom of the left tape guide within 1/4 ~ 1/2 a turn IMO.
  17. Assuming all looks good, put the left tension arm height adjustment screw back where it was at the beginning of the last step by turning it clockwise the same amount you turned it counter-clockwise.
  18. Reinstall the left tape guide cap.
  19. One last survey...tape height still doesn't fluctuate on either the impedance or counter rollers when shuttling from FFWD to REW and REW to PLAY? Does the tape also still sit still/look good in the tape guides when shuttling? No tape rubbing on reels?
  20. If yer like me, now you're going to do step 19 with the tape at the beginning and the end of the reel. :rolleyes:

Okay. If your transport and tape path pass muster on the above procedure, your tape packs should look wonderful, and your transport should be quiet and smooth. PHEW! :D

It seems like a lot, but really, once you get the rhythm of the shuttling and looking back and forth between the rollers and moving the tweaker as you go (pausing the rhythm to adjust those reel tables of course), it really doesn't take that long. With the procedure now under my belt I suppose it might take me 10 minutes...it got faster as I went.


PLEASE PM ME IF ANY OF THE ABOVE INSTRUCTIONS ARE CONFUSING OR YOU HAVE SOMETHING TO ADD TO THEM AND I WILL EDIT THE POST

Comparing the 48 and the 58, the 58 kind of does itself in with the 3 tape guides and frankly that's what makes it so much more complicated because on the 58 the tape is supposed to touch the bottom of guides 1 and 3, and the top of guide 2. What this means is that the guides are wider than the tape, and rather than having two fixed points that are the same as tape width (ala 48), you have the 3 points and the wider path which leaves the possibility of the tape being cockeyed slightly in the path...when you juxtapose that with the fact that the tension arms are above and inboard of the guides on the 58 (i.e. the tape wraps about 150 degrees or so around the counter roller and the pinch roller...no impedance roller), adjustments in the tension arm height take longer to realize visually in the tape path...its easier to be like a dog chasing its own tail.

Now, the interesting thing is that when I loaded tape last night and put the deck into EDIT the reels started crawling. :eek: So I also double-checked the tension sensor voltages (the left was off by about 0.2VDC...no big deal but I adjusted it anyway), and the right arm was a little low in repro so I tweakered that. Then when I went to re-check the tensions the takeup side was just out of spec (too high)...I'm chalking it up to fuzz or dust in the sensor or the deck just waking up these past few days after years of rest...not worried about it. It being too high does indeed explain the crawling. I adjusted it back down end everything is working just great. This is the payoff, guys. It took me maybe 10 minutes to do all the above stuff relaitve to the crawling issue, including removing covers to access test points and spring adjustments and such. This is not to boast. I'm just pleased that the struggles and learning over the past couple years has paid off in this way, and again it is almost entirely a credit to this forum as well as some gracious souls over at the Tascam Analog Only forum who are also active here (hilltop studios and pianodano). If you are new to the forum and are reading this, check out my "Tascam 58-OB Story..." for an prime example of the kind of support, helps and community that can be found here...some amazing analog-o-philes in that thread...read it to see who they are. Whether it be real technical support and teaching, just plain fun jawing and sharing, or a kind word of encouragment when you make a really big mistake, I think this is a realatively rare online community.

Anyway, 'nuf touchy-feely... :o

Since I replaced the left reel table and adjusted both table heights I wanted to double check the brake tensions so I did that. They were pretty much "there", but the left side was a little low.

I reinstalled all the panels except for the top dress panel...come to think of it I'm not sure why I left that off at this point. It was late. :rolleyes:

Since the next steps involve audio (i.e. head contact, azimuth, and then electronics calibration), it was time to move the 48 into the control room which meant the 58 had to move out. :( Sort of symbolic. I do still intend to get it going...it still has its place for sure, but things are going so well with the 48 at this point and I'm hopeful, again, that it can be ready to be used on my current project, so I'm prioritizing.

I moved the ES-50 syncronizer to the 48 rack, and I'm cleaning up/checking out the two DX-4D's I've acquired (anybody need any dbx 150X's???) that will join it...I'm still waiting to receive some cabling I've purchased through a number of sources...I've decided to buy pre-made snakes instead of building them. Too much time at this point to build all the cables and there would be a lot of them since I'm using the DX-4D's and interfacing the 48 and M-520 with patch bays. :eek: But the 48 is now sitting next to the M-520 in control room looking eager to get calibrated and start capturing sounds. I started running snakes last night to get the M-520 connected to the studio snake and the digital rig. More on that in my "Tascam M-520 Story..." thread.

It'll be a few days before I continue on the 48, but my hope is that the electronics calibration goes like the rest of the process has gone so far. I know the amp card for track 7 doesn't pass audio, at least that's the way it was about a year ago when I last checked so we'll see. But, again, thanks to this community, I'm not the least bit concerned about that hurdle. I'll deal with it when I get there, and it shall succumb. ;) The 48 wants to work.

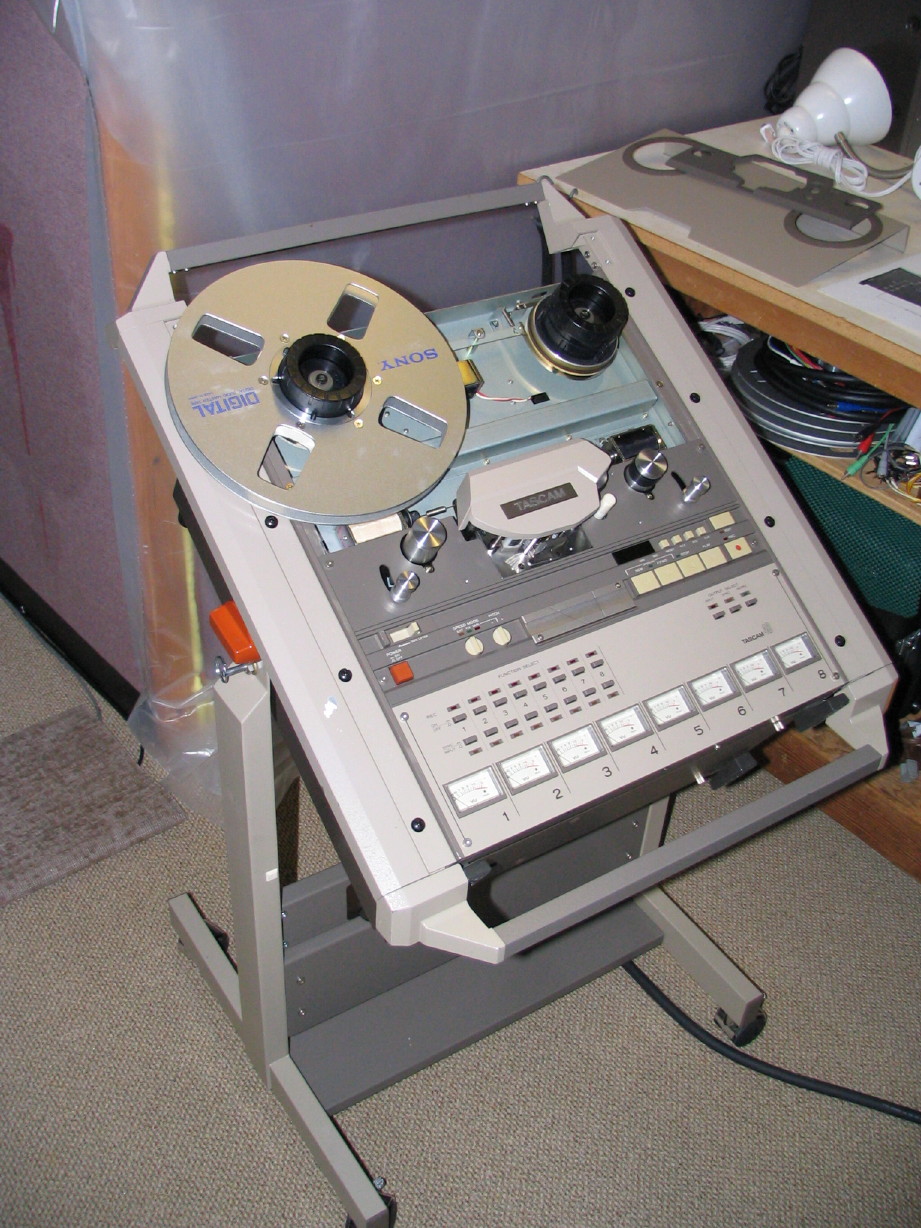
OH! Another comment on the CS-607...If you do your own maintenance and calibration, don't get a cheapy rack like this:

41qHK3HMZCL.jpg

Folks, it is just not worth it. Whether you access your cal trimmers from the front or bottom or whatever, at some point you're going to need to access stuff in the back and it is a significant pain to try and do work at the back of the deck with it tilted back toward you at 45 degrees. Tascam did a great job on the design of the CS-607 rack. Its sits lower and is narrower than the rack pictured above, is much sturdier and better built and easier to adjust...during my activities last night it was such a treat to be able to easily lay the deck flat, set it upright, set my tensions with the deck at 30 degrees...I can't say enough about it after all the work on the 58 in one of those cheap stands. Yes you do loose 7U of rack space down below...it isn't worth it...get another rack for that stuff if you need it. So if you've got a tabletop style recorder-reproducer, think about it. If I knew what I know now, I'd have willingly paid $200 for a CS-607. I paid $100 for mine (missing the stopper/locking pin assemblies and casters) and it was worth every penny. ;)
 
Last edited:
Cory will be taking service orders soon for the restoration of your TASCAM tape deck and mixer! He'll not only bring it up to spec but will do so like an old time technician would a precision Swiss watch! Your deck will be indistinguishable from a new factory unit! His $75 / hour cost is a bargain considering the kind of detail oriented service you'll be getting and he won't stop till he's happy and that says a lot!!
:D:D:D;););)

BTW, Cory, what's the name of your recording studio? Do you have a website? Can anyone 'off the street' come in to get recorded?

--
 
Hey cory, as a fellow 48 owner I thank you for the great effort and detail that you're documenting in this thread. I may not comment often but I'm definitely reading intently. Thanks again.
 
Yikes, Daniel, you are far too kind. :) Its a lot of fun Y'know, and I'm excited its coming together and I like to share that, especially if it helps others, but I sincerely thank you for the kudos! :D

I do have a website and a registered business entity but the website is so skeletal...last priority. My day job and family take priority so studio work is moonlighting at best, but someday I hope to develop the website. Because it is such a moonlight venture clients are hand selected, and my studio work is a ministry...I don't usually charge and If I do it is to cover any hard expenses, so I focus on clientele that are focused on ministry as well.

Rufur...awesome...thank you and I'm glad to be connecting with other 48 owners! ;)
 
While the 48 waits for me to get to a stopping point with the M-___ mixer long enough to get the cabling and cross-connects with the M-520 into place (and since I'm on a parts painting spree) I painted a 1U blank panel to cover that spot at the top of the 48 in the rack. Couldn't find an off-the-shelf color that matches the CS-607 rack so I went with the closest I could get locally.

New%20Beige%20Blank%20Panel.JPG
 
Last edited:
FWIW, it matches great! Don't fret!

Beatz,... an unrelated question,...

Since the front panel of the 48 looks very similar to the MS-16, and I see you have removed the cover that's above the reel tables,... it looks very compartmentalized. So, how/where is the access to the reel table mounting screws that would be involved in reel table height?

The reason I ask, is that 2 years ago I bought an MS-16 with mixer, table, patch bay wiring harnesses, tapes, MRL and the whole works. The guy spooled up the MRL tape for me onsite and e'thing worked fine. When lifting this heavy beast by myself out of my back driver's side door, I fumbled a bit and the unit gave a little slide (not dropped outright) and I think bumped one of the reel holders. Anyway, long story short, after >2 years in idle sitting "preproduction" mode, I've hooked it up and spooled up the tape. Each reel on the takeup side would rub a little eccentrically on the front of the tape edge. The first reel I thought was just a little bent, so I bent it further and tho it cured the problem, was realistically probably all bent to hell. When I spooled up the next reel and it rubbed like the first one, I eyeballed it out to see the tape was not evenly spooling to the middle of the reel. Just a slightly larger gap on the "bottom" and no gap & rubbing on the "top". It's then I decided to endeavor to touch up the reel table height, maybe 1/32". However, I removed the very top panel of the MS-16,... nothing but the transformer and heat sinks in there. I tried to remove the left side panel, but was restricted because of being rack mounted. It occurred to me to remove the front panel to have a look-see, but was prohibitive, based on me not wanting to get into a total teardown of the unit for limited gains. I have the manual on the shelf, but was not referencing it currently.

That fixit project nearly came to a standstill, but I ingeniously cut a cardboard shim in the shape of a NAB hub ring, then adjusted it a bit (vy-thin 3-layer corrugated cardboard), until with only 2 layers and a bit of compression,... fit like a charm and shimmed the takeup reel to the perfect height! That's Dave:1, Machine:0, at least for now.

Without further description,... the shim works perfectly enough that I have considered putting one on my original 38 that needs the 1/32" reel table height touch up. However, I'm familiar with reel table height on the 38, just too lazy. I was not able to gain access in the chassis of the MS-16 enough to scope out the reel table height. I still suspect the access is gained thru removing the side panel, but being as it's rack mounted and all hooked up for action, is prohibitive to "go-in-deep" at this point. Plus, the shim is perfect for now.

Am I looking at un-racking this heavy beast just to do the reel height adjusment? It's minor and only needs a touch-up, but is significant enough in it's small way to rub on each reel without the shim.

You got this post by way of showing that 48 with it's front panel removed. The MS-16 front panel looks nearly identical in that section. I see from the 48 photo under the panel there appears to be no access or clearance for the reel height adjusmtent. Just reel-table, brakes and base metal plate. I'd assume there's access from the side panel to these screws. Any thoughts or comeback on that idea?

Sorry, that's not a proper question. But, FYI, I've often resorted to the "take e'thing off til you get what you want" method of disassembly. Sometimes that's not expedient, or even a good idea. Plus, the MS-16 chassis weighs a lot and is already conveniently rack mounted,... something I don't want to undo just for minor stuff like that. I guess I should just RTM? In a word, I'm lazy.:eek:;)

If ya have any advice it will be well taken, but the shim works great for now. It's just not an elegant solution, is it?:eek::eek:;)

Thanx for ur time to read this post.
 
Last edited:
Not a problem, Dave.

Hopefully Ethan will see this and weigh in, but the top dress panel on the 48 comes off easy...two screws on the top and two screws on the face. It'll help to take the reel adapters off because slides up a little and then tips down.

Once off there are two holes in the top rail, one above each motor shaft. That's to get the screwdriver or allen wrench to the hub screws...two for each reel table. If it is the same on the MS-16 it'll help you to have a flashlight and to be able to get around the back of the deck since it's in a fixed position angle-wise (as opposed to being in an adjustable rack) so's you can look through the hole to see if you have a screw lined up for the tool.

It is a relatively painless procedure and requires lttle tear-down on the 48...same deal on the 58 as well so I would wager that it is likely quite similar on the MS-16.

Let me know if I can help in any other way or clarify...I'd put some pics up to aide the description but can't right now. hopefully the written description suffices. Pics can come later if needed.

Get those shims outa there! :D

We used to do the same thing with our Sony deck, but we used cottage cheese container lids cut into 'O' shapes. :o
 
Last edited:
I seam to recall that I had mine out of the roll around rack and took off the covers to adjust the reel height. It has been some time and was just an afterthought adjustment so it did not stick.

Easy to do just like the other tascams once you have it out and opened up.

--Ethan
 
its passing audio

I spoke earlier about channel 7 not passing audio (VU meter showing nothing), but it actually is passing audio...the meter is dead. I got it to dance around while sending a 1kHz tone to it and tapping on the meter face, then nothing...I'll start by reseating the channel cards and doing the DeoxIT thing on the contacts...then I'll try a different card from my parts deck, and if that doesn't work then I'll pull a meter from the parts deck.

Anyway, it is all hooked up to the M-520...soon I will calibrate. ;)
 
Coming Soon to Craigslist...

The gear hath taken over. A recent compulsive purchase left me in a state of "What am I doing??!"...my self-control with gear acquisitions had clearly diminished to an unacceptable level. Thanks to a good friend here on the forum and my patient (but concerned) wife, I'm now on an enjoyable path of simplification, and the 48, among other pieces, is being put out to pasture.

Tough decision for me since the 48 has, so far, been much less problematic a deck than the 58, and my 58's future is as of yet unknown. It is in pieces and when recapping is done I don't know what other bugaboos I'll find in there...hard to get rid of a fully functioning low-hours deck when your replacement is of unknown status. BUT...I figure with the parts deck for the 58 I'll be able to get it going eventually. Plus I feel something of a connection with the 58, it is a more professional-grade deck than the 48 though the distinguishing factors are subtle, and I have no remotes for the 48 but I have the RC-51 full-function remote and RC-50 basic remote for the 58, so there is a more usable package there for what I need. So off goes the 48.

SO...of course I don't want to put it out to pasture without being properly setup because that tells me what condition it is in electronically, and hence helps me set a value for the sale.

I finally repaired the bad VU meter. I re-read the past posts and I don't know why I kept referring to the channel 7 VU meter, because it has always been channel 4. Anyway, it turned out to be a bad meter. Here's what I did so you too can maybe troubleshoot a bad meter in your deck (and, again, for a refresher the meter wasn't responding but the deck was passing audio...tap on the meter face and the needle would sometimes spaz around):

  1. Swapped channel cards to see if it was a meter amplifier problem...the meter amplifiers are on the channel cards in a deck like this (or most decks like this I assume). When I swapped amp cards 3 and 4 meter #4 was still dead, so it wasn't an amp card problem...actually relieved about that.
  2. So then I wanted to check and see if it was a problem with the cabling. The amp cards plug into the motherboard and then there are cables that plug into the motherboard that go to the meters in pairs. I was able to swap the connectors for the meter 1-2 pair and the meter 3-4 pair. [note that first I studied the schematic to make sure that all that was being swapped was stuff pertinent to the meters, like the meter drive circuit and the peak LED in this case...you don't want to just go switchin' things around. After looking at the schematic and wiring diagrams I knew it was safe to swap those connectors. Anyway, did that and it was meter #4 still dead...since meters 1&2 were working fine before the swap I knew that if it was a cabling problem, moving that cable over to 3&4 should make both 3&4 work and since there was no change in the symptoms I knew it couldn't be cabling.
  3. Another note: always follow manufacturer directions about powering stuff down in between etc., etc., etc. In order to access the plugs for the cabling and such I had to remove amp cards and you NEVER do that without powering the deck down, and I tend to go an extra step and disconnect the deck from the mains and then switch it on for a bit to let the capacitors drain.
  4. Another thing to note is that I did skip a step in my diagnosing...yes there could be a cracked trace or cold solder-joing on the motherboard, but I had gently probed and prodded the motherboard with the deck powered up and couldn't get meter #4 to spaz out so I didn't think that was the issue. If I couldn't get the problem isolated and resolved elsewhere, I'd have come back to the motherboard and taken a closer look...I had a hunch what the problem was so I was moving somewhat quickly through the steps in the diagnostic process.
  5. Anyway, amp card A-OK, cabling A-OK...cold solder-joint on the meter PCB? Inspected and nothing looked suspicious, but I heated all the joints with a soldering iron to make sure. No good. Meter #4 still dead.
  6. So I pulled the trump card and pulled the meter array out of my parts deck, hooked it up to the good 48 to make sure the meters were working, picked one that was easier to get to (like #8...the rest of them are buried in a thick colorful wire loom which makes for fun desoldering :rolleyes:), removed it, removed the non-functioning meter from the good deck, put the replacement in and everything works ducky-fine now. BTW, yes I suppose I could have skipped the first steps by just plugging in the meter array from the parts deck right off and seen that everything up to the meter was working, but the parts deck was tucked away and I was hoping it wasn't the meter since it took a little bit to get the deck out and pull the array out of it. I was actually confident that the problem was a loose solder joint on the meter input wiring. So much for that hunch.

So with all meters/lights/functions working it was time to calibrate...most the way through that but it is going well. General comments:

  • I can't believe how hung up I was doing this process with my 58...measuring everything with the true RMS DMM (Fluke 83) meter...sheesh...Its not perfect. Get your input levels set accurately and then claibrate your meters accurately and then just use the meters on the deck for the rest. I'd say in most cases that's good 'nuff, though I did do spot checks with the DMM along the way just to make sure.
  • It sure makes things easier having an analog mixer nearby, especially one with an onboard oscillator if you don't have a stand-alone oscillator, which I don't. I use a PC-based tone generator if I need something other than the 40Hz/1kHz/10kHz that the oscillator on the M-520 produces, which I need to check/calibrate the record eq.

And that's where I'm at...I've done everything but had to stop last night at the record eq check. Azimuth check and adjust, input and repro calibration is done as well as biasing for 456/SM911 and record electronics except for the aforementioned eq. I set it for "0" at 250nwb/m. This calibration thing isn't really that bad when you have the right equipment at hand...its not some big mystery, though it is a process to get to that point. Look at my 58-OB Story thread and you'll see...it takes time to learn but once you do it all falls into place and I guess the encouragement to anybody thinking about stepping into it is to trust that the clouds do clear. ;)

So some time this weekend I'll check the record eq, and for fun check the erase ratio. Never done that before because I never got to that point in the calibration process with my 58 before my mishap with the amp card (cooking some circuitry in the process). :)
 
NEVER do that without powering the deck down, and I tend to go an extra step and disconnect the deck from the mains and then switch it on for a bit to let the capacitors drain.

Cory, can you expand on this a little more? So when do the capacitors actually drain and when do they retain their charge? Interesting.

That 48-OB is gonna be a super deal for someone, especially that it's low use and has been cared for and serviced with utmost care.:)
 
Back
Top