Orthophonic High Fidelity

  • Thread starter Thread starter whyseye
  • Start date Start date
whyseye

whyseye

Well-known member
A little bit off-topic, but I've got my dad's old RCA Victor Orthophonic High Fidelity radio receiver and turntable, in a really handsome cherrywood cabinet, that I'd like to restore to working condition.

Years ago, I had rewired my new receiver through its speakers, and I remember the sound being fairly rich and full. The radio receiver also worked the last time I fired it up. The turntable probably needs a new belt, if it's belt-driven, and a new stylus. I have an assortment of NOS and used replacement tubes as well, and know that they have not been handled with bare fingers.

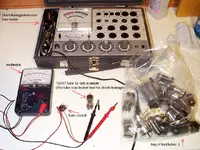
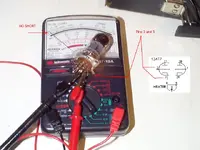
Here are the first of what may be many questions - how best to clean may years' accumlation of dust from the tubes that are currently in place; what if any dangers there may be in powering it up after a long period of disuse; best ways of testing/troubleshooting any tube problems with no on-hand testing equipment; anything else that I'm ignorant to know that I should be asking?
 
So maybe I shoulda put this in the newbies section? :o

It's not tape, but it is analog.....anybody with a link to something like "Tubes for Dummies", or something?
 
For cleaning tubes of exterior dust, I can't why a slightly dampened cloth couldn't be used to wipe away the dust or even soaking them in a warm water solution with some dish detergent in there to de-grease and then afterward drying them with paper towels. They are, after all in a vacuum and water tight as such.

As for testing the tubes, I guess seeking out an older, established TV repair shop would be best for finding a place that has a tube tester machine.

Once a tube is plugged in and the unit turned on, there should be a visible heater glow in the tube which is used to bias the tube much like a tape is warmed up by a bias current so if there's no glow, the tube is shot, unless they all don't glow and then it might be a bad rectifier in the power supply.

Older components like electrolytic capacitors can dry up and not hold a charge after many years of non-use so some of those might need replacement.

Of course, you could always just plug everything in and see what happens and go from there?

Good luck with the project! :)

Got a picture of this radio you could post?

Cheers! :)
 
I'll take some pics...it's really a beautiful piece.... :cool:
....I have trouble resizing stuff small enough to post here, but I'll give it a try later today....

...thanks for the info....I didn't want to mess anything up out of ignorance... :o
 
I don't think you could really mess it up too much by just turning it on for a short period of time just to see if it's working unless you see smoke billowing out of it! :D In which case, be ready to pull the plug on it!

Most older gear that ran with tubes could have a tube fail and basically the unit would just stop working without unduly damaging the rest of it.

Cheers! :)
 
start by using a hand vac or similar... a dry paintbrush helps to loosen the crap... FWIW the glow is NOT for bias... the electrons are literally boiled off the plates by heating them.... thats what the first # on a tube is...the required heating voltage... i wouldnt expect it to work but if what i expect were to be the case you wouldnt hurt too much... most likely the filter caps are roached... they dry out overtime especially with no use... i'ld probably pullthe output tubes before powering it up just to be safe...
 
whyseye said:
what if any dangers there may be in powering it up after a long period of disuse
the right way is to power it up through variable transformer (variac) , slowly brinning up the voltage from 10vac to 110 VAC, bringing up 10 volts or so per hour and then keep checking on the "situation". Also checking on the "situation" would not make much sense if the one who is checking have no idea what and how deal and why with what ever may be in present. However if nothing visually bad happens, then one can assume that everything is ok, which is nothing more than an assumption.
If something does smell or look bad, then turn it off and do not turn it on again. Bring it to a service shop (if there's one around).

the "wrong" way is to just plug it in, flip the switch "ON" and see what happen. Actaully chances are that nothing bad will happen.
If it works - it works. If it does not, then don't do anything.
I've said "don't do anything" simply because you've said this:

whyseye said:
, best ways of testing/troubleshooting any tube problems with no on-hand testing equipment...?
which brings me to an assumption and a consequential conclusion that you better don't try to "test/troubleshoot" these units on your own. Just don't open the thing, period. That is my conclusion based on the very fact that you've asked a such question.
whyseye said:
anything else that I'm ignorant to know that I should be asking?
YES! Things like: "How dangerous is trying to "fix" a high voltage tube equipment without any basic knowledge and with no on-hand testing equipment"?"
The answer is: "VERY dangerous. You may die."
 
if

If you have a variac you can power on slowly. This will typically catch bad caps....and other ready to short parts. (I love it when caps plasma out)

But a slow ramp up in voltage does not test for inrush current. Thus sooner or later you will need to do a "smoke test".

With it unplugged turn it on (volume at minimum) and then at a reasonable distance plug it in ready to pull the plug. Look and listen and smell for anything out of the usual.

Tubes (I grew up on tubes) can glow cherry red and still work afterwards. (THis is bad of course ans they may never sound the same again after glowing the plate).

What do you have to lose....but time and a bigger repair job :D
 
Am getting the sense that this will not be a DIY project....I appreciate the input from everyone....thank you all....
 
Just how old is this unit and how many years has it been sitting unused?

I appreciate the super safe methods explained here with using variable power supply devices to slowly wake this beast from the dead but all of is not 100% necessary if it has only been a reasonably short time since it last worked.

Cheers! :)
 
It's probably from about 1955 or 56.....it had been used regularly til perhaps the early 80s, and not since then...so it'd probably be best to err on the side of caution...I'll still post pics if I can do it some justice...
 
whyseye, I was watching your galleries. That is pretty cool art works! :cool: :D
Since you are a fine artist, this may be sort of relevant or for any other reason, so here are couple notes on the subject of cleaning tubes.
First of all I personally would not wash them like dishes :D , not to say that you would damage tubes that way, but rather because of it is not necessary. You can clean tubes rather well simply with piece of cloth, use a bit of water, I use windex all the time for all sorts of cleaning. BUT!!!!!, here is a little issue specifically with tubes - the writings on the glass (tube type, brand, made by, some manufacturing code or what ever may be there). These writings are really easy to come off - and I mean REALLY. You can even wipe it off in a one wipe of the finger or even simply by touching it. What ever ink that is (or say was) (also vary from tube to tube), but sometimes it's really like a chalk powder on the glass.
So, if the markings on the tubes are important, then you'd have to really spend some time to do fine-art-like cleaning work. :D
Here's how I do it now after some "try-this-and-screw-up(s)":
Let's say the tube is heavyly dusted (which commonly has most dust either on top or on one side of it, and the dust, due to heat, also may get somewhat "melted into a rather solid and harder to come off substence"). In the worse situation the most of dust stuff is located right in the area where the markings are, sometimes covering the text heavyly so you can't even see it.
So, the first thing I'd do - I use dry piece of soft cloth and wipe VERY gently all the dust I can without applying any pressure. Sort of using cloth like a wiping brush. Then I keep doing it with applying a bit more pressure. When the writings (markings) become visable (or say - acceptably clean), then I stop. You can keep wiping more but every next move may remove the text. It is not that bad in most cases, as long as you do not apply any moisture. As I've said, even a bit sweat from the finger may be enough to wipe the marking text off in a single move.
Now, after the "dry cleaning" procedure I sometimes do some "wet cleaning". Sometimes dry cleaning does all the work, but sometimes not. So I would normally use a bit of windex (this can be just water) , soak a piece of cloth and wipe all the areas where there's no text. The top of the tube always gets shiny as new, but sides are tougher. So I would use q-tip carefullly wipings the areas around the text.
The last thing, I often do is cleaning the pins with q-tip soaked in alcohol or in GAIG DeoxIT D5 (that's an optional, of course, but cleaning contacts is a good idea, same goes to tube's sockets, btw)
*********
Now, you may say, that saving markings on the tubes has no meaning. That is true in respect to tubes' functionality, but in today's reality the actual fanctionalyty of a tube is not exactly the main factor that makes a specific tube what "it is" or to be more specific - what people make of it ;) :p , not to mention the people who live in their own "reality", I mean, people who would spend an hour of their life face-to-face with a tube armed with a q-tip :D

/respects
 
The tube types should also be printed on the chassis or board next to each tube socket, and back then, schematics of the entire simple circuit were often pasted to the inside of the box.

I didn't work with tubes much, but I think it's safe to say there are two main failure modes for tubes. One is that the insulation between the heater and the cathode would break down and spontaneously cause a short. You should be able to measure for this with a common multimeter, without having to heat up the tube and apply high voltages. The other is that the emisivity of the cathode declines slowly over the many hours of operation. If the unit has been sitting unused in a garage for decades, I don't think the emisivity would be any worse now than it was the last time the unit was used.
 
Wil816 said:
The tube types should also be printed on the chassis or board next to each tube socket, and back then, schematics of the entire simple circuit were often pasted to the inside of the box.

I didn't work with tubes much, but I think it's safe to say there are two main failure modes for tubes. One is that the insulation between the heater and the cathode would break down and spontaneously cause a short. You should be able to measure for this with a common multimeter, without having to heat up the tube and apply high voltages. The other is that the emisivity of the cathode declines slowly over the many hours of operation. If the unit has been sitting unused in a garage for decades, I don't think the emisivity would be any worse now than it was the last time the unit was used.


Lets not forget the loss of vacuum. The geter should look silver somewhere on the inside of the glass. If it is white then air has gotten in....
 
Lets not forget the loss of vacuum. The geter should look silver somewhere on the inside of the glass. If it is white then air has gotten in....
I haven't heard of loss of vacuum. The silvering is from the the internal elements essentially being distilled onto the inside of the glass. It happens with light bulbs as well. If air get in though, the glowing parts (at least the ends of the heater filament) will burn and smoke.
 
Wow - great comprehensive info, gang!
A lot of education here....and I'm learning.....slowly....
...and I know that a little knowledge is a dangerous thing, but I'm banking the info....
 
Wil816 said:
...the insulation between the heater and the cathode would break down and spontaneously cause a short. You should be able to measure for this with a common multimeter, without having to heat up the tube and apply high voltages.
I am no expert, but have some miserable yet personal experience with testing tubes. So, I may be mistaken. :o
So, as I know the shorts occur and thus are being suspected (become a subject of testing) not between the heater and other tube's elements, but between cathode and grid(s) and in some special cases between specific elements in cases of "freaky tubes" :D
Now, here's the problem with test using just a multimeter - such test may not (and I'd think most likely will not) detect short or leakage between cathode and grid in a "cold tube".
I am going to get some photos and post here to demonstrate what I'm blah-blahing here about. It's not that hard to do for me - actually easier than writing about this crap, plus - seeing is believing :)
Give me few mins. I'll be back.
***********
whyseye, btw, here's safety practices topic: http://www.diyaudio.com/forums/showthread.php?threadid=30172 , take time going through it. I've posted this link few times before, and I guess will do it again in the future. I maybe over-paranoid over this issue, but it's a good pranoia :D
 
ok,
here's what I have for demonstration.
I've picked out of bad tubes collection bag :D a popular 12AT7 tube that was tested bad - shorts between both cathodes and grids. I am going to use a multimeter first and then I am going to test the tube for shorts (leakage) on a basic emission tube tester.
Let's see what happens.
 

Attachments

  • tube_short_test_set.webp
    tube_short_test_set.webp
    42.1 KB · Views: 69
Here's multimeter "cold test" between pins 2 (grid) and 3 (cathode) of the tube. Set multimeter for resistance x1K. Result - infinite resistance - no short. OK. :cool:
 

Attachments

  • tube_short_test_1.webp
    tube_short_test_1.webp
    32.6 KB · Views: 71
Back
Top