Track Rat
Just Your Average Sized Member
Looks very cool sir. I love to build my own. By the way if any one wants rack rails and is in the St. Louis area I have LOTS. Six footers.
") lol... sorry
lol... sorry  anyways yeah I'm gonna build some of them for myself some time ....lol
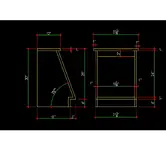
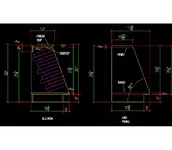
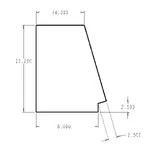
Heres a starter. Side and front elevations. Just guessing but it'll work.Wanna send me the blueprints so I can make one, too?
If you want sections, let me know ") BTW, the panels are 3/4" thick, I guessed at the corner trim being an inch. Ir wraps around the panels edges.
BTW, the panels are 3/4" thick, I guessed at the corner trim being an inch. Ir wraps around the panels edges.Scale? They ARE scaled. The dimensions are true. Lay out the sides just as the dimensions shown. The spacers at the base and the top fit BETWEEN the end panels. The top overhangs front and ends. You can use butt joints, rabit joints, dados, or what have you., Fasten with nails, screws, glue or whatever you have and what ever you want it to turn out like. The trim can be substituded with iron on wood tape. It comes in a roll. Or use your imagination. Even "T" mouldings, hardwood of another color, or aluminum extrusions..or paint. Hell, you don't even have to use hardwood ply. Use MDF and paint the MOFO.Shall I just scale your drawings?
The IMPORTANT thing is the INSIDE WIDTH dimension. Rack mount equipment is 19". Make your case 19 1/8". That gives you a 1/16th on each end for clearance. Or make it tight, but some equipment is a hair oversize sometimes. Anyway, I just guessed at the dimensions of HIS case. These will work for most gear. If you have DEEP equipment, such as AMPS or such, simply add a couple of inches to the DEPTH dimensions. Good luck. If you have any questions, don't hesitate to ask. (I'm just a little taller and a little deeper) The only suggestion I would make is concerning the lip at the front that is 4" from the bottom. On mine I made that lip perpendicular to the slanted face so as to allow the rack equipment to continue all the way down to that bottom corner instead of having to clear the horizontal member. Just a suggestion. mattimus said:i love the rack... im building one too... im gonna be in 'construction/wiring' mode for about a month soon enoigh.. and thats just cuttinga hole for a window and wire the place up.
hows the behringer v-amp pro? i want to grab one and was wondering if its any good?
im mostly using its s/pdif outs to send to my soon to be purchased m-audio project mix I/O for ghost tracking guitars
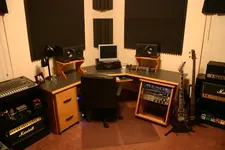
andydeedpoll said:i'm quite liking the funky little speaker stands you've got there too!
did you build those yourself too?
Andy