MXL 2006 mod

  • Thread starter Thread starter Blue Jinn
  • Start date Start date
Blue Jinn

Blue Jinn

Rider of the ARPocalypse
OK,

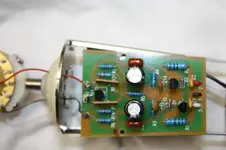
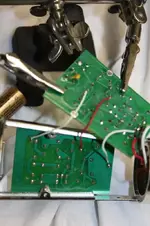
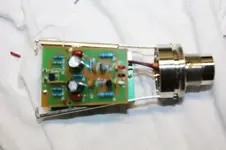
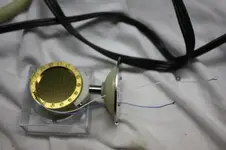
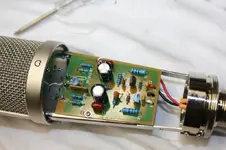
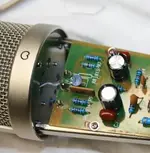
Starting another mod thread for the masses. I know, it's all been done before. However, I'm taking a slightly different approach and swapping capsule and instead of upgrading the coupling cap --eliminating it. Otherwise, the rest of the caps in teh circuit look fairly decent. I have one recording of before (just me talking) I'm going to get some voice and acoustic guitar recorded for some "before" and then I'll mod it. I'm still waiting on capsule mounts.
 
Do a few other recordings of some sample stuff that won't vary from recording to recording.
And the rattling of a bunch of keys are a good before and after test as well.

Are you to do a picture demonstration of the process too?
 
@moresound -- keys, hadn't thought of that. Old trick for trying out a tape deck... Thanks and yes, I intend to take some before and after pix too. This is an easy mod only a few changes. It is just taking so damn long to get teh mounts....


@joeycapucino -- pm'd you back.
 
Do a few other recordings of some sample stuff that won't vary from recording to recording.
And the rattling of a bunch of keys are a good before and after test as well.

Can you explain (or expand on) this please and the tape deck thing too. I've never heard of it
thanks.

Ps Blue are you under the same name on the mic mod yahoo group?
 
I've read about making a test recording w/ some rattling keys a kind of brute force broad band noise when demo'ing a prospective purchase. and yes, my handle is the same on various internet forums...
 
Last edited:
Can you explain (or expand on) this please and the tape deck thing too. I've never heard of it
thanks.

Ps Blue are you under the same name on the mic mod yahoo group?


Do you mean Micbuilders?
 
Finished the mod. I need to mp3'ze some samples, and download the pictures. Basically, swapped teh stock 32mm K67 style capsule for a C12 clone capsule from my group buy. I eliminated the coupling capacitor and connected the capsule + lead directly to the FET, and connected the polarizing circuit to the backplate of the capsule. The coupling cap is usually recommended for upgrade on these, but it isn't necessary with a unidirectional capsule. Some of the before recordings wound up mangled some how, so I'll have to loop some of it. This is an easy mod. I used the stock mount and just drilled the holes a bit larger to fit the new capsule. Also had to file the head basket rim a bit to get it to fit over the new capsule. Sadly, I destroyed one of the 1gig resistors whilst desoldering. (Had to swap irons too...)

But the mod is eliminate one cap and one resistor, change capsules, and reroute the capsule wiring.
 
Can't wait till you post up those samples and photos!
 
OK, hopefully the powers that be have fixed the uploader First pic is the unmodified circuit board. The next shows the capacitor that is removed (C13) (Some mods replace this one, I chose to remove it and directly connect the capsule to the FET) Also, the white wire on toward the top of the boards connects the polarizing voltage. I simply jumpered that to the backplate wire on the new capsule. That is the blue wire (backplate) to the white, and the white is removed from the front side circuit board. It remains connected to the backside (dc-dc board) or more precisely, you want the backplate to connect to the junction of C12 and R12. I posted a copy of Zapnsparks genchinamod.pdf in another thread. The component labels are different on that schematic. There is also a MXL990/MCA SP1 schematic I posted in another thread. This is the same circuit. The next photo shows the unfocused board with the parts removed, including R8 Next is the new capsule mounted, the red and black wires are now white and blue Finally the completed circuit and a close up of that. There are already two teflon posts, so it is easy to unsolder the old capsule lead from the right side one, and solder the new positive lead to the left on that also has a 1gig resistor and the FET. The mic would probably benefit from upgrading and optimizing the bias of the FET. Note also, that recordings I've posted are really crappy. I've got to stop doing this at midnight.... The mp3's are rough, real rough, and I wasn't paying attention to the levels going in some how, so there is some distortion on the unmodified. The comparison is me saying "this is a microphone" then one of those "rain sticks" some car keys, and some simple acoustic guitar. Also, there may actually have been a problem with the unmodified mic. I'm not sure if I had a bad cable, dirty switch or what, but I had problems with this mic before I modded it.
 

Attachments

  • IMG_3930.webp
    IMG_3930.webp
    21.1 KB · Views: 211
  • IMG_3931.webp
    IMG_3931.webp
    33.9 KB · Views: 208
  • IMG_3932.webp
    IMG_3932.webp
    17.1 KB · Views: 201
  • IMG_3933.webp
    IMG_3933.webp
    12.1 KB · Views: 200
  • IMG_3934-a.webp
    IMG_3934-a.webp
    37 KB · Views: 206
  • IMG_3934.webp
    IMG_3934.webp
    16.9 KB · Views: 251
  • 2006_unmodified_aggregate.mp3
    2006_unmodified_aggregate.mp3
    1.1 MB · Views: 131
  • 2006_modified_aggregate.mp3
    2006_modified_aggregate.mp3
    655.5 KB · Views: 131
Last edited:
Update, it seems I had a dirty switch on the M-520 board, which accounts for the crackling on the unmodified guitar samples. FYI, all of the recordings were made via a Tascam M-520, which has solid state preamps. I used the buss out to a M-Audio Delta 66, using Audacity. The guitar is a cheapie, the guy who was supposed to come over w/ his nice Martin no longer works here.
 
Back
Top