I'm finally seeing progress!

rushfan33

New member
Here are some pics of my progress for the studio. I decided that due to room contraints, I was going to complete the control room first so I could get all of the gear out of my house and into the studio. Here are the pics. I could've been much farther along but I'm limited to how much I can pick up on one load when my dad comes down with his truck. Though I'd like to have all the supplies at once, this is working quite well.

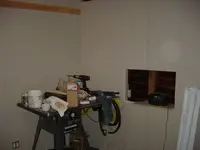
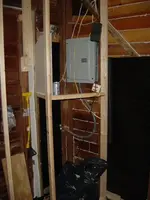
Pic #1 is of the right side of the control room. The cutout you see is for the flat panel monitor I have for the computer. Under the opening, there will be a 40" shelf for my Keyboard. Attached under that will be a pullout computer keyboard shelf. Since 98% of all my recording will be with the mixer and ADATs, this will work fine.

Here it is-
 

Attachments

  • control room 1.jpg
    control room 1.jpg
    27.2 KB · Views: 463
Last edited:
The next pic is the left wall, which will also look into the live room. The window is 46" wide and 26" tall. It's a standard Viking double paned window that someone special ordered. I bought it because they returned it. I gotta a hell of a deal. There were 5 windows total. I'm going to buy 2 more.
Here's the pic-
 

Attachments

  • control room 2.jpg
    control room 2.jpg
    30.7 KB · Views: 432
Last edited:
The next pic is of the iso booth. I put the insulation in and started to sheetrock a little bit. It'll mainly be for doing vocals. I plan on putting a some nice colors and cool lighting in there as well. I was toying with the idea of building a music stand that folds into the wall.
Here's the pic-
 

Attachments

  • iso booth 1.jpg
    iso booth 1.jpg
    34.9 KB · Views: 417
Lets see.... the next one is......... this is the view you have as you're walking in the studio.
 

Attachments

  • entry.jpg
    entry.jpg
    31.8 KB · Views: 415
This last one is a pic of the left rear corner of the control room. I had a lil' problem thinking this one through as the electical panel is located back there. What I decided to do was to use the corner for a multi-purpose area. The bottom portion (under the horizontal 2x3) will be the house for the stereo system. It will include a receiver with surround sound, a CD player, a cassette player and a DVD player. Directly above the 2x3 will no doubt be an access door to the electrical panel and above that, it'll be a soffit area for a small television.

Here's the pic-
 

Attachments

  • power panel.jpg
    power panel.jpg
    45.1 KB · Views: 407
Dammit Man!!! :mad:

I've been working on my place for over 10 months now, and I'm nowhere CLOSE to sheetrock!! :mad:
You come here with your plans, and the next thing I see... You're rockin' the joint! :p

Your place is looking real good Rush.
I can't wait to get to the point where I can "dress the lady".
 
Michael Jones said:
Dammit Man!!! :mad:

I've been working on my place for over 10 months now, and I'm nowhere CLOSE to sheetrock!! :mad:


Thats because you're making a huge pine pretzal Michael. Guys like Rush and myself are doing it the easy way :)
 
Not to mention Michael.... my entire studio is about the size of just your control room!:mad: :( :D I just had to put up a couple of sticks and put em' up. The rest pretty much IS "dressing up the lady".

Also, my "shell" was already built around 50 years ago.

I had to do some gutter work around the house this weekend and that took up some time but the next binge building session will yield some mucho progress. I'm really concentrating on the iso booth and control room. I can finish the ISO booth in one more weekend easily but again, it's the material (or lack thereof) that slows me down. My dad has the truck but he lives 100 miles away so I have to plan around his schedule.

I hope to complete the control room in about 2 weeks. Strangely enough, the biggest obstacle for me is the color scheme. I totally dig Blue Bear's color choice. I think I'm going to blatantly rip him off in that regard. :eek:

Also, I'm stuck on the floor on the control room. I 'm wondering what I should do for the floor. Either way, the floor space is only around 100sqft so I can either splurge, or I can put down some cool and colorful linoleum!? Anyone have any ideas for the floor?

RF
 
Dude. . . 100 sq feet of hardwood flooring wouldn't cost much, even if you paid someone else to install it. Tile could be pretty cool too. Both can be floated very easy, or have a layer of cork or something under them.

Beez
 
rushfan33 said:
I did actually think of tile as well. If I see something that really gets my attention, I'll go for it.
RF

You're considering tile over wood?

Bad boy! [chant]Wood wood wood[/chant]

Sorry, I like wood.
 
Have a look at some wood (laminate) flooring options here:
http://www.lumberliquidators.com/laminate.html
They seem to have the best prices I've found. Luckily, there's a dealer in my city, so... no shipping charges...

I think I've decided on this for the studio floor:

oldboston_plank_laminate.JPG


It's called Old Boston Plank.

Kinda fits in with that "Carriage House" theme. ;)

($1.39/sq. ft. ; I could do the whole studio for under $1700, and have a floor to die for!) :p (Cheap at twice the price!)
 
dealer in my city, so... no shipping charges...
I think I've decided on this for the studio floor:

It's called Old Boston Plank.

Very cool... I ended up with 9 boxes of a bleached maple from Pergo, simply because a boyfriend of a friend gave it to me since it was discontinued. Finding matching pergo was a pain, but two towns over was a flooring liquidator who had tons of it in stock, at $20 a box... so thats a little less than a dollar a sq foot, so needless to say I cleaned them out of it.

PR3215z.jpg


Nice full truck :) a few of the panels have damaged edges, maybe six to eight in all, but since panels are staggered anyway, I can lop off those edges no big deal for the staggering effect.

I think my tiny studio is going to be bright... offwhite walls with black auralex spaced out, dark green marblized moulding (should be fun to paint with a spong) and light maple flooring. I'm certainly excited!
 
By the way, thank you Michael for posting the lumber liquidation link... they have a warehouse in hackensack NJ, a mere 40 minute ride for me and my F350 :)
 
No prob. frederic. I'm just passing it along. (Someone else posted it here before.)

I was going to go with the color you selected, but I'm thinking of a purple and plum color scheme.
Kind of a "rag-rolled" purple for the live room. Rag-rolling gives the colors a lot of depth, that with the Old Boston Plank, and some wood doors that fit that floor color would look cool!

The CR, I'm thinking plum-ish with timber finishes in a light red oak. Maybe? Yes? No? (Most likely)

The drum room and VB are still up for debate on colors.

I wish I were picking out paint and fabric. :(


Soon.
 
Thats funny, my original color scheme was going to be significantly more radical... reds, blues and purples.

Then I realized I get little sunlight in here even with three windows, so I opted to paint everything lighter colors like off white, put down a light colored floor, and use dark trim, so this way there is some contrast, but at the same time I don't need so many lights to make the room bright enough to work in.

The overhead flourescent is really not going to be used much... just when I have to move gear in and out, wire things, solder, etc. Its more of a flush-mounted worklight. I'll be using the dimmer controlled halogens 99% of the time.

I just *hate* getting my legs caught in worklight cords... if you've been watching the cam as much as I think you have, you've seen me do that several times.
 
frederic said:

I just *hate* getting my legs caught in worklight cords... if you've been watching the cam as much as I think you have, you've seen me do that several times.

HA!
Yep. I know what you mean.

This represents my total electrical wiring expertice!:
(Note the extention cord clamped to the window frame)
I'll be glad when I have some REAL power.
 

Attachments

  • elecscheme1.jpg
    elecscheme1.jpg
    23.7 KB · Views: 302
Yep. I know what you mean.

This represents my total electrical wiring expertice!:
(Note the extention cord clamped to the window frame)
I'll be glad when I have some REAL power. [/B]

What you need is something like this:

4da539ff65d5893998a801259dbbadfa1-resized200.jpg


Two, installed at opposite corners, lighting up the entire workplace. I have such a unit in the garage, however when I started out the tear down, I only had one 15A breaker wired, with four rooms on it including the studio loft, so running such a big light was out of the question.

Once I got past slapping in new breakers, I ended up wiring in the ceiling light instead.

But these things are very useful, as you have two heads you can rotate and angle to different parts of the workplace, and keep it in the corner so no one kills themselves tripping on it.

Just beware, they get very hot.
 
Back
Top