DrumArtist23
New member
Hey guys and gals, I am now on to (in my opinion) the toughest part of my studio build: the desk.
I have money set aside to buy all the materials I could need, but the thing I lack is a well planned desk to build. I have done plenty of looking online, and the cheepest desk I could find, that would fit my mixer and have the rackmount space I need, would cost me $1190.00. I don't have that kind of money.
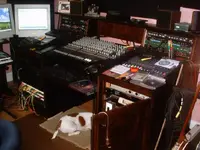
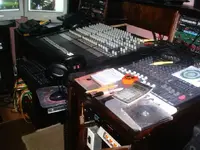
Here is what I am trying to accomplish - a desk that will house the following:
- MX9000 Eurodesk
- (2) Active Ref Monitors
- rack mounts built into the surface of the table and under the ref monitor shelf
- rack mounts on left and right (floor to table height - used as support for the table)
- Keyboard
- 24" LCD Screen
- Mouse
And one leather wrapped arm rest from one end of the desk to the other.
I have done some drawings, but after working through them, my ideas don't really end up looking well.
I will pay the person with the best layout (including cutting dementions) if they are so inclined.
TL;DR - Will pay someone (if necessary) to design studio desk.
I have money set aside to buy all the materials I could need, but the thing I lack is a well planned desk to build. I have done plenty of looking online, and the cheepest desk I could find, that would fit my mixer and have the rackmount space I need, would cost me $1190.00. I don't have that kind of money.
Here is what I am trying to accomplish - a desk that will house the following:
- MX9000 Eurodesk
- (2) Active Ref Monitors
- rack mounts built into the surface of the table and under the ref monitor shelf
- rack mounts on left and right (floor to table height - used as support for the table)
- Keyboard
- 24" LCD Screen
- Mouse
And one leather wrapped arm rest from one end of the desk to the other.
I have done some drawings, but after working through them, my ideas don't really end up looking well.
I will pay the person with the best layout (including cutting dementions) if they are so inclined.
TL;DR - Will pay someone (if necessary) to design studio desk.
")
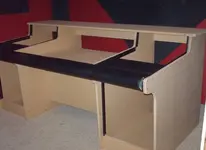
") Here is some UNFINISHED Sketchup views(which do NOT show the undercarriage racks and computer iso boxes, and some pics of various stages of construction.
Here is some UNFINISHED Sketchup views(which do NOT show the undercarriage racks and computer iso boxes, and some pics of various stages of construction.


 :rolleyes:")