DIY Omni-mic (Compensation involved)

  • Thread starter Thread starter Sunyboy
  • Start date Start date
S

Sunyboy

New member
Hi!

I was browsing the net some time go on tutorials on how to build a condenser and this link caught my attention.

http://www.prosoundweb.com/recording/tapeop/buildmic/buildmic_16_1.shtml

However, the diagrams are a little ambiguous to me, i have no electronics experience, but i would love to be able to build the mic described in that link. I don't know many people who do this kinda stuff where i live ( the few I've contacted said they were too busy- I'm desperate)

My idea is that, I'm willing to compensate anyone of you who can make a video putting this thing together. The parts are easy to obtain so that shouldn't be a concern to any of you

Please let me know!

Thanks!
 
Last edited:
It's even easier than your link makes it sound.

Nobody needs any compensation, and I don't think you need a video. This is even easier than the guy in your link makes it sound... I've used this same setup many times. I can't say whether the quality is as good as your guy describes it or not. I've made recordings that sound very good to me, but then I've never used a "real" condensor mic, so maybe I just don't know what I've been missing.

Anyway, when I say it's easier than he makes it sound, I mean you don't need to bother with the separate "power supply" box. You can just tape the battery to the mic cable.

I don't have time right now, but I'll right back with details and a simple drawing and instructions. Trust me, ANYBODY can do this!!!

J
 
The Tape op Mic was the first mic I ever built and I wasn"t very impressed, sure it worked and was fairly clean and noise free but I hated working with a Battery powered mic.....

A Much better design is a clone of one of the MSH (Naint) mics (which schematics can be found at the Naint Mic site as well I believe preamde DIY Kits) and these mics have higher SPL handleing capibility and are Phantom Powered...

You can buy a mic Kit at the bottom of this page for $9...

http://naiant.com/microphonedesign.html


Cheers
 
  • Like
Reactions: NL5
Instructions as promised

OK, here's how I've gone about it...

Digikey Parts list:

Part Digikey PN Price
Electret Capsule P9925-ND 1.86
100pF Hi Freq Capacitor 1001PCHT-ND 0.78 (Pack of 10, only need 1)
1.5uF DC Bypass Cap 495-3519-ND 1.40
2.2K Load/Gain Resistor OD222JE-ND 0.42
XLR Connector SC1003-ND 5.68
Battery Connector 2242K-ND 0.98

1 -Trim the big cap leads down so the the body of the cap will just clear the rubber boot of the XLR connector when you solder one end to XLR connector contact no 2. Should be about 1/2 an inch on each end.

2 - Using attached drawing, as a guide, solder the resistor and the small capacitor to one end of the big capacitor. None of these parts have polarity, so doesn't matter which end is which. Fold the small cap and the resistor up against the body of the big cap.

3 - Slip a 3/4"-1" piece of shrink wrap tubing (Radio Shack) over the red lead of the batter connector. You may have to split the red from the black a bit to make extra room. Solder the red lead to the free end of the resistor. Make your connection up close to the body of the resistor. Trim any left over resistor lead. Slide the shrink wrap tubing down over the solder joint and shrink into place with a hair dryer. You'll have to get the hair dryer right down on it to activate the shrink wrap. Careful not to burn yourself or the table underneath.

4 - Slip a piece of shrink wrap over the remaining end of the big cap lead. Should be long enough to reach the solder joint where the resistor and small cap are attached and still leave a little of the big cap lead showing. Now solder that tip of the big cap lead to the positive mic pad. I do it 90 degrees. It is very important that the big cap lead does not touch the metal can that makes up the body of the mic element. That would short out the mic and you'll get no signal.

5 - Almost done. Solder a 6" piece of black wire to the negative contact of the mic element. Carefully shave away a short section the jacket of the wire at the spot where the free end of the small cap lines up and solder the cap lead to the wire. As above you want to make this connection close to the body of the cap.

6 - Slip a 1" piece of shrink wrap on the black lead of the battery contact. Solder the black lead to the same spot that you just soldered the capacitor to the black wire. Slide the shrink wrap down to cover the joint and the capacitor and shrink in place with hair dryer.

7 - Dissassemle the XLR connector. Slip a piece of shrink wrap over the big cap lead that isn't attached to mic. Solder to pin 2 of the xlr connector. Trim the black wire and strip the end so that it long enough to solder to pin 3 and then continue over to pin 1. Now reassember the XLR connector. You'll have to cut the rubber boot quite a bit to get it to fit, but that's ok. Just slit it down the side and trim away rubber until it will wrap around the big cap and squeeze down into the connector body. You're going to wrap it with tape or really big shrink wrap anyway so it doesn't have to be perfect.

8 - Roll on the black tape to firm everything up. Leave the battery connector dangling.

9 - Once it looks nice at tidy, snap in a 9V battery and tape it to side of the connector.

10 - Plug and see how it sounds.


Hmm - I have a drawing but I can't figure out how to attach it. All of the above will be hard (impossible) to understand without it.

I need to find some place on line to upload it. I'll do that and write back later.

Best regards,
J
 
drawing

Here's the drawing. . .
 

Attachments

  • untitled.webp
    untitled.webp
    12.6 KB · Views: 326
Your 1.5uF output cap is too small for a professional mic pre nominal input impedance of 1K ohm, unless you want a bass rolloff below 100Hz. The 100pF cap is wishful thinking on an unbalanced, partially unshielded circuit. Some preamps don't respond well to an open pin 3. Finally, you have no source resistor, which significantly degrades the performance of the capsule. I mean what is the point of worrying about 0.01% THD from an electrolytic cap when your capsule has more than 0.5% THD at 94dBSPL?

If you're determined to use a battery, try this:
 
Thanks

Thanks for the suggestions/improvements. If it floats your boat to try to make me sound stupid I'm cool with that. I'm actually not, but everything you said makes sense. I like you're circuit much better. For the record, the open pin 3 is a mistake in the drawing. I was aiming for a single ended circuit, with pin 3 tied to pin 1 as in the instructions above. I really like making it a balanced circuit, though.

Do the bypass caps really need to be 10uF? One of my other goals was to keep the thing small. 10uF caps are going to be huge unless electrolytic. Sounds like the difference between electrolytic and film might not be a big deal though. Is that right?

Also, you talk about distortion at high dB levels. Do you have any sense of how this setup would perform for lower level sources like voice or acoustic guitar. As I said, I've used the circuit before exactly as I drew it and I've always been happy, but happy for me just means better than my SM57 for recording acoustic guitar.

Final question, do you dislike electret capsule mic in general or this capsule in particular. If the latter, is there another you'd recommend.

I'd appreciate any thoughts. . .
J
 
Last edited:
  • Like
Reactions: NL5
Actually a few things. . .

If you actually decide to build this mic, at a minimum I recommend incorporating MsHilarious's improvements having to do with the cap sizes.

1 - Increase 100pF to 1nF
2 - Increase the big cap to 10uF and switch to electrolytic.

As in my instructions, make sure you connect pins 1 and 2 on the XLR connector this was mistakenly left off my drawing.

If you really want to make it as good as it can be, go with MsH's circuit entirely which will make it a balanced circuit. . . which is a good thing.

Regardless of what you do, if you're trying to build it small like I've suggested, with the components partially housed in the XLR connector shell. Make sure before you assemble anything that the diameter of the compenent bundle will actually fit through the barrel of the shell with no conductors touching the metal of the shell. I've never actually built one inside the shell the way I've proposed. The two that I've built have a short piece of shielded mic cable connecting the circuit to the connector. Going with electrolytic cap will help, but if it won't fit, you'll need to let more of it hang out of the connector or use a short piece of cable.

Anyway. . . good luck!
 
Last edited:
Well I just came off a self-imposed vacation from posting because every time I posted something I thought was factual it seemed to start a fight. So I will have to accept that am I apparently a jerk.

So it ain't you, it's me.

Now, as for your questions: the answer to every one is it depends. Seriously, every circuit is a compromise. I know probably 15 different circuits you could use with WM61A and all those similar capsules. If one of them was perfect for everything, I would just know that one. At the moment, I happen to be building six different circuits.

OK, capacitors: yes, film caps are better than electros. They have measurably lower distortion. Yes, film caps are much bigger than electros. If you can find a size of film cap that's in the audio path and it's the value you need, you use the film cap. If you can't, you use the electro.

What value do you need? Well, a general design is going to incorporate a worst-case scenario. 10uF has a corner frequency of 16Hz into 1K ohm. Even that is not truly ideal for 20Hz response, but most mics don't have the flat bass response of a small omnidirectional capsule, so nobody complains. Ideally, you'd use something more like 33uF.

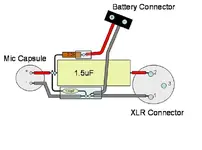
Now, if you are DIY, you can only consider your situation. Are you using a portable recorder with say 3K ohm input impedance? If so, you can get by with 3.3uF cap, and maybe your 1.5uF cap wouldn't even make you sad.

But wait, maybe you want a bass rolloff? Then use the smaller cap. It's kind of considered bad form to build a bass rolloff that is dependent upon another piece of gear's input impedance, but again if you are DIY, you can take that into account.

Let's say you are recording voice and acoustic guitar. Most male voices are baritones that bottom out around 80Hz. Guitars do too. So a bass rolloff could actually be a good thing, because it will filter out the rumble from your A/C unit, road noise, what have you. The majority of cardioid mics have a bass rolloff (if you are outside of their proximity zone), so in comparison, your omni mic with the bass rolloff might sound totally normal. And if you are taping a show where they are pumping the subs, a bass rolloff is a very good thing.

On the minus side, if you take that same mic on an instrument like grand piano or an orchestra, or pipe organ, it might sound a bit thin.

On drum overheads, I don't know. Some people like the full range sound of the kit in overheads, some do not. You decide.

OK, distortion. As you have noted, it's OK on quiet sources, but will degrade rapidly as SPL increases. It would be nearly useless for drum overheads, since I believe it hits 1% THD at around 98dBSPL.

To reduce distortion, you must limit the load on the capsule. My 4k7 resistor solution is only partial, because the input impedance of the preamp will be a parallel load on the FET. That circuit is good for 1% THD at about 110dBSPL.

You can get a further improvement by connecting only pin 3 to the capsule drain, and do an impedance-balanced arrangement for pin 2. That will result in reduced sensitivity. It's an approach for very loud sources where the circuit needs to be kept simple.

But if you want true high-SPL performance, you need a buffer circuit as in the MSH Kit mic. That is only one possibility; there are many different ways to do a buffer circuit. That will also get you low output impedance, so you can drive long cables.

Where are we? Pin 3. I wouldn't ground that directly. If there is a phantom power supply that's switched on, it would waste power and possibly drop the phantom voltage to other mic inputs. A lot of preamps, especially portable/USB/etc. ones, can't hack a load like that. Instead, connect a capacitor from pin 3 to pin 1. Better, use a series resistor and cap to create an impedance-balanced output.

WM61A is a fine capsule. Any of the circuits on this page can be built point-to-point in an XLR (well, not with film caps), maybe with a little practice.

So enjoy! :)

Oh, one more thing: a 9V? A single 9V can literally power about 200 of such mics without breaking a sweat. How about an A23, for smaller size?
 
Thanks MsHilarious!!!!

I know SunyBoy started this thread and I just chimed in, having built and used something similar in the past.

After reading your response, though, I'm juiced up to go build one myself to replace the one I built with "my" circuit.

Maybe I'll even make the video SunyBoy wanted, or at least grab some pics to document the process.

Anyway thanks again and best regards,
J
 
Correction to my second post of yesterday

Oops . . .

I just can't seem to get the pin 3 thing right. In my second post from yesterday, I said to ground pin 2. I meant to say pin 3!!!! As MsH has pointed out, even that probably isn't the best thing to do, but you definitely don't want to ground pin 2.

J
 
Your 1.5uF output cap is too small for a professional mic pre nominal input impedance of 1K ohm, unless you want a bass rolloff below 100Hz. The 100pF cap is wishful thinking on an unbalanced, partially unshielded circuit. Some preamps don't respond well to an open pin 3. Finally, you have no source resistor, which significantly degrades the performance of the capsule. I mean what is the point of worrying about 0.01% THD from an electrolytic cap when your capsule has more than 0.5% THD at 94dBSPL?

If you're determined to use a battery, try this:

Hi. I am hoping to make a couple of condenser mic's for recording a drum kit. I have been looking at the tape op circuit myself and have bought a couple of Panasonic capsules. I don't have much experience with electronics schematics. I found the picture that "jjjtttggg" attached helpful but noticed that "mshilarious" had also posted a picture or schematic (I dont know which) which is unfortunately no longer viewable.

I would ideally like to incorporate phantom power into my design as I have an amp/desk with full Phantom power. Is it easier to use a 9v battery and is it even necessarily better to use phantom power?

Does anyone have a drawings (to help me in conjunction with schematics which I find difficult to follow) for the same circuit that mshilarious describes or similar circuits either with or without phantom power?

Also as a drum kit puts out a high SPL I was intending to try to modify the capsule following the Linkwitz technique. I see that the circuit pictured on the first page only has 2 connections to the capsule and not 3 as with the Linkwitz mod.

If anyone can offer any help with this I will be extremely greatfull

Thanks in advance for any input.

Cheers.
 
Back
Top