You are using an out of date browser. It may not display this or other websites correctly.
You should upgrade or use an alternative browser.
You should upgrade or use an alternative browser.
Re-location/build of Diesel Dungeon Studio!
- Thread starter RecordingMaster
- Start date
c7sus
Disenfranchised Member
Absolutely not! haha
I'm not sure what the laws are like in "Eagle Winged Palace of the Queen Chinee", but I live in Canada and igloos don't have any kind of building/electric permits necessary.
I'm hoping you know I am kidding, but no i didn't get any permits. Firstly, because it was in an existing room in my basement. Electrical was already all ran from when it was built. But I ripped it all out and redid it from scratch down there and "to code". Reconnected to the breaker box to the same breaker # that the old plugs were on for that room. So i can't see why i'd need any permits for that. And if I somehow DO need a permit...screw whoever the authority is that would ever care about that! lol
The "authority" that may one day care about that is your homeowner's insurance company, in the unfortunate event of a fire.
Here in the states if you replace a service your insurer would want documentation from an inspector that the job was done to code.
Manimpretty
New member
That was a great idea with the string to hold the rockwool in place. The studio is really looking good man!
RecordingMaster
A Sarcastic Statement
That's a very girly pattern ....
But it's blue!

Looks different in person I guess. The flash was on the camera, but in normal lighting they just look like a dark blue sheen and if you catch it on an angle in certain light, depending on where you are standing, you can vaguely make out a pattern. i wanted a vintagy kind of vibe.
Maybe I should have just gotten Nascar bed sheets from the thrift store...you know...to REALLY show off how big I want people to think my "manhood" is!

RecordingMaster
A Sarcastic Statement
The "authority" that may one day care about that is your homeowner's insurance company, in the unfortunate event of a fire.
Here in the states if you replace a service your insurer would want documentation from an inspector that the job was done to code.
Meh. If a fire happened, the fire dudes would come in and see where it went wrong, but would see that everything was done to code and it was probably just a malfunction of something at the breaker box or something. Not only that, but the area in which the plugs lie inside the walls (the only thing that could cause a fire that would point the finger at how the room was built as opposed to like a grease fire on the inside of the room), has a fire-retardant barrier all around it. The Tyvek house wrap I used (first layer against brick wall) is fire retardant, the insulation I used is fire retardant, the drywall is firecode drywall and the plugs and switches are all inside metal boxes, attached properly to the studs. So the only thing that could cause a fire after all that would be the cable itself which is all brand new, and was installed properly, proper cable, etc.
Anyways, thanks for the jinx! I've already knocked on wood! Everyone else please do so for me now.
RecordingMaster
A Sarcastic Statement
That was a great idea with the string to hold the rockwool in place. The studio is really looking good man!
Thanks man! I actually borrowed (stole?) the idea from this dude (see below). I made my facing panels a little more sturdry though - instead of lattuce I used 1x2's, and I used more string, haha. Oh and mine are 30" face where as his are only 24" (may be fine for him - he does great work) which just doesn't cut the mustard for me. Tracking drums in there, live bass (YES WITH AN AMP occasionally) and mixing/mastering, occasionally material with lots of low end. I'm a low end freak when it comes to even rock stuff.
How to Build Studio Acoustic Treatment - Corner Bass Traps | Prime Cut Recording Studio Blog
c7sus
Disenfranchised Member
Meh. If a fire happened, the fire dudes would come in and see where it went wrong, but would see that everything was done to code and it was probably just a malfunction of something at the breaker box or something. Not only that, but the area in which the plugs lie inside the walls (the only thing that could cause a fire that would point the finger at how the room was built as opposed to like a grease fire on the inside of the room), has a fire-retardant barrier all around it. The Tyvek house wrap I used (first layer against brick wall) is fire retardant, the insulation I used is fire retardant, the drywall is firecode drywall and the plugs and switches are all inside metal boxes, attached properly to the studs. So the only thing that could cause a fire after all that would be the cable itself which is all brand new, and was installed properly, proper cable, etc.
Anyways, thanks for the jinx! I've already knocked on wood! Everyone else please do so for me now.
The "fire dudes" aren't your insurance company.
And how exactly would they "see" that everything was done to code in the aftermath of a fire?
"It's burned to a crisp but the craftsmanship is exemplary so here is your check" was never uttered by an insurance claims adjuster.
Saving a few bucks on a permit and inspection fees doesn't balance out against the risk of having to rebuild your home out of pocket because your claim was denied.
Not trying to jinx you, just pointing out reality.
RecordingMaster
A Sarcastic Statement
The "fire dudes" aren't your insurance company.
And how exactly would they "see" that everything was done to code in the aftermath of a fire?
"It's burned to a crisp but the craftsmanship is exemplary so here is your check" was never uttered by an insurance claims adjuster.
Saving a few bucks on a permit and inspection fees doesn't balance out against the risk of having to rebuild your home out of pocket because your claim was denied.
Not trying to jinx you, just pointing out reality.
Fire dudes have a way to check it out afterwards to determine the cause is all I'm saying. Yes...FIRE DUDES!
As for insurance...I've HAD insurance inspections in my past house that is about 100 years old when I first bought it. Guess what they passed?! ALUMINUM wiring from an addition that was built in the 70's (when aluminum was the bees knees). He didn't see it nor know how it was wired because it was behind a freaking wall. So there ya go. That stuff is so dangerous, had they known, they'd have forced me to remove it all and rewire!
Putting up new drywall in a room with a few new outlet boxes is a far cry away from needing any permits or inspections in my land over here. Small potatoes man. I didn't build an addition or anything. Just redid a room. S'all good!
Thanks for your concern though.
RecordingMaster
A Sarcastic Statement
Facings are up for 3 of the 4 superchunks. Tacked em into the wall with finishing nails and a counter-sink tool to hide the little silver nail head (went to use my bradnailer only to find out I'm all out of bradnails!).
I realized there would be some insulation exposed to the open air on my two front superchunks due to the bulkheads on either side and window on one side. The insulation wasn't visible, but exposed nonetheless to the open air. Which i didn't like. Especially on the window side where the chunk triangles extend over top of the window box a bit. If I had the window open ever, I'd worry a breeze would blow the particles into the room because the insulation would be exposed (you'd see it if looking into the window from outside). So i covered those exposed areas with small pieces of garden fabric, tucked around behind the insulation and under the facers for a snug hold.
Here is one of them (top was exposed)...
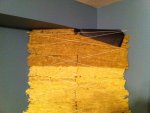
Here is a back view of the other one as if your head was in the window box, looking into room....
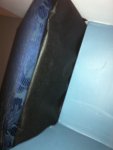
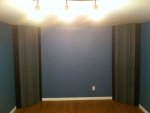
Here are the front ones faced and complete...
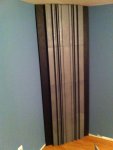
Here is 1 of 2 "diffusive superchunks" done and faced. Those are painted diffuser panels...not "acoustic FOAM"! (Although they are made of super dense EPS). Since the diffuser panels were not as wide as the chunks, I had to face the chunks with something, so I made the same frames as I did for the front ones, but covered them in thick black garden fabric (cheaper than nice fabric since the majority of them won't be seen/exposed) then glued the diffuser panels to the fabric using PL300 in a caulking gun (foam board adhesive...won't melt through foam).
One more to go!
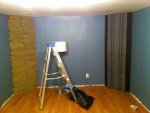
I realized there would be some insulation exposed to the open air on my two front superchunks due to the bulkheads on either side and window on one side. The insulation wasn't visible, but exposed nonetheless to the open air. Which i didn't like. Especially on the window side where the chunk triangles extend over top of the window box a bit. If I had the window open ever, I'd worry a breeze would blow the particles into the room because the insulation would be exposed (you'd see it if looking into the window from outside). So i covered those exposed areas with small pieces of garden fabric, tucked around behind the insulation and under the facers for a snug hold.
Here is one of them (top was exposed)...

Here is a back view of the other one as if your head was in the window box, looking into room....

Here are the front ones faced and complete...

Here is 1 of 2 "diffusive superchunks" done and faced. Those are painted diffuser panels...not "acoustic FOAM"! (Although they are made of super dense EPS). Since the diffuser panels were not as wide as the chunks, I had to face the chunks with something, so I made the same frames as I did for the front ones, but covered them in thick black garden fabric (cheaper than nice fabric since the majority of them won't be seen/exposed) then glued the diffuser panels to the fabric using PL300 in a caulking gun (foam board adhesive...won't melt through foam).

One more to go!

Last edited:
RecordingMaster
A Sarcastic Statement
Doesn't putting a diffusor panel in front of a superchunk defeat the purpose? Sound waves bounce off of a diffusor, for a superchunck to be effective you want the soundwaves to go through and be stopped.
EDIT: MJB, apparently not. Check out posts #22 and #23 here.
I'm no acoustician, but your thoughts on this one are apparently (so I have looked into) incorrect. I didn't want the superchunks on the drum end (eg the more "live end" compared to the control end) to be too dead in the highs (and rightfully so, who wants dull drums?). So I wanted the superchunks to act only as bass absorbers and partial broadband, but to reflect the highs back. Since there are about 4" exposed on either side of the diffusers, they WILL still absorb some top end but not nearly as much as the fully exposed classic style superchunks on the other end.
I figured I am already going to have two 4" panels behind the kit, one 2" panel on either side of the kit and two panels above the kit (all broadband, oc703), so I figured that was plenty. I will also have those same type of diffusers in the middle of the two rear panels (instead of bare wall) and on either side of the drums (next to the oc703 on either side), and mic stands and cables hung on the walls a little further up the room (at maybe 1/3 the way). So that end will have a good mixture of diffusion (probably only down to about 800 hz but better than none), broadband absorption and bass trapping. I figured since I've read a lot of the acoustic experts saying you can cover bass traps with paper or foil (under the fabric for better looks) to reflect the highs, that these diffusers are thin enough (3") do the same thing but also diffuse a bit rather than only reflect straight off of them.
Last edited:
RecordingMaster
A Sarcastic Statement
Holy crap! How did I miss this thread?
Your room is lookin awesome man! Seriously. Good stuff abounds.
Takin your time to do it right and STILL manage to find time to have a kid.
You da MAN!
much props, good sir.
Aww, gee, thanks Dogbreath! It's always nice to have some positive encouragement. Thanks to the other fellers on here for your positive vibes too!!
You're right, having a kid has made this task slow riiiight down, but it's a labor of love. I also need to spend time with the wifey and, God forbid, get actual work done around the house that is non-studio related. Haha. Oh yeah, and I need to work my day job to pay for all this crap! lol. Like most of you can relate, I'm sure!! So usually a typical day working down there for me would start at around 11pm once the wifey hits they hay. I might spend til around 1am or 2am working, then proceed to go to bed, then up by 6:45 am and work from 8a-5p. Yep, labor of love alright! But I'm almost a year away from my "Dirty 30" so I figure I might as well work as hard as I can with no sleep while I still somewhat have the energy to do so.
 (man, I'm tired today).
RecordingMaster
A Sarcastic Statement
The face to the other rear "diffusive superchunk" is now up. Somehow the spray painting turned out more even on the diffusers for this one. I guess I've gotten the knack down for these (love that band!). The EPS (even though these are really dense EPS) is a b*tch to spray because it sucks up all the paint! It took one can of water-based spray paint just for one coat on four dissuers! Then they need about 2 more coats after that! 
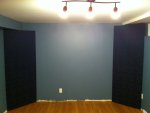
Got the room all cleared out and vacuumed up all the nasty fibers from the chunks. Next I will be moving the desk and drums in (the two things which will pretty much always be in the same spot) so I can start gauging where to put all my broadband panels, more diffusers and ceiling clouds.
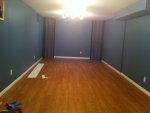

Got the room all cleared out and vacuumed up all the nasty fibers from the chunks. Next I will be moving the desk and drums in (the two things which will pretty much always be in the same spot) so I can start gauging where to put all my broadband panels, more diffusers and ceiling clouds.


Manimpretty
New member
Looking really good! I've been renovating my studio for the last couple months and I can appreciate the amount of time, money, and effort you're putting in. Thanks again for sharing!
RecordingMaster
A Sarcastic Statement
Spacing my wall-mounted 2" broadband OC703 burlap-faced panels, 2 inches off the wall. So I am hanging them via J hooks in the wall (which stick out 2") and eye bolts which are attached to the frames. But then there is the questions of 'how do I make it so the bottom of the panels don't swing inward towards the wall?' So I got some 2" thick, dense styrofoam and cut them into little 2" tall blocks with an exacto. Nailed them into the frames (2 per frame) using 2.5" nails and fender washers, then covered the screw head with sticky felt to not damage/vibrate on the the wall (stuff you put on chair leg bottoms).
Here is a pic of the spacers...
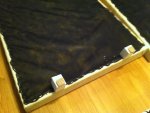
Here is a pic of the spacers...

RecordingMaster
A Sarcastic Statement
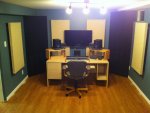
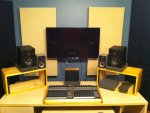
Finished mounting my first reflection panels (except ceiling clouds and wall/ceiling bass traps above mix position) as well as my LED 40" flatscreen (1080p).
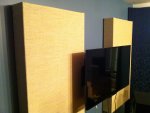
The panels on the front wall are 6" thick and mounted straight to the wall because there is 4" thick worth of OC703 inside them and approx 2" airgap behind them inside the frame, so no need to space the whole panel off the wall, as I needed to mount a flatscreen there and the screen would have had to be about 10" off the wall in order to accommodate, which I'd rather not do. I did, however, get a tv mount that extends off the wall horizontally and pivots so i can angle it towards the right or left. So if I ever need to pull the tv in closer to the desk for whatever reason, I can. It extends I think past a foot. The tv is so light, it's like hanging a framed painting. So no worries there, and yes, the mount is well anchored. I could hang on it.
Here is the whole view. I will be moving in my gear and rack stuff after I put up the ceiling clouds. I will also have a side car on either side. The left will be a sidecar rack housing anything I do not need to reach while mixing/tracking (which would take me out of the sweet spot) - like power conditioners as well as amps for my passive monitors (Minimus 7's, new Auratone [see next post] and JBL 'midfields'). On top of the left side car will have my 27" imac which is the main brains as well as going to be used as my side-view monitor where I will display mostly the edit window in PT. Big screen is for the mix view (so it is right in front of my control surfaces). The right side car will just be a drawer unit for odds and ends and such....
Here is a close up of the screen mounted in front of the 6" deep front wall panels...
Here is a close-up of the empty desk. No gear moved it yet. Just monitors so i could gauge where to place my first reflection panels using the mirror trick with help from my lovely wife.
The panels on the front wall are 6" thick and mounted straight to the wall because there is 4" thick worth of OC703 inside them and approx 2" airgap behind them inside the frame, so no need to space the whole panel off the wall, as I needed to mount a flatscreen there and the screen would have had to be about 10" off the wall in order to accommodate, which I'd rather not do. I did, however, get a tv mount that extends off the wall horizontally and pivots so i can angle it towards the right or left. So if I ever need to pull the tv in closer to the desk for whatever reason, I can. It extends I think past a foot. The tv is so light, it's like hanging a framed painting. So no worries there, and yes, the mount is well anchored. I could hang on it.
Here is the whole view. I will be moving in my gear and rack stuff after I put up the ceiling clouds. I will also have a side car on either side. The left will be a sidecar rack housing anything I do not need to reach while mixing/tracking (which would take me out of the sweet spot) - like power conditioners as well as amps for my passive monitors (Minimus 7's, new Auratone [see next post] and JBL 'midfields'). On top of the left side car will have my 27" imac which is the main brains as well as going to be used as my side-view monitor where I will display mostly the edit window in PT. Big screen is for the mix view (so it is right in front of my control surfaces). The right side car will just be a drawer unit for odds and ends and such....

Here is a close up of the screen mounted in front of the 6" deep front wall panels...

Here is a close-up of the empty desk. No gear moved it yet. Just monitors so i could gauge where to place my first reflection panels using the mirror trick with help from my lovely wife.

Last edited:
RecordingMaster
A Sarcastic Statement
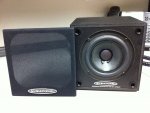
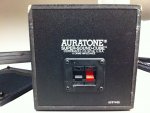
Guess I can now scrap my fake Auratones (basically some old 70's Fisher cube speakers that sort of looked like the old Auratone 5c's, but sounded nothing like them) because I just picked this baby up for extraordinarily cheap from a guy who wheels and deals all kinds of random stuff in huge quantities (think like the show Storgae Wars) lol he didn't know what it was and did not care in the slightest. It is practically mint and sounds great (well it will never sound 'great' but by great i mean it works as intended, nothing blown). I believe this is the 1985 model judging by the timeline pics on the new Auratone website. They have the paper cones and they are fully intact, the paper doesn't even smell old. It's as if it was frozen in time, haha.
