Tascam MX-80 Repair...

Oh hey!

The Tascam Forum is back up, so I was able to review the history on this unit...I now recall (after reading) that the stacked pots for a couple channels were bent. I couldn't remember if I replaced one or both of them but I believe the unit I'm thinking of in which I replaced the pot was on one of the PE-40's I used to have...one of the pot shafts was broken off on that one and Tascam had new, so this MX-80 is all original.

I'm still banking that somebody overloaded the input.
 
Awesome...Got my Mouser order the other and with it a new TL072 SIP-8 opamp. This MX-80 was my first "project" and it never got finished because I was lost for what do. Now that loose end will be tied.
 
Its done...

Got the replacement opamp in. It started to smoke when I first powered it up. :eek::eek::eek: Shut it off right away of course. I didn't double check before putting it in. Remember that the original opamps are a single row 9-pin chip. Couldn't find those but pins 1 and 9 on the stock chips are redundant (do the exact same thing), so 8-pin chips would work, but I didn't double-check which way to offset the 8-pin chip (i.e. leave pad 9 open or pad 1 open on the PCB). I assumed pin-to-pin placement (pin 1 still to pad 1, pin 2 to pad 2, etc.), but that was wrong. Duh. If I'd thought about it just a little bit or referred to the datasheets I'd have remembered that on an 8-pin DIP pin 8 is the ground, so I needed to put pin 1 to pad 2, pin 2 to pad 3, etc. That offset would have pin 8 in pad 9 and the inputs and outputs to the chip just right. The only problem is that pad 9 on the PCB is connected to nothing (i.e. no traces go to pad 9, pin 9 of the stock chip was not connected). Fortunately I was smart and bought a couple extras just in case, so it was a $0.50 mistake.

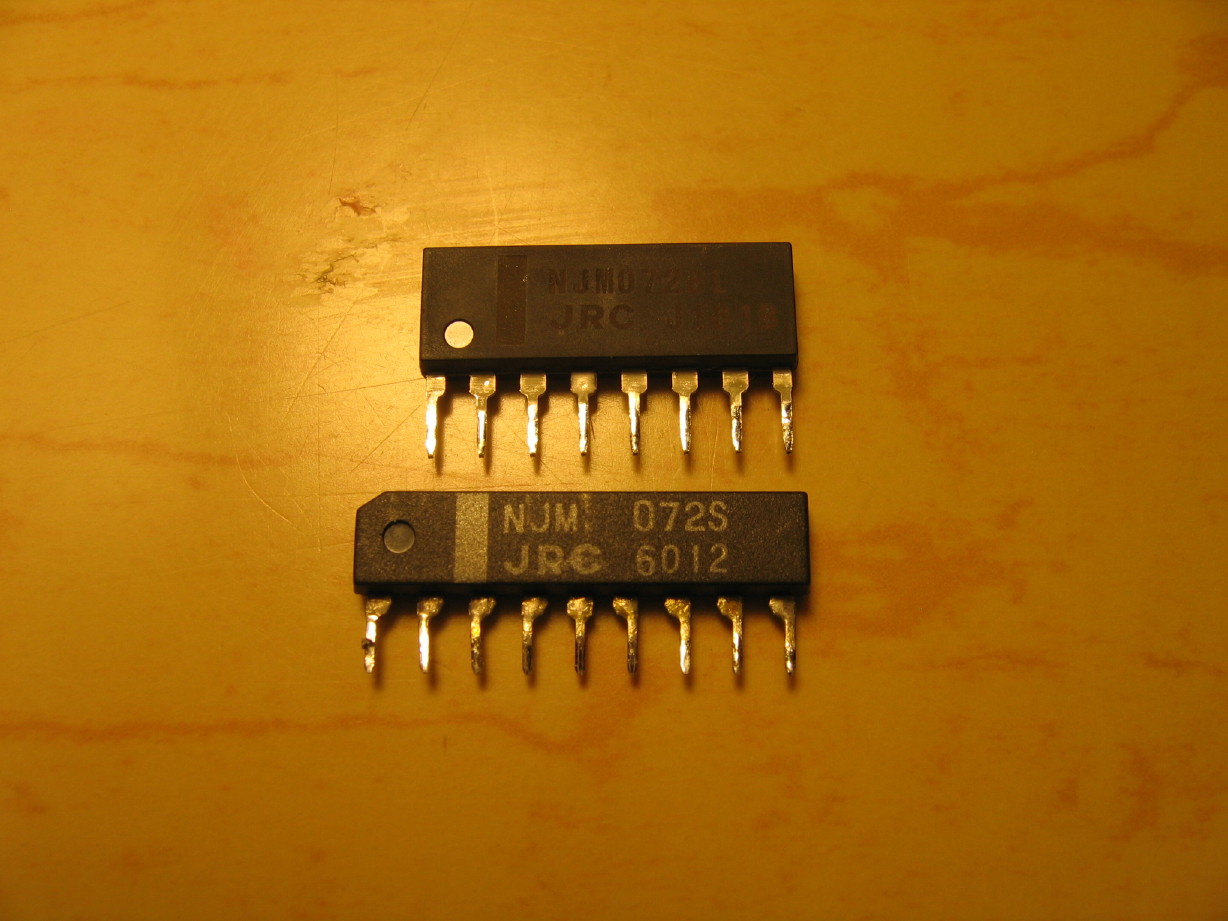
Here's a picture of the new chip (top) and a stock chip (bottom):

IMG_6894_3_1.JPG


To solve the pin 8 issue I ran a jumper wire from pad 1 on the PCB to pad 9 so that pin 8 of the chip would be connected to ground, which used to come in to the stock chip on pin 1 because, remember, pins 1 and 9 are redundant. So I pulled the abused replacement chip out and put another new one in. Here is what the jumper looks like:

IMG_6893_2_1.JPG


Buttoned everything up and guess what? I now, at long last, have a 100% functional MX-80. :) And the pots are much less scratchy now. This unit was the first unit on which I cleaned pots. I did it wrong and it didn't improve anything and the pots were horribly scratchy when I got it. They are silent as can be now.

This may seem like a small thing but I have to say this is an extremely satisfying thing to have accomplished; to have the MX-80 working. I remember now how this all came about...The MX-80 was, indeed, my very first vintage analog piece of gear since going to digital in teh mid-90's. My only preamps were on my Yamaha 01X mixer/interface/control surface, and my Yamaha i88x. The 01X has 8 preamps of decent quality, and the i88x has 2 preamps of very good quality plus 6 analog line inputs. I remember I was shopping for mic preamps to connect to those line inputs because the pre's on the 01X were relatively noisy at high gain. I was doing a search on eBay and there was this thing made by Tascam and I remember being amazed because, at that time, I didn't even realize Tascam made rackmount processors. I thought it was the coolest thing I'd ever seen with the stacked pots and everything. The seller disclosed that channel 7 wasn't working so I knew I was only getting 7 working preamps but that was fine because it was only $35. Done. I got it figuring I'd be able to fix it; that it was probably something simple. Well, obviously it was not simple for me though I quickly figured out that the preamp was working, but the circuit from channel 7 to the stereo buss wasn't working and that didn't matter because I was just going to use it as an 8-channel discrete mic preamp. It was ALL covered with labels when I got it and somebody had removed additional labels in the past with what I figure to be a screwdriver because the face has ALL sorts of scratches in it...so it was kind of neglected...it took forever to get those labels off because the adhesive was like cement. :mad:

So anyway, it has always been a symbol of the unfinished in my lineup of gear, and the MX-80 was, obviously, the first of MANY unfinished projects...I got the MX-80 even before I had gotten back into tape recording; I hadn't woken up to that yet. I remember getting the RS-20B next, then the 48 and 58...on and on andonandonandon...Its wierd but I feel like, between being really happy with the MM-1000 and settled with it as "IT" for me as a tape machine as well as having the Soundtracs mixer as a companion, between that and finishing my first unfinished project, I feel like I'm finally slowing down and settling in and catching up...like the marathon of discovery and madness is coming to a close and the MX-80 marks the beginning of the last chapter of this volume. Forgive me for waxing poetic but its a significant thing for me.

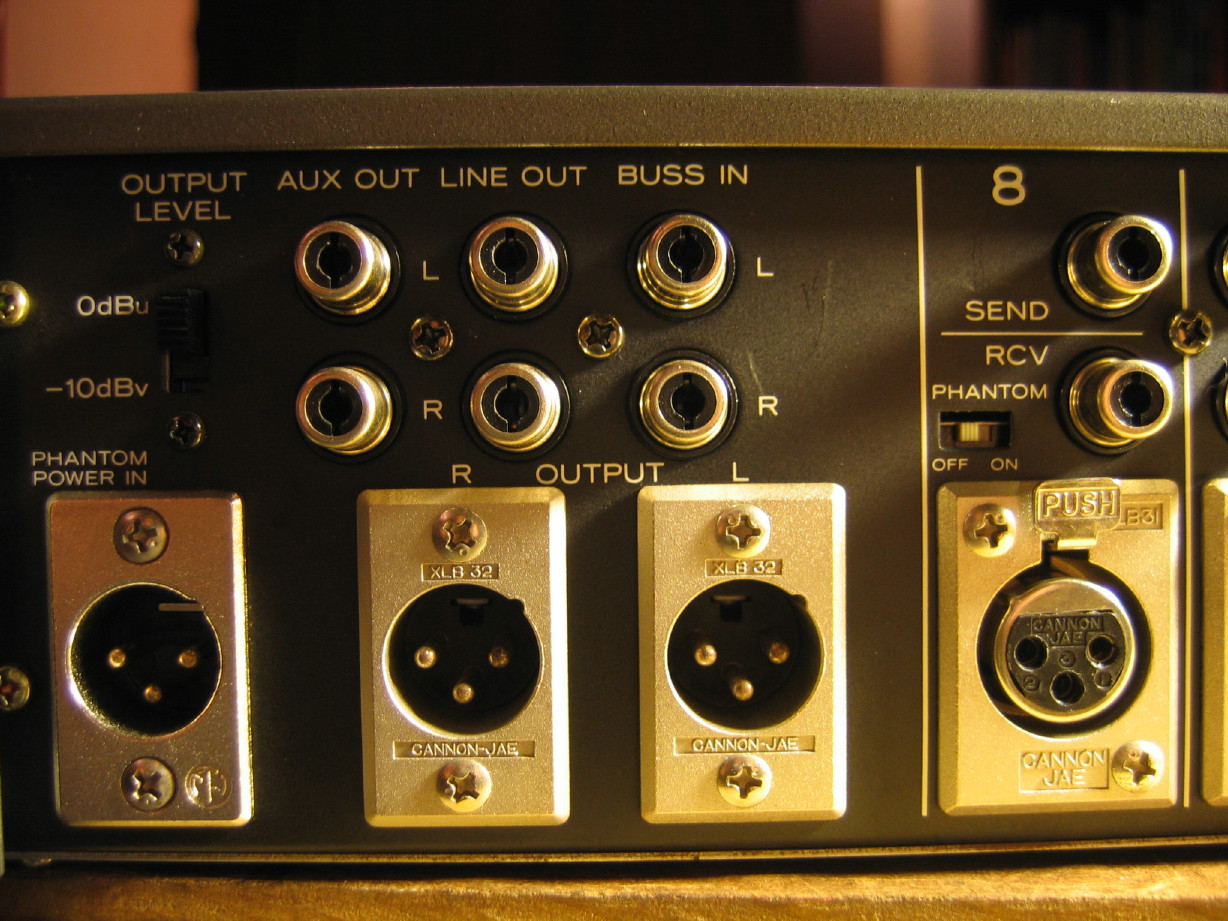
So, like I've said previously, the MX-80 is kind of a funny thing for me because, due to my sort of constantly shifting lineup as my knowledge and understanding has changed over the years, it has never really found a permanent place, but I've never quite gotten up the courage to sell it or part it...it has saved a situation more than once for me and has kept its place in limbo here. Now I have a real need with needing a temporary preamp and 8 x 2 cue mixer for the MM-1000. Yes, temporary, but I think even when that need is done the MX-80 will stay. It really is a versatile unit as, again, it isn't just an 8 x 2 mic mixer...it is really an 8-channel discrete mic pre and an 8 x 2 line mixer. There is also a 30dB pad on each mic pre so you CAN use it for balanced line inputs too, and, though not "ideal" it will work as an 8-channel balanced to unbalanced line converter as well OR mix and match!...the mic pre's connect to the line mixer via jumpers so those SEND and RCV jacks provide you with inserts. Add to it all a mute function and phase reverse, balanced AND unbalanced outs for the stereo buss with individual level controls, buss input jacks so you can cascade multiple devices together and a phantom rail (external supply required) with individual phantom enable switches and you've got a nice package. While the face is a bit scratched up on mine the jack panel is really clean and the inside is clean too. Like all units from this era from Tascam it is solidly built. Lots of steel. So its here to stay...And the PSU is recapped, and there's the new phantom power input jack (now a standard 3-pin XLR...stock is a bizarre and obscure 2-pin XLR) and I have a nice Stewart Audio phantom supply to go with it.

So, that's it. This thread wasn't initially one of my "Story" threads but it really has turned out that way, and though it is in the shadows of a number of other more prominent and prolific "Stories", this is one of the most significant for me.

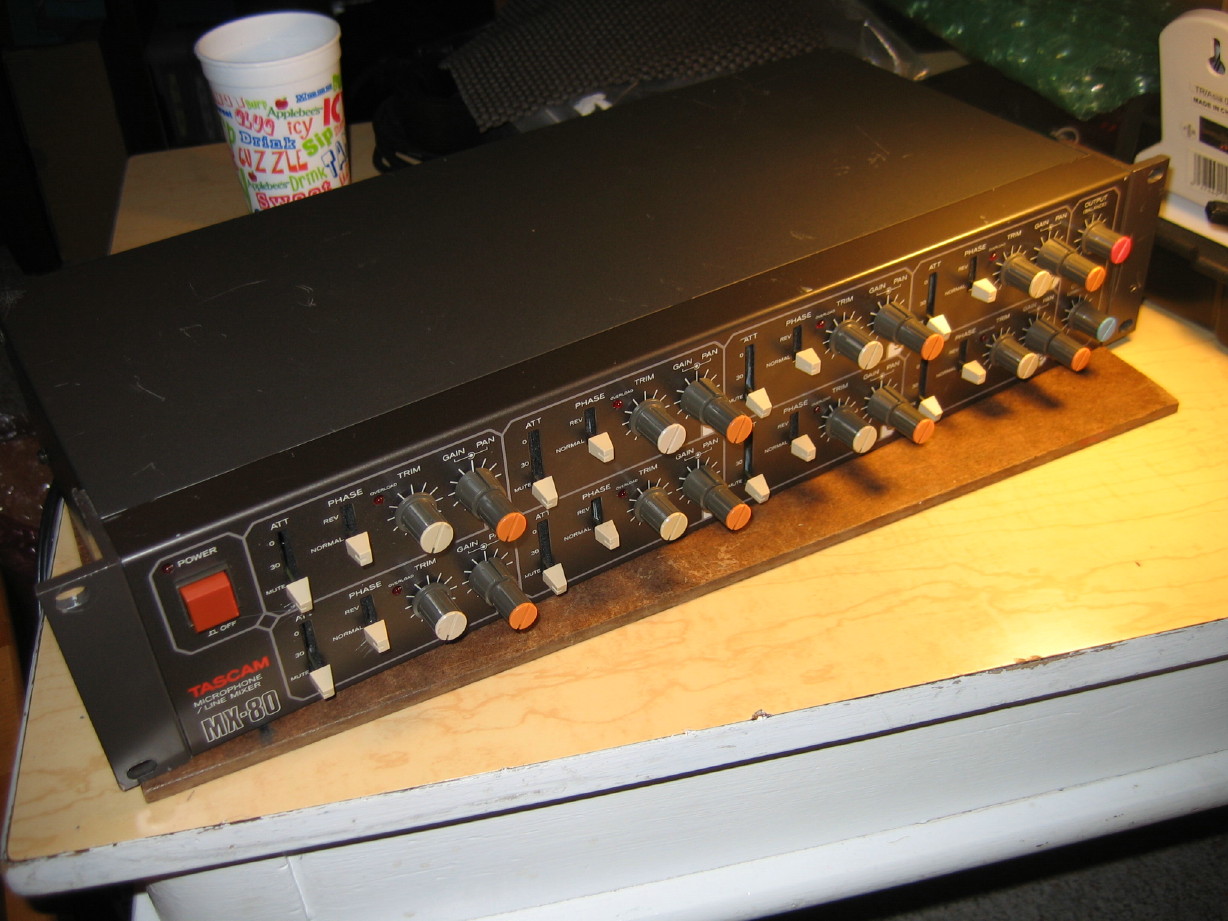
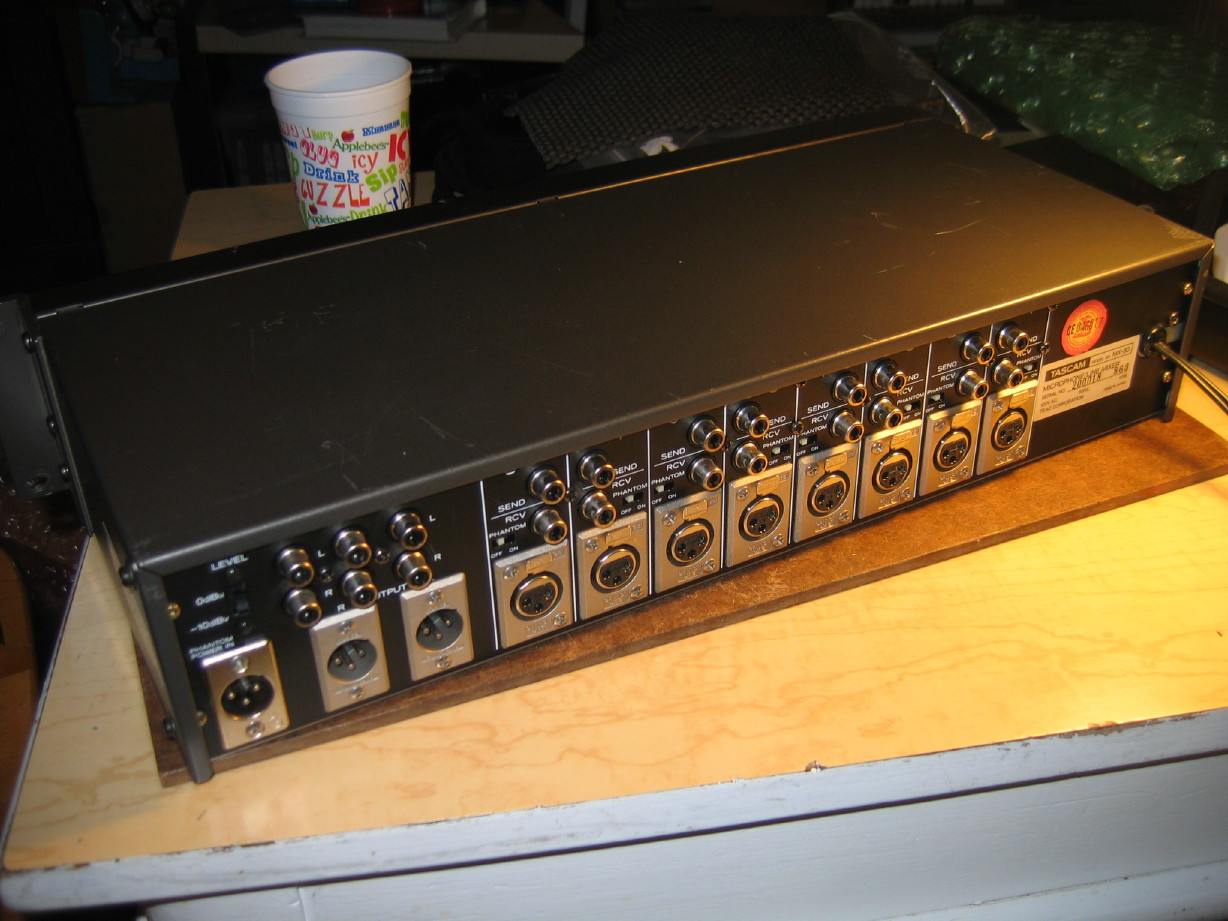
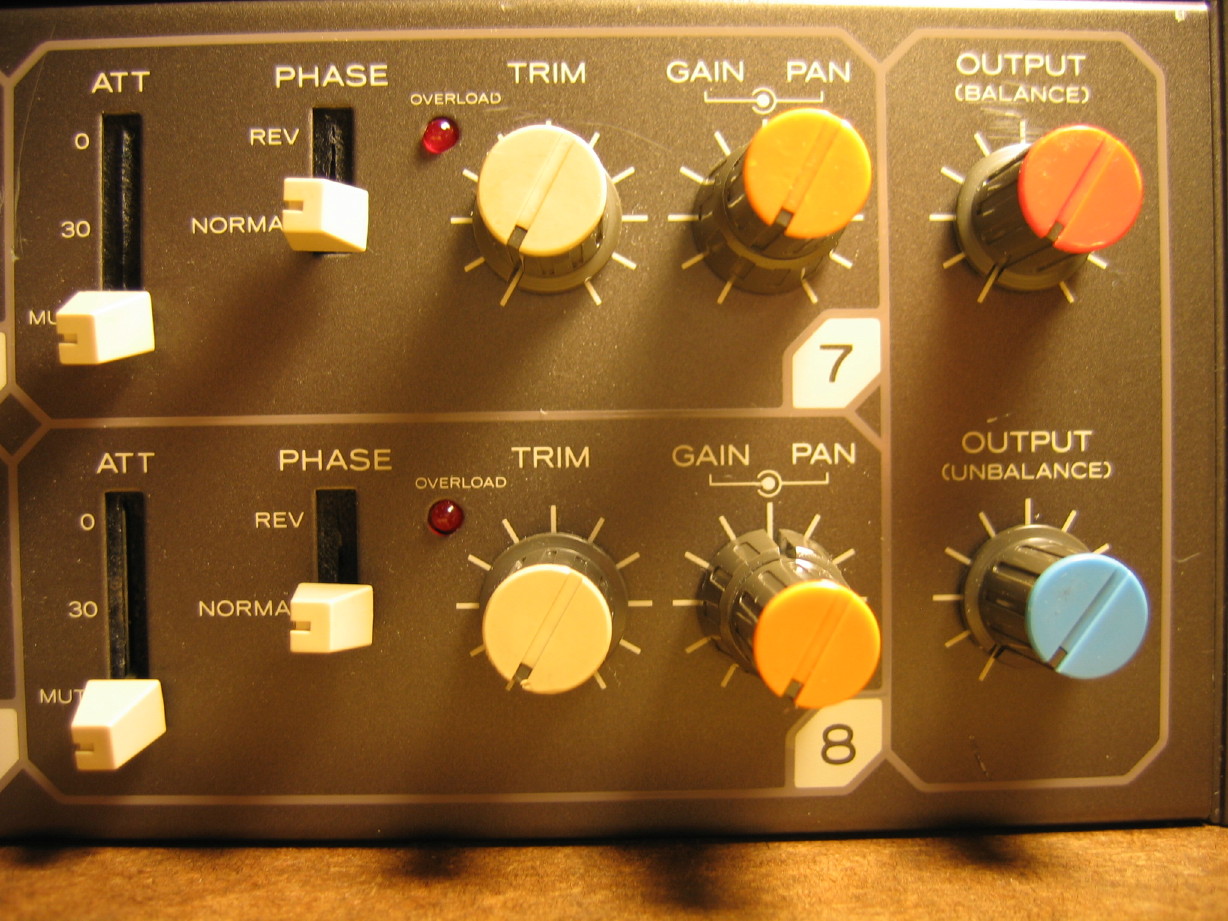
I'll leave you with some additional pictures of the unit's front and back overall, as well as closeups of the master and channel controls as well as the master and channel jacks. Enjoy! ;)

IMG_6896_5_1.JPG


IMG_6897_6_1.JPG


IMG_6902_9_1.JPG


IMG_6901_8_1.JPG
 
Real nice Cory. It's cool to have some closure with the MX-80. You really did a great job, looks minty. How, may I ask, did you get the hardened tape residue off without compromising the original surface? BTW, I kinda held my breath for a sec when you said "It started to smoke".. ;) Yup, indeed, I can totally see how immensely satisfying it is to complete this project. May others follow soon. :)
 
Thanks, Daniel...I didn't hold my breath...I said "Whaaaaaaaat...?"

Nothing else looked burned and its performing fine. If there are problems with anything then I'll go ahead and analyze what I plugged into what when the chip was in wrong and replace components but I think it was just the plastic on the chip itself that was getting too hot.

Leave it to me to cook something...:o:rolleyes:

I used 91% iso alcohol and a piece of t-shirt. I started laying the alcoho-soaked shirt material on the spots and then using a plastic pan scraper to slowly work it down. I recall it was a major PITA. Never experienced that much trouble with any other adhesive material. Don't know what it was.
 
Just a quick clean up of one of your shots, Corry, to finish up the project! :)

No need for a description, just a "FOR SALE" with this photo! Would sell itself and command a premium price too! :D I wonder if you could say "photo of actual item for sale" in the advert? I guess so. It's Cory's actual MX-80 just sexed up. :D In any case, great work Jeff!!:)
 
Leave it to me to cook something...:o:rolleyes:

:eek::eek::D:D ................ ;)

I used 91% iso alcohol and a piece of t-shirt. I started laying the alcoho-soaked shirt material on the spots and then using a plastic pan scraper to slowly work it down. I recall it was a major PITA. Never experienced that much trouble with any other adhesive material. Don't know what it was.

Thanks! I hope I won't have to go through the same with my, ahem, newest acquisition. ;) Might just leave it alone tho. I've heard of leaving some vinegar dampened cloth on the surface. Makes a bit of sense 'cause the chemical in there is a weaker version of the acid in your stomach, potentially would break it down. :eek:
 
No need for a description, just a "FOR SALE" with this photo! Would sell itself and command a premium price too! :D I wonder if you could say "photo of actual item for sale" in the advert? I guess so. It's Cory's actual MX-80 just sexed up. :D In any case, great work Jeff!!:)

Thanks Daniel! :)

Hows your TASCAM 4 track beast these days? Everything OK with it? Hope so!

Cheers! :)
 
Hows your TASCAM 4 track beast these days? Everything OK with it? Hope so!

Oh yeah, the ATR-60-4HS is doing fine, not getting used too much but I wouldn't part with it, same with my others. Been doing 4 track cassette mostly but that's because of convenience and the lo-fi sound that I like. That manual I got from you is great BTW, completes my arsenal! :D Currently working to clean up an M-320B that I got for $200 local, delivered :) but..... that's for a separate "mini story" thread.;) Any bites on your MS-16?:confused:
 
Any bites on your MS-16?:confused:

Bites, yes. Actual buyers with cash in hand, ready to buy it; zero. :o

Someone even posted another MS16 in the local Craig's list here in town for $750, supposedly complete with the dbx units and no details what so ever about the condition of the machine. I emailed the seller 4 days ago about the machine to ask for pictures and info on its condition. So far, I haven't heard back from the guys even! :confused: Maybe it's a fake ad placed by one of the many shoppers who have been trying to beat me down on the price? I wouldn't be surprised if it was. :rolleyes:

Anyway, I don't want to high-jack Corry's thread here.

Cheers! :)
 
Jeff, that's insane...it baffles me how quickly you can turn out those renditions, and they are so awesome!
 
Jeff, that's insane...it baffles me how quickly you can turn out those renditions, and they are so awesome!

Glad you liked it! :)

That one was fairly easy to do as the shape of it wasn't too tricky to cut out and place into a new background. Cleaning up all the scratches took most of the time! :D

Cheers! :)
 
Bites, yes. Actual buyers with cash in hand, ready to buy it; zero. :o

Yeah, it's strange... Often time it's the "how cheap can I get it" which interests the buyer rather than the "what am I buying" part. Maybe you should indeed put it up on eBay, with a higher Buy It Now price with the option to send you a Best Offer. Run it for several weeks or so (I think there's an option for a month or so...) AND, most important to you I'm sure, is tell the buyer that they're responsible for picking it up or arranging freight. That way you won't have to let strangers in and have a firm deal when someone uses eBay to buy it. Really, it's too risky and time consuming otherwise. Plus, with your photo taking skills, not photoshopping mind you but rather using angles, light etc..., you'd be miles ahead of just about everyone else. Photos do indeed sell the item. That plus describing that in effect the machine was serviced / restored etc..., I think you may sell it for a good amount. Just my 2c. But, yeah, let's move on at the risk of further hi-jacking Cory's thread. :eek:

Whaaaaaaa??!

M-320 for $200 delivered?! :eek:

Heh:D Thanks Cory!!;)

And a B version, no less, with phantom power!

Nice score, Daniel! :cool:

Cheers! :)

Yup, pretty excited about it. Thanks Jeff. I like to tell the story that Cory and I, in a rather parallel way, had our respective mixers delivered about the same way for approx the same amount. But that's for another thread.... Sorry for the hi-jack Cory..:o
 
Hey thanks for the hijack concern guys but I don't care about my threads being hijacked...just adds more blogy treasure value to them anyway...its a community after all. I'm not territorial. :P
 
and there's the new phantom power input jack (now a standard 3-pin XLR...stock is a bizarre and obscure 2-pin XLR) and I have a nice Stewart Audio phantom supply to go with it.

IMG_6901_8_1.JPG
How would I go about doing this myself? Not new to soldering but new to figuring things out for myself :confused: Found the neutrik panel connector online, but just wondering how the wiring went so I dont blow anything up :facepalm: and then do I just connect to the output of a standard in/out phantom power supply? Thanks for being a prolific poster sweetbeats :thumbs up:
 
Hi there. So I had to refresh my memory on this one…the original oddball XLR type jack is 2 pins, right? So when you look at the back, the two solder cups bond a ground, and the +48V. On the original jack pin 1 is ground, pin 2 is +48V. You can diagrammatically see that here from the schematic:

2F9869FC-6B99-4F5E-B83C-FA9022808269.png

It’s quite simple.

I have two MX-80s here, but I can’t remember if one of them is that first one I had with the modified phantom power input jack…I think I sold that one…regardless, what’s here is buried from a move last fall.

I think what I probably did for the replacement 3-pin XLR jack was to connect pin 1 to ground and pin 2 to +48V to be, in some way, consistent with the original circuit, and pin 3 is not connected. Pin 1 must always be ground. But it really didn’t matter in my case whether the +48V was connected to pin 2 or pin 3 of the phantom power input jack, because the single +48V conductor inside the MX-80 goes to the switch and then splits and goes to both pins 2 & 3 of every mic input jack, and my phantom supply has the condenser mic input jack and then the output jack carries the signal on pins 2 & 3 from the input jack, and applies +48V to both pins 2 & 3 on the output. So if there’s no mic connected to the input, it’s just ground on pin 1 and +48V on pins 2 & 3 at the output of the supply. So I can use a regular mic cable from the supply to the phantom power input jack on the MX-80 and it doesn’t matter whether pin 2 or pin 3 of the phantom power input jack is connected internally to the phantom power rail that goes to the switch because either one works…+48V is available on both pins 2 & 3. If your phantom power supply is the same configuration (has an input jack and an XLR output jack with +48V applied to both pins 2 & 3), then you would just do it the same way.

The only other thing to consider is the current capability of your phantom power supply. Most of them power one mic. IIRC the transformer on my supply is rated at 1A, and I looked inside and the components were at least rated to 0.5A or something which is overkill for powering even 8 mics. And I think this is likely to be the case in most circumstances.

What make/model supply do you have and what is the current rating on the transformer (assuming it has a wall-wart type transformer)?
 
thanks so much for your detailed response!! I’ll get cracking on the swap out this week.

The psu I was planning to get was just a behringer ps400, and the manual says it’s rated at 150mA, so not sure how far I can stretch that! Open to any recommendations you might have, and thanks again for your help.
 
Back
Top