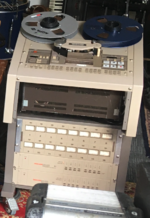
Tascam MS16 - relocating the meter bridge etc.

planty

New member
hi all,

we've recently acquired an overhauled MS16 with the stand, remote, etc.
on our configuration, the meter bridge is placed on the front of the input/output module, but preferably we'd have it mounted in the stand directly under the machine (how you see it usually). I couldn't find anything in the manual (or google) so I'm wondering if anybody here can point me in the direction.
The same goes for the channel arming & head select module which is attached under the MS16 but I'd much rather have it below the remote if that's at all possible.

Last detail; the remote stand seems to miss the orange knobs & metal pieces to mount the auto locator/remote on it. is there an alternative solution for that (without buying a new roll around rack I mean)?

thanks!
 
Hi. I’m having trouble visualizing how things are mounted up from your description. Is there any way you can post a pic of the system?
 
Oh I see. Wow. That all looks odd.

Post a pic of the remote stand too so I can see what’s going on there and what parts are missing.

As far as the arming panel, if you want that in the remote stand that should be as simple (haha) as making a longer cable. You’ll notice the arming panel is in a self contained module, and there is a connector on the back to a cable that plugs into the back of the transport. You just need a longer cable like that. Now that’s the wrinkle. You can buy bulk multiconductor cable and desolder the connectors from the existing cable and solder to the new longer bulk cable, or look for one of those longer complete cable assemblies. *every* now and then I’ve seen something like that come up on eBay. So conceptually it’s simple, but a bit complicated to implement.

With your meter panel, wow I’m not sure what all has to be done there. Does the meter panel connect internally to the backplane of the I/O amplifier chassis? I’d have to see pics of the meter panel removed and the inside and backplane of the I/O chassis…homemade rack ears…weirdness.
 
So, just looking at the manual, I believe the meter unit comes out of the I/O module as a self-contained unit. Pull it out and look at the back. Is there a cable that comes out of it that connects inside the I/O chassis? If so, then look at the back of the I/O chassis. On the right side as you look at the back there should be a blanking panel for the meter panel connector. Remove the blanking panel, unplug the meter unit from inside the I/O unit, mount the meter unit in that upper section of the cart and plug it into that connector on the right side of the back of the I/O chassis. Done.

[EDIT]

Check the serial number of your machine and then refer to pages 4-17 through 4-20 -OR- 4-21 through 4-24 of the manual (depending on your serial number). That section details relocation of the meter panel from the I/O unit to the upper section of the cart.
 
Last edited:
And I’m not positive, but it looks to me like this may actually be a 10’ cable that would work to remote locate your arming panel…!

https://www.ebay.com/itm/10ft-HIROS...2349624.m46890.l49286&mkrid=711-127632-2357-0

What I don’t know for sure is if the cable that currently connects the arming panel to the transport is a “straight” cable (in other words pin 1 of one end goes to pin 1 at the other, pin 2 to pin 2, etc.), and also if you current cable is male sockets at one and and female pins at the other. If it is then I think that cable above would work.
 
Back
Top