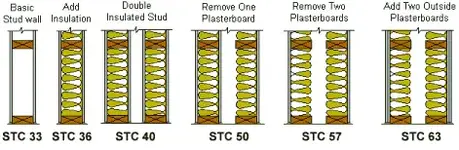
Michael, optimum use of materials for sound isolation is two masses, one air space, period. If you look at the "663" graphic, you'll see that REMOVING material will actually IMPROVE sound isolation, especially at lower frequencies - this is predominantly because the narrower air gap makes this a stiffer "spring", which then couples between the layers better - this passes more sound than if the air gap were larger, and ALL the mass was in the two outside leaves.
Optimum in the case of that graphic (which were actually tested assemblies, BTW) means that (check the 40 and 63 dB walls for this) you can get 23 dB more isolation using the exact same amount of material, just by WHERE in the assembly you place the mass.
This is no joke - I've had seasoned drywall contractors tell me that Resilient Channel doesn't work - in every case, when asked how they used it, they answered that they put it over the existing wallboard and put 1 or 2 more layers of wallboard over it - one even admitted he just "nailed through it", meaning he shorted it completely with nails.
Even the ones who didn't do that, lost any chance of improvement when they added the extra air gap between layers. What they should have done was to remove the original drywall, fasten the RC to the studs, fill with insulation, and THEN put 2 layers of drywall up. These guys told me the stuff actually made things WORSE for isolation - I don't doubt that; the physics are what they are, and that really stiff "spring" that was the 1/2" air gap where the RC was, absolutely killed any advantage the extra layers could have given.
As for insulation, a complete fill between leaves of a wall gives the best performance; even a slight overfill is good, because it causes the insulation to damp the panels' vibrations which further improves the TL, especially at resonance.
Of course, tight caulking is also a must - if it won't float, it won't be sound proof... Steve
Oh, forgot I was going to 'splain the low frequency thing a bit more - check this out
http://www2.sfu.ca/sonic-studio/handbook/Equal_Loudness_Contours.html
Note in the equal loudness graphs, that the lowest graph line is the approximate threshold of human hearing - if you trace that line to the left, you'll see it crosses the audibility threshold at approximately 52 dB at 50 hZ - this means that it takes 52 dB of SPL at 50 hZ before you can even HEAR it - this is why "loudness" controls on stereos are set to boost lows and highs relative to the rest of the spectrum, when listening at lower levels - as you raise the listening level, you reach the flattest region of the human ear at around 85-90 dB.
However, because of the hearing threshold being different for different frequencies, a kick drum that causes your SPL meter to bang 110 dB does NOT cause you to need 110 dB of loss through a wall in order to be inaudible, since you can't hear less than 52 dB at that low frequency.
Also note that the flattest response of the ear is at the level we generally recommend mixing at - and you can see by the shapes of the graphs that your perception of "enough bass" will change with the level you monitor at. That's why I always use a SPL meter on the console, set to C weighting, slow - if I make an adjustment to the mix and it causes this level to drift away from 85 dB, I bring the overall mix level up or down to compensate. This keeps frequency perception more constant, and helps keep mixes more "portable"...
")
 :rolleyes:") You guessed it, the rating drops to an average.
You guessed it, the rating drops to an average.
