My Quasi-Recording/Mix Room Build

  • Thread starter Thread starter Myriad_Rocker
  • Start date Start date
I never thought of wrapping the superchunks like you did. That's a good idea. Fibers n such.
There is more than one reason to do this. The plastic will reflect Hi Frequencies, therefore allowing only low frequency absorption so the room doesn't become dead. Low frequencies go right through the plastic.

The staple gun actually broke on me last night.
Those things SUCK!
I've owned two of them and both broke within a month. PLASTIC CRAP!:mad:

I really want an Air Stapler that shoots T-50 staples. Like this...
PROFESSIONAL WOODWORKER 3/8 in. 18 Gauge T-50 Crown Stapler - 8869 at The Home Depot


The objective for the entire weekend is to simply get the bass traps done. It doesn't seem like that big of a task when you say it but when you think about all the crap you have to do to make it happen, it's a bitch.
EVERYTHING is a "bitch"
when it comes to this stuff.:( Nothing is easy. My latest project is no exception. So far, it's taken six months to design, purchase, demo, build/re install. However..I'm so close to finishing it I can taste it. Hopefully today!!:drunk::D Got a ton of pics to post, but they're on my wife's computer and I've gotta compress and upload them to my hosting site first. Hopefully I'll have time tonight.
 
My progress this evening (sorry for the crappy pics):

Just need to trim the excess here. Then I'm going to attach some quarter round and the bottom kick plate that I made.
bass_trap_covered1.webp

Again, just trim the excess, attach quarter round and kick plate. Good to go.
bass_trap_covered2.webp

Need to actually finish stapling this one. It got late so I just did enough to attach it at the top for now. Finish up tomorrow along with the others and it's good to go.
bass_trap_covered3.webp


The fourth one will be mobile and I have yet to build it. I will make it after I've finished everything else.
 
Very nice indeed! I am on the edge of my seat, waiting for the final product! My hat is off to you though sir. I would/could never do something this amazingly extreme.

Drew
 
Alright, I accomplished the weekend's task. Bass traps are done and slat absorbers are in place. I couldn't fit the entire front of the room in the picture so here it is in sections.

front_of_room_bass_trap_comp.webp

right_side_bass_trap_comp.webp

left_side_bass_trap_comp.webp
 
Last edited:
You're being way too generous,
No he's not.:) The fact is Myriad, you are becoming an inspiration for others here. You are one of the very few here that actually has implemented the known solutions for Small Room Acoustics. Kudo's to you for your HARD work and persistence. And btw....it looks fantastic! Just like you're Sketchup's too!
 
No he's not.:) The fact is Myriad, you are becoming an inspiration for others here. You are one of the very few here that actually has implemented the known solutions for Small Room Acoustics. Kudo's to you for your HARD work and persistence. And btw....it looks fantastic! Just like you're Sketchup's too!
Thanks, fitz!

On another note...I went to mount my the hardware that is used to mount my LCD to the wall. Well, I'll be damned if it won't mount in the CENTER of the wall!!!! The studs are 16" on center but I need at least two studs to mount the hardware...and there's a stud in the middle...and the spacing is too far apart for the mounting hardware to span the distance the rest of the way. :(
 
Hello Myriad. I don't know the size of your monitor, but I'd fasten a piece of 3/4 ply to the center stud and then fasten the Monitor mount to it. Two 1/4" lag bolts should do it.
 
Hello Myriad. I don't know the size of your monitor, but I'd fasten a piece of 3/4 ply to the center stud and then fasten the Monitor mount to it. Two 1/4" lag bolts should do it.
The monitor is 42" and the mount itself weighs about 30lb and comes with 4" (or longer, don't have them in front of me) lag bolts. I'm not sure a peice of 3/4" ply is going to hold it. I think it may rip right out.
 
In that case maybe this will work. Just measure all the centerlines of the bolt holes in the bracket, and align the 2x4 horizontally and vertically accordingly.
 

Attachments

  • Monitor support.webp
    Monitor support.webp
    19.8 KB · Views: 186
In that case maybe this will work. Just measure all the centerlines of the bolt holes in the bracket, and align the 2x4 horizontally and vertically accordingly.
You really think that will work, fitz? No worries of it falling? If so, I think I may do that. I guess the lag bolts to secure the new 2x4's to the wall will have to be twice as long, huh?
 
You really think that will work, fitz?
Absolutely. I've done it.:D

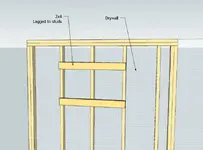
Use TWO 1/4"x 4" long lagbolts at each connection. That's SIX lags for each 2x4. The lags length has to go through an 1 1/2" of the 2x4, 1/2" or so through the drywall, and 2" into the stud...voila...4". You couldn't pull it off with a bulldozer.:D The lags for the bracket will only have to be 2"...1/2" for the bracket and 1 1/2" for the 2x4. They may go into the drywall a bit...but who cares? And btw. Ever try to pull a 2" lag out of wood? Ha!:rolleyes: I've bolted heavier things. If 2" into the stud won't hold it...3" won't either. Ha! However, that's up to you. If you feel better..hell, use 5".:)

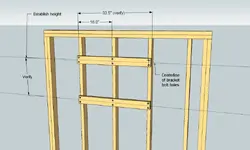
Here's a tip though. Use a Studfinder to absolutely know where the edge of the three studs are. Measure from center of one outside 2x to the center 2x and to the center of the other 2x. Theoretically...it should be 16" center to center. But I've learned the hard way. Don't trust THEORY!;) Once you know for sure, then you can lay out your piece lengths(theoretically 33 1/2") and holes centerlines. I usually mark mine 3/4" from the end and edge for the center of a bolt. That leaves 2" between bolts.

Before beginning, you need to look at your bracket, and make sure the Lag bolt HEADS at ANY of the studs do NOT interfere with the bracket. If so, you may have to countersink those about 1/2". The following instructions do NOT take that into consideration.

Find a bit equal to the diameter of the lag where the bottom of the threads are. Probably around 5/32" Mark and drill a pilot hole in the 2x4 for each bolt that will hold the 2x4 on the wall. Mark a level line on the wall where the bottom and end edge of the 2x4 will be. While holding the 2x4 along the line, insert the drill bit into ONE bolt hole at the end of the 2x4 and drill the pilot hole through the drywall and as deep as you can into the stud.

Now here's the key. USUALLY, small diameter bits are NOT long enough to drill through 4" of material. If you can find a LONGER than typical bit...well, cool. If not, here's what I do. You will need some help holding the 2x in place till you can fasten ONE BOLT. This insures EXACT hole to hole mounting.

Now, RE-DRILL that one hole out to 1/4" on the 2x4 ONLY. Again, place the 2x4 along the line, insert one BOLT AND WASHER in the 1/4" hole, tap strongly with a hammer, and then tighten with a ratchet and socket making sure the 2x4 remains level. Once that is done, now you can drill all the other pilot holes through the 2x, the drywall and into the studs as deep as it will go. Now, remove the bolt again, and RE DRILL all the holes in the 2x ONLY, out to 1/4". Now, go back and redrill the PILOT holes in the wall 2-3" deep as they are already started.


Now, rebolt the first location. Then insert all the rest of the Lag's and washers, tap with a hammer and tighten. Viola! One piece done.

Repeat for the other 2x, keeping in mind the vertical distance of bolt hole centers on the bracket. Vertically, align the horizontal centerline of the top 2x to the horizontal center of the bottom 2x according to that vertical dimension of the bolt hole centers on the bracket.

Once they are up, figure your distance to the midpoint of the width of the room. It may NOT match the midpoint of the 2x, as the center stud may be offset a bit. In fact, I'd almost bet it is. Now you have a centerline to mark your holes for the bracket. Once you have those marked, either by simply raising the bracket up and holding it in place, or by measurement, drill your pilot holes. But frankly, I'd use the bracket itself to mark the holes. That way, you are DEAD ON!:D

And then, do the same with the bolts for the bracket. Tap them in lightly and GET ER' DONE!;)

And btw...the REASON I drill pilot holes are two fold. One, it makes tightening the bolts easier, especially if you hit a knot, and two, it keeps the 2x from SPLITTING...yes SPLITTING! I've seen it happen. 2 bolts, with no pilot, can potentially split a 2x. One other thing. Some people will find this a bit overkill and time consuming. Well, it all depends. I say...can you afford for your monitor to fall?;)
 
One other thing. If you feel a little apprehensive about the 2" lags on the bracket, use HEX HEAD MACHINE BOLTS, washers and nuts. Countersink the backside of the 2x for the nuts and washers for those bolts. That way it CAN'T pull loose.;)


Assemble the bracket on BOTH pieces of 2x first, and then lay up the assembly on the wall and drill all the pilot holes etc. Then fasten the whole assembly up with lags.
 
Ok, here's what I mean.:)

Oh, and btw, if you elect to use the Hex head machine bolts and Lag the whole assembly, you better verify any offset of the studs vs the centerline of the room first. Then you know where to attach the bracket to the 2x.
 

Attachments

  • Monitor support 2.webp
    Monitor support 2.webp
    26.3 KB · Views: 178
LOL! You typed all that up for nothing because I already did it. I used 3 1/2" lag bolts to secure the 2x4's to the studs, though. And I only used 3 lag bolts per 2x4 (right in the center). The battery on my drilled died halfway through the very last hole. Just for fun, I held onto the bottom one that I put up and lifted my feet off the ground. I was hanging from the 2x4 I had just hung so I think I'm good.

Now I just play the waiting game for the battery to charge back up and I can finish the job. I had an extra battery but I'll be damned if that one wasn't dead, too. :D
 
Boards up!
boardsup.webp


Mount up!
mountup.webp

I'm not putting the LCD on until I get the front wall treatment up and done. I needed the mount up there so I could make my front wall treatment to accommodate it.
 
LOL! You typed all that up for nothing because I already did it.
:eek:Good for you! Had I known the bracket looked like that..well, I probably would have done it differently than I said. Oh well. Looks good Myriad.
 
Yeah, the boards were spaced a bit closer together than your drawing. I can't think of a way it could have been done differently. So do tell... :D
 
Back
Top