Main Output Pot on Behringer UMC1820

  • Thread starter Thread starter raybbj
  • Start date Start date
raybbj

raybbj

Member
Hi Folks,

Does anyone know what kind of pot (part#) is used for the main output volume pot on a Behringer UMC1820 interface? I have had endless conversations with Chat GPT, Gemini and Co-Pilot, but to no avail. My pot is scratchy and it's a sealed pot so I don't I can lubricate it with DeOxit.

As popular as the Behringer UMC series of interfaces are, surely I can't be the first person with a scratchy main output pot.
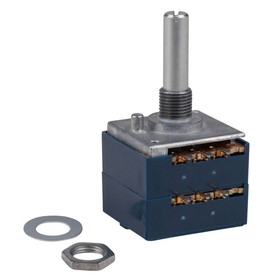
I know the specs:
- 6 pin (stereo)
- sealed
- Audio Taper
- 10K
- 15 mm shaft
- 9 mm housing
- D shaft
- mounting lugs
- Panel Mount

I just can't seem to source these specs. One AI assistant told me that Behringer made these pots custom for the UMC interfaces, but that goes against their business model of using off the shelf parts to keep costs low.

Can anyone provide guidance?

If I can't source a replacement pot, I might try putting some DeOxit on the shaft and seeing if it will wick down into the housing.

Regards,
Ray
 
I’d give cleaning it a shot. But sparingly. Being sealed there’s no place for exceess to run off.
 
Confused? You know the spec? Can’t you just order a compatible item or is there an issue? All I have ever done is pop it out, so I can check the physical size and the pad spacing, and order one from my usual component suppliers. Visually that’s all I’ve done. Usually they fit, sometimes with a bit of pin bending. Other times the body might be a few mm too big so physically it doesn’t fit, so you order another from somebody else? In all the years of doing these kind of repairs, I’ve never even kept records for myself of where the parts came from and certainly I’ve never thought of putting the info on the net, because in another year there’s no guarantee the supplier will have the same spec again? 10k log two channel/stereo pot. 15mm shaft, 9mm housing? Is that not the other way around?
First poss

I found some 16mm versions on Amazon these have splined shafts not flat.

If I was fixing it, there seems no real issue based on what you’ve said, but once the faulty one is out, I’d not expect any issue. I tried AI and the results are ridiculous. Clearly the training for technical things is crazily weak. All suggestions are rubbish!
 
Last edited:
Like I said, I can't seem to find anything that meets these specs. I'm on vacation next week, so I will take it apart and put some DeOxit on the tip of a toothpick and see if I can any to wick down the shaft, otherwise I will keep trying to source the pot, but it's proving to be difficult.
 
In what way? They look perfectly normal? You've not taken it apart yet? Then how did you get the specs? Pot bodies in the miniature size are generally 16mm. The critical thing really is the shaft type, and the depth from front to the two 3 pins. That is easy if the panel to pcb pad distance is larger, but impossible if it’s very small.

Part of deoxit success is the swooshing of lots of fluid under pressure. You can dribble in down the shaft. It will evaporate before it gets to the tracks, and even if it did, the solvent would lift the dirt, evaporate and put it back again! Usually, once out, you can release the tabs, remove the cover, swoosh and replace. Get the thing out first. Then fix it or swap it.
 
Here are photos of the UMC1820 pots and the underside of the circuit board. Maybe this will help you find a proper replacement. Yellow pots are the monitor and main controls, the blue ones are the channel pots. The pushbuttons on top of each channel and the headphone controls are on a separate circuit board that connects via the connector.

UMC1820.webp

UMC1820 backside.webp
 
Here are photos of the UMC1820 pots and the underside of the circuit board. Maybe this will help you find a proper replacement. Yellow pots are the monitor and main controls, the blue ones are the channel pots. The pushbuttons on top of each channel and the headphone controls are on a separate circuit board that connects via the connector.

View attachment 152559
View attachment 152560
Thank you for the photo A203 seems to be what I need, but it also seems to be a Behringer specific part#. I'm still searching for the correct replacement
 
It's doubtful that they have anything exclusive. ALPs does make a pot the should fit. This has all the dimensions. Flat shaft, no detent, 10K audio taper. You can search by part number.

 
I've run into the same issue with Behringer gear—they definitely don't make custom pots, but they do use specific Alpha or ALPS clones that can be a nightmare to find on Mouser or Digikey. Your best bet is searching for a 9mm dual gang A10K horizontal snap-in pot; look specifically for the Bourns PTV09 series or Alpha RD902F. Even if the shaft length is a hair off, you can usually trim it or shim the knob. Before you swap it, try the DeOxit trick: pull the knob, flip the interface face-up, and let a drop of D5 sit at the base of the shaft for an hour. Sometimes it actually wicks past the seal enough to clear the scratchiness without a full teardown.
 
  • Like
Reactions: RFR
It also seems to be a common part for all the Behringer interfaces. I see them in the 404HD, 202HD, 204HD, etc.

Alpha has a pot with the mounting tabs. As usual, there are probably Chinese pots that are direct replacements. Search AliExpress.

1778698568192.webp
 
Alps yes, knew soon as I saw it. As Rob said, cleaner works to some degree by the "blast". There looks to be a circlip at the shaft/bush junction, find the opening of that and blast with Deoxit. Now, AFAIK Dewhatsit is not a lubricant so if it does not effect a repair try WD-40*
Are both channels equally scratchy? If not one of those caps local to the pot might be leaky putting DC on the track, if you do have to swap the pot I would change those as well. That said! Modern electro-caps very rarely fail (and by "modern" I mean in the last 30 years!) but you never know? Bellringers might have had a bad batch?

I don't know the OP's technical ability of course but changing a multi-pin component on a PCB requires some skill. Tracks can be lifted or/and broken. There will surely be tracks both sides of the PCB and it is VERY infuriating after fitting such a part to find you have broken one! I STRONGLY suggest the use of solder wick to clean the PCB, not a sucker and clean holes with sharp cocktail sticks never wire! That sticks and almost guarantees buggered print.

*I KNOW! Don't bother! It has worked for me for 50 years.

Dave.
 
Tracks can be lifted or/and broken. There will surely be tracks both sides of the PCB and it is VERY infuriating after fitting such a part to find you have broken one!
Audio boards will probably be double-sided. Multi-layer PCBs can be cruel if you pull out the conductor down a hole.
 
Audio boards will probably be double-sided. Multi-layer PCBs can be cruel if you pull out the conductor down a hole.
What do you mean -‘pull out the conductor down a hole’ - is it the extraction you’re talking about?
 
Lots of great information here. Thank you all for your contributions. I will keep trying to solve this problem using all your tips.

@ecc83 I'm skilled with a soldering iron and I will use your tip of using a wick vs. a sucker if I can source the part. Thank you.
 
What do you mean -‘pull out the conductor down a hole’ - is it the extraction you’re talking about?
You make a bare pcb. Drill holes in it. Then you have to metalize the inside of that hole, so solder has something to attach to.
If you yank out a through hole component, the metal in the hole can come out with the component.
 
You make a bare pcb. Drill holes in it. Then you have to metalize the inside of that hole, so solder has something to attach to.
If you yank out a through hole component, the metal in the hole can come out with the component.
Ah! We call that "plated thru hole technology" Works very well if done right and avoids jumpers. Best to be aware of it though because it might not be obvious that a track is carried thru to the other side. Again, wick is far more gentle than a "sucker-pop". Not used the the vacuum solder stations so cannot comment.

Dave.
 
I'd use both hand sucker and solder wick. They both do a good job.
When it goes wrong, I re-apply new solder, and try to suck that out better.
I have used pump sucker stations, but manual gives you better control.
 
Back
Top