Help me with painting my guitar please.

guitarded2

New member
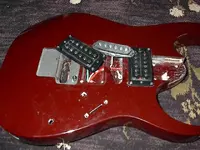
Ok here is the scoop. I have been procrastinating painting/fixing up my guitar for a while. It is an Ibanez DTX120 (yeah yeah ugly destroyer/iceman wanna be) Finally the guitar broke down to a point where the only way to fix it was to replace the volume 500k pot. I decided to put a 250k pot in it to make it less bright I switched the pickups from the stock humbucking pickups to a seymour duncan (bridge) and duncan design (neck) The pickups worked for a while but then the wires in the guitar were put in too sloppy and shorted out because of my sloppy soldering. I just ripped out the electronics and went to a music store and bought a new 3 way switcher thingy and two 250k pots. I had another input jack laying around the house so I had everything I needed. I tried to drill a hole into the guitar because the pickup wires were not fitting through the hole. After getting it stuck into the body I brutally beat the drill bit out :o. I got a bigger hole from it but the paint on the body was pretty much gone thanks to my bipolar episode:D
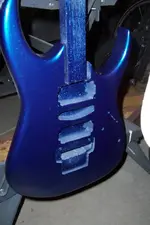
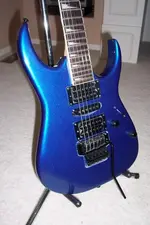
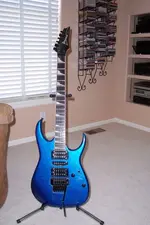
. I decided to paint it I used a hand sander got all the layers of paint and clear coat off, sprayed the primer over the guitar (ten layers), waited 15 minutes between each, let it dry over night, sprayed the metallic spray paint over it about 8 times using the same formula as the primer, and I waited over night, I looked at it today and it was a little wet it eventually dried but the problem is that it seems almost grainy Dad recommends that I simply use a rugged cloth to gently sort of sand the linty type pieces off. I am afraid that this might mess it up I sprayed three clear coats on and it just appears that the clear coat is not even doing anything it smells like spray paint but it just doesnt seem to do anything please help me. I love this guitar its technically my first electric guitar and I dont want to lose her. I used the search function and could not find anything useful after reading a ton of websites nothing seemed to help me with my problem.

thanks in advance


PS guitar modding is a migrane I think I would rather pay that 2k for a dream guitar rather than lose all of my hair trying to mod one.
 
I can't help you out....I am just a "student" at this myself...but I wish, I'd thought of your user name....it would fit me perfectly....:D:D:D

I will have to use it as a blurb sometime though!!!
 
ugggg

did you sand your primer ?? ..... if you have 10 coats of primer you should have stoped at 5 let it dry a few days then wet sand it w/ 600 ... then apply your final coats of primer again let it dry a few days and wet sand w/ 600 ..... then you can start w/ your color and clear ..... again let it cure about a week then wet sand w/ 2000 and start buffing
 
STOP what you are doing, go to Stew-Mac's website, and get Dan Erlewine's book on finishing, and READ IT.

Do NOT, I repeat, do NOT use nitro (unless you like the risk of dying in a giant ball of flame), but use either Stew-Mac's waterborne finish, or LMI's KTM-9.

Basically, you haven't done anything right yet, so take my advice, get the book, read it, and then do what it says. Dan's techniques tend to be a bit on the fussy side, but they work even if you don't have Dan's level of technique and experience, so they are excellent for amateurs.


Light

"Cowards can never be moral."
M.K. Gandhi
 
did you sand your primer ?? ..... if you have 10 coats of primer you should have stoped at 5 let it dry a few days then wet sand it w/ 600 ... then apply your final coats of primer again let it dry a few days and wet sand w/ 600 ..... then you can start w/ your color and clear ..... again let it cure about a week then wet sand w/ 2000 and start buffing


Why the fuck would you wet sand primer? You wet sand clear coats prior to polishing. Wet sanding any sooner than that is a waste of effort. Not to mention, why would you want more than one coat of primer? It's a guitar, you want a thin finish.

By the by, Muttley and I have posted MANY TIMES about this subject. Use the search button and you will find a great deal of good information on the topic.


Light

"Cowards can never be moral."
M.K. Gandhi
 
wet sanding ????????

why would you not wet sand primer ????????? if you want a smooth finish it starts long before the paint
 
why would you not wet sand primer ????????? if you want a smooth finish it starts long before the paint

dave has got a point here...I not only play guitar and mess with finishes I also paint custom motorcycles in my bike shop. Only diff is wood or metal, after primer in this case, its basicallt all the same steps. First thing, and most important is the temp and humidity you are trying to paint in....its gotta be 70-75 and no higher than 50 percent humidity....period. Or you will get a haze, fish eye, or scaling look it just doesn't dry right. Primer is for sealing imperfections in the sanding and thats all, once its smooth its done no matter how many coats you apply, always use a "tac cloth" in between coats. When doing hand "shaker" can paint I use Dupli-Color Laquer, its avaiable at Wally World in the "auto" parts section (not paint store part) some auto parts storesell it, and it works good, and is easy to apply if you take time and be sure to shake your paint up good. Use 600 grit inbetween primer and base (metallic) 2-3 coats, and clear use 1200grit and this is where you want more coats to finish (sanding removes coats), always let it dry in between coats...good luck
 
Last edited:
why would you not wet sand primer ????????? if you want a smooth finish it starts long before the paint


Sand it, yes; wet sand it, no.

There is absolutely no need to wet sand preliminary coats. Also, 600 grit is way higher than you need to go. 320 is fine. Use the white stuff with the lubricant in it (Sta-rite or something like that). It goes MUCH easier, and does a faster job which is every bit as good.


Light

"Cowards can never be moral."
M.K. Gandhi
 
I'm reworking my cheapie RG 320 as we speak. Getting close to the finished product actually. Here's what I did and learned...keep in mind, I'm no expert but I'm working on my finished product and it's turning out quite nice for a $50 paint job and it would so happen that I painted it a metallic blue :). I'm braced for a flaming from the pro's but this is a DIY/Homegrown forum so I'm for keeping it real.

Strip it with something fairly agressive then get down to about 300-400 grit and prime it. I used a combination wood sealer/primer. It's supposed to help control moisture and stabilize the wood. Not sure if it's to protect the wood or if it's to keep moisture from coming out and lifting the paint but that's what the folks at the hardware store recommended. Follow the manufacturers instructions and let it dry!

If you don't let it dry completely, it can continue to outgas and the gas will come up through the paint as it's trying to dry and this can create bubbles or pin-holes. If you've got runs (in the primer sealer :eek:) then smooth it again with 300-400 grit paper.

Make sure the surface is smooth and clean then go at it with the paint. Follow the manufacturer's instructions but patience and practice will get a smooth run free color down. As for metallics...metallic paint have little flakes of "stuff" in it. I read somewhere that to get the metallic bits to lay down when sprayed that it's ideal to paint onto a surface that is laying down, not hanging upright. I also read that metallic paints have a "flopping" agent that helps to pull the metallic bits down but it doesn't always work if the paint is applied to wet and/or too dry. One more tip I read was that it would be best to put the last coat on a bit dryer than too wet and get sags. Metallic paint will feel a bit rough due to the particulates in it. Once the clear coat is applied, it covers them and won't be noticable.

I applied several coats, and was sure to again follow the manufacturer's instructions. The thing I kept reading about was letting the paint "flash". It again has to do with out gassing that happens as the paint dries. If you put heavy coats on top of freshly sprayed paint, it will trap the gas under the fresh wet paint and it will push bubbles up creating pin holes or bumps. Apply light coats until coverage is good then apply one last wet coat. Between coats, if you get runs in the paint, you can color sand. I used 400 grit paper to clean things up just before the last coat of paint. You don't want to color sand the last coat because it knocks off the metallic flakes and dulls the metallic shine.

Let it dry!

Then, finally the clear coat. Just like the color coat, lay it down in thin coats. If you get runs or dust or what ever, color sand using wet/dry 1000 grit. Apply several light coats then finally one last wet coat. Watch for the clear to flash then put on the next coat. Too soon and you'll be sanding again.

After your last clear coat, you NEED TO LET IT DRY COMPLETELY before doing anything else. I've read that several weeks is reasonable. It's still soft and "gummy" and won't let the sand paper work properly if you decide to go the extra distance for a super smooth high gloss finish. Either way, you'll probably get orange peel or other surface imperfections...more sanding. Go at it very lightly with 1000 grit, then when the surface is smooth, go at it with 2000 grit. (That's where I'm at currently). It will look dull and hazy. The idea is to get the surface glass smooth but not to go too deep and into the color layer. Once it's smooth, go get some rubbing compound to remove the fine scratches, then finally, polishing compound followed by wax.

There's a lot of good info on the web, look up color sanding and orange peel. you'll turn up a lot of info.

I know...here comes the next question...how about some pics. Sure, be glad to. I'm on the road right now but as soon as I get home I'll take a few snaps and post 'em.
 
Last edited:
Sand it, yes; wet sand it, no.

There is absolutely no need to wet sand preliminary coats. Also, 600 grit is way higher than you need to go. 320 is fine. Use the white stuff with the lubricant in it (Sta-rite or something like that). It goes MUCH easier, and does a faster job which is every bit as good.


Light

"Cowards can never be moral."
M.K. Gandhi

Just wanted to add, if you get the paint laid down cleanly and without runs, splatters or bugs. Don't bother with color sanding between coats of paint (or clear for that matter). Only if it's going to be an eye sore. The final clear coat is where sanding with fine and superfine (1000, 2000, 2500 or higher) is where it will pay off in the final finish.
 
I found a couple before/after pics on my laptop. The little specs you see in the after...not...something weird about how the camera picks up the metal flakes.

My next step is to do a final color sanding. I'll use 1000 grit then 2000. I'll finish with a buffing compound then a polishing compound then finally a wax of some kind. I don't have a big fancy buffer. I intend to do it old-school...by hand. A lazy Saturday on the back poarch is calling me.

Gotta brag a bit. I'm calling it the Radius-G. After sanding it down, I hit all the edges with a round-over bit in my hand router then got pretty agressive with the palm sander.

Scored a couple EVH Wolfie pups on Ebay and I'll keep the stock Ibanez single coil. I'll get rid of the fretless cedar neck you see in the pick and put the Wizard back on and call it good.

Ok, so you were looking for help and I hi-jacked it. Sorry. Just trying to offer a few pointers and to show that it can be done and I'm serious...less than $50 bucks. It just takes some patience, some home work and a little elbow grease.

Oh, and no matter what...NEVER use epoxy filler on a guitar and like
Light said...Nitro-Cellulous...hope you've got a full-service retirement center picked out and a good fire policy on your place. If you don't turn your brain to mush, the place is sure to go up in smoke unless you really know what you're doing but then, you wouldn't be here asking for advice either. It isn't worth it...not even close. ;)
 

Attachments

  • Before.jpg
    Before.jpg
    61.7 KB · Views: 87
  • After 1.jpg
    After 1.jpg
    61.6 KB · Views: 86
The final clear coat is where sanding with fine and superfine (1000, 2000, 2500 or higher) is where it will pay off in the final finish.


WAY too high. Sanding between intermediate coats should be done with 320, because anything higher is just going to make it take forever, and it is plenty fine enough.

Once you have your final coats of finish on, THEN you start going higher. Start with 600 grit, then 1000, and if you want you can go to 2000, but you are still going to need to use some kind of polishing compound to get it truly glossy.


Light

"Cowards can never be moral."
M.K. Gandhi
 
Thanks Anfotan,

Light's probably right (no doubt) but I'm going at it cautiously. I finished my 1000 grit wet sand this morning. It took a little while (1/2 hour or so) but I think I was lucky in that my clear coat went on pretty cleanly and smooth. I thought the orange peel to be minimal at first but after a minute or so of light sanding, I could really see the "lunar surface" in the clear coat.

The surface is baby butt smooth now but has a foggy appearance. It wasn't like sanding at all but more like polishing. When the surface gets smooth, the sandpaper seems to glide over the surface very easily and I take this as a sign to stop, wipe it down and have a close look.

I bought 2000 grit so I've got nothing to loose here but a little time. I'm going to go at it with the 2000 just because it will make up the difference between the 1000 grit and the much finer stuff in the rubbing compound. Also, since I don't have a fancy electric buffer and plan to apply the compound by hand, if nothing else, it might reduce some of the elbow effort if I were to skip this step.

Slow as you go, with a dose of patience. I'd be singing a different song if I were paying someone by the hour. I hope that the original poster can get a little something from my project and the comments of the others.
 
Bullshit about not wet sanding primer. I worked in the auto refinishing business for years, and the ONLY way to get a slick base to paint on is to wet sand the primer coat. It is the industry standard way to prep primer. Wet sand with 400 or 600 grit. MAAAYBE 800 grit. Anything more than that is superflous and might even cause the base coat to not adhere right. Wet sanding with 1500 or 2000 grit is what you do when you are done painting, and are wets sanding the clear coat to buff out.

Dry sanding primer is a good way to waste lots of sandpaper, and guarantee that whatever you are sanding comes out looking like fried ass.
 
I'm not sure how a simple subject like this had to get so confrontational. I'm willing to bet there's more than one way to get the job done.

I opted not to wet sand the primer but I did end up hitting it with 400 grit dry to smooth out the surface. I had a few splatts and bumps that probably would have shown through the paint. I then put on several coats of color then wetsanded with 600 to smooth the color coat then after it dried, I put on one more coat of color. I didn't color sand the last layer of paint because of the metal flake.

I then went at it with clear. Several light coats then one final heavier wet coat. I then finished up but using 1000 then 2000 then finally with 3M rubbing compound and then finally a wax/cleaner.

One of the pics looks as if there's a smudge on the front...it's a couple finger prints. Turned out like glass. Not to bad for a DIY paint job for less than $50 if I do say so myself.
 

Attachments

  • Finished 1.jpg
    Finished 1.jpg
    59.1 KB · Views: 59
  • Finished 2.jpg
    Finished 2.jpg
    58.4 KB · Views: 59
You should be wetsanding with 320 in between every coat to smooth it out and allow the next coat to stick better. That probably would have avoided your problem.
 
Back
Top