You are using an out of date browser. It may not display this or other websites correctly.
You should upgrade or use an alternative browser.
You should upgrade or use an alternative browser.
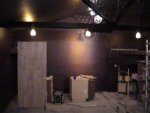
Our Jam room under construction
- Thread starter bigdaddyd
- Start date
When you want to post a pic, and you are in the "Message" box, look below it in the "Additional Option" field. Click on the "Manage Attatchments" field. A "browse" box will pop up, which allows you to browse your computer files. Pick one, then click on "upload file" and WAIT. When the file has been uploaded the file name will apear in a box. Then click on "Close this window"(or something like that  :rolleyes:") ) Be sure your file has the allowed extention, and is under the size limit.
) Be sure your file has the allowed extention, and is under the size limit.
fitZ")
) Be sure your file has the allowed extention, and is under the size limit.fitZ
Michael Jones
New member
WOW!
That looks cool man.
Want to come over here and do my drywalling?")
That looks cool man.
Want to come over here and do my drywalling?
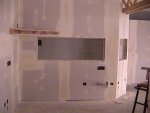
There is a builder in Spokane that does all the main big commercial jobs. Hes an elite contractor. He built this "castle" looking office and requested my buddy to personaly do the finish taping. My pal is that good. Me and him shared a business together for a little over a year. I learned to tape and finish sheetrock from a real pro. I hate it. But I can do it pretty well.
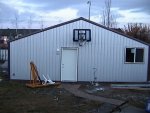
The only thing I didnt do personally to my building is pour the floor. Kind of a good feeling, I guess. Saves the denaro`.
Being an electrical contractor came in handy for the wiring!
D
The only thing I didnt do personally to my building is pour the floor. Kind of a good feeling, I guess. Saves the denaro`.
Being an electrical contractor came in handy for the wiring!
D
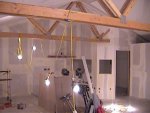
An update.
I paint tommorrow. Then lights, then carpet.
I just purchased a pintech electronic drum set. Middle of the road in size. ( or is it middle of size in the road.) We already have a racked pearl acoustic set which is a loaded 7 peice. What to do, what to do?!?
I came up with a wild idea for a drum stage. I will build a revolving platform and have the drums back to back. Ive thought it through and have the iron being bent now to go under the 1 1/2" cross layered plywood. I will take some pics as I go, and post them all in the end. My kids and I are hooked on rush, so in the shadow of a the professor- vwa la, rotating drum set.
should be cool...
D
frederic
New member
Well, since I built a rotating platform about 10 years ago, I'll share with you how I constructed it. I just looked to see if I had pictures, but alas, I do not, so hopefully my description will help you out.
The rotating part was fairly easy... it was three layers of 3/4" commercial grade plywood (4'x8') sheets screwed together, to form a three layer, 1.5" thick square. We marked the center by going from diagonal corners, marking off a line in both directions. The intersection point is the center, and we drove a deck screw there, through a 4' long furring strip, 1" from the edge of the furring strip. On the other end, we drilled a 1" hole close to the other edge, and attached using a metal bracket, a milwalkee sawzall. We had to drill a 1" hole through the plywood for the long blade to drop through. Then we walked around the platform, cutting out a perfect 7'10" circle.
The circle was actually damn good too
Then we built a false stage over an existing stage, and placed the drum platform where we wanted it, lying it on top of the new plywood stage. Then using a sharpie, holding it perpendicular to the stage, traced the outline of the plywood circle, removed the circle, then cut that out with the same sawzall. If you go slightly outside the line that's okay, just don't go inside so it doesn't bind. This will give you about 3/8" around the edge of the plywood stage and the "hole" in the false stage that it will rotate in.
Now comes the fun part, making the platform self-supporting and rotating. Our false stage was 8" or thereabouts above the actual stage, so we put eight 4' sections of 2x4's on the bottom of the circular drum platform, using long deck screws, in a star fashion, then trimmed the outer edges so they matched the circle shape and didn't stick out. To the bottom of that, we attached eight rubber wheel casters, which will roll on the real stage below, which was flat obviously.
For a center section, I cut out where the 2x4's met in the center, and bolted on a square flange, with a 2" or so round pipe welded to it, using lag bolts. On the floor, we mounted another 1/4" thick square flange, with another pipe perpendicular, which was a slightly smaller diameter as compared to the larger diameter pipe on the bottom of the rotating floor. We packed that with axle grease, though I imagine this was not the best design for a "bearing". As long as the pipe on the rotating platform extends over the narrower pipe on the floor, and neither pipe reaches the other flange, that's okay. We left about an inch or so clearance on each end, certainly enough overlap. The pipe in the center didn't support any weight, the eight casters did the work.
Now your platform freespins, if you and your friends try to rotate it.
Now comes the hard part... trying to rotate it mechanically. Initially we tried a huge electric motor with a rubber wheel fitted to a homemade hub, clamped onto the output shaft of the motor, and rubbed that wheel against the 1/5" thick plywood flooring, however to be honest, that just didn't work out at all. It slipped too much and the smell of hot rubber from the rubber tire (think ATV tire, smallish diameter) wasn't very nice. This wasn't going to work out well.
So, what we did was on the 2x4's is cut them back from the outer edges a little bit, and put another scrap of 2x4 over the edge of each, forming eight "hooks" if you can picture it. Then we used a manilla rope, wrapped it around twice, then over to the side or back, I forget, under the false stage, and wrapped it twice around a pulley we attached to the motor. We tied a knot in the rope forming a loop, and this worked out a lot better, even though it did slip a little bit. We ended up wrapping the inside of the pulley with a thin strip of rubber from an old car floormat, and used epoxy to hold it on. We tried many glues and epoxy is what held.
Anyway, that is what we did. Later we realized it would have been a little easier had we did the reverse, using the same spindle as before, putting the casters on the real stage, facing up, and having the platform rotate on the casters without the 2x4's. For a drive wheel, eliminate one of the casters, and put a small rubber wheel on an electric motor, so the platform rests on that wheel, and mount it so that the rubber wheel on the motor, has a flat spot where it rubs on the platform. Then the weight on the platform will encourage it to bite more, especially if the wheel is slightly deflated, giving it more contact patch with the rotating platform.
The sad thing about all this effort, for this one show, is that our drummer started to rotate with the entire drum kit as planned, however something shorted, burned out, or died, when the drummer and his kit had his back to the audience, which is how he had to play for the next hour, until the next break where we had to move everything around so he faced the right way.
Junkyard electric motor, junkyard pulleys, homemade platforms, well, it was a disaster waiting to happen and this only proved not only were we not-so-talented musicians, but we made really bad engineers to boot!
But we made up for it all by being loud. Since this was the mid 80's, apparently no one minded.