C
You are using an out of date browser. It may not display this or other websites correctly.
You should upgrade or use an alternative browser.
You should upgrade or use an alternative browser.
TexRoadkill
Audio Bum
Looks good.
Track Rat
Just Your Average Sized Member
Interesting. Will that be between the glass?
C
casenpoint
New member
Yes, It is supposed to reduce any noise between the two windows. And dark to reduce any glare(reflections) that might be seen on either side of the wall.
RICK FITZPATRICK
New member
Hey casenpoint, don't forget a small desiccant package(silica gel) to keep condensation from forming between the two pieces of glass. You probably knew this already, but thought I'd remind you if you didn't.
fitZ
")
fitZ
C
casenpoint
New member
Where should I place it if I decide to do that? I could shove the packets between the two fabric where they meet. Will it be effective tucked away like that?
The new glass is on order and should arrive Monday.
And I still have a door to put in!
Thinkin' about throwin' a drywall party just to get the rest of all the drywall up in the Control Room.
You know since the garage started taking shape it has slowly been reffered to as the "studio".
The new glass is on order and should arrive Monday.
And I still have a door to put in!
Thinkin' about throwin' a drywall party just to get the rest of all the drywall up in the Control Room.
You know since the garage started taking shape it has slowly been reffered to as the "studio".
RICK FITZPATRICK
New member
I love it. "The Studio"You know since the garage started taking shape it has slowly been reffered to as the "studio".
 Crap, mine have always been in bedrooms, but they are still called the studio by everyone at home, cause thats exactly what they are once you start recording. At least to me. Even if its still just a little ole bedroom. Ok, yea, thats where I'd put it. As long as the fabric can breath, then it should be fine. You can get a bottle of it at drug stores, or even gel packs at Shoe stores! I'd put one in each corner just for overkill
 One other thing. Do a search on google for glass cleaning. I read a window cleaners trick for washing the glass before you install it. But I don't remember what it was
 :rolleyes:") Alzhiemers strikes again.....old fart syndrome
Alzhiemers strikes again.....old fart syndrome") Anyway, good luck with the glass, and post a pic when your done.
Anyway, good luck with the glass, and post a pic when your done.fitZ
C
casenpoint
New member

C
casenpoint
New member
This is a layout of the window, seals, and 3/4" frame strips. I was able to obtain some 1/4 by 1/2 neaoprene rubber 60 shore. And this is the best way that I could come up to using it correctly.
I have inserted the silica pack in the corner under the linen and fiber glass. Quick question though; Is it ok to use a used silica package or has it lost its absorbance in my shoe box?
I have inserted the silica pack in the corner under the linen and fiber glass. Quick question though; Is it ok to use a used silica package or has it lost its absorbance in my shoe box?
Attachments

knightfly
GrouchyOldFartOnBatteries
Probably lost it - put it (them) in the oven at 250 degrees overnight, good as new... Steve
RICK FITZPATRICK
New member
HEY casenpoint, CAD, cool! Looks good to me. Of course, I like older women too Hell, at my age I like ANY woman.....hahahahaha!(just kidding dear......(WHAP!) damn that hurts....
fitZ
Hell, at my age I like ANY woman.....hahahahaha!(just kidding dear......(WHAP!) damn that hurts.... fitZ
C
casenpoint
New member
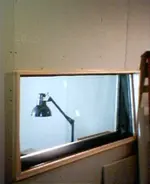
Done!
The window is in but I won't know what kind of stc rating I got until I've install the door and remaining drywall. The glass seamed to have a little play in it. So I am going to shim it with thin strips of wood. A posicle stick seamed to work in some places.
This project is done. Now I can turn direction toward the rough framed opening. Maybe I'll start another thread on the construction sequences of the door.
Attachments
DDev
New member
Looking good. Each step is one step closer to making music.
Keep the posts coming. We all enjoy watching the pain, agony, and final triumph of completion of a project.
Cheers,
Darryl.....
Keep the posts coming. We all enjoy watching the pain, agony, and final triumph of completion of a project.
Cheers,
Darryl.....
C
casenpoint
New member
Thanks Darrell.
I've move on to the door. And have found the rough opening was not square. Also, the floor was not level. Looks like i'll be playing this one by ear.
I purchased some 1/8 rubber 60A sheet 12x24. I've cut them into strips and will be lining the rough opening once I've straightened(squared) the problem out.
All parellel lines do not exist! I know I won't get it perfect. A perfect square with parallel lines is a farce. Try to build one! The linesthat you've drawn are not in fact parallel. If infact you had a ruler that continued forever that line would have crossed the line or skewed away from the other. In short my rough opening bites major monkey balls!
I purchased a good door(solid core) that better be up before I start recording with my new mixer. I know Behringer's ge a bad rap ,but, I have went ahead and bought a MX3282A Eurodesk. I am also thinking about buying an Alesis HD24. I have also found that I do not have enough outs to accomodate that recorder. I would like to record atr least 16 tracks at a time but have only 8 subs out.
1.Can I use aux sends?
2.Can I use main outs also?
Lots of questions but now is not the time.
Anyways thanks for the compliments!
Later,
Casenpoint
extra photo
Attachments

RICK FITZPATRICK
New member
Hey casenpoint, a rough opening doesn't HAVE to be perfectly square. Thats why they call it ROUGH What has to be aligned, is the jamb to the door, as the door may NOT be square, from side to end, or parallel for that matter Thats why you hang the jamb WITH THE door in it. Then shim the jamb as you fasten it. But a studio door has to have tighter tolerances AND should have a rabet along the edge to create a double stop. The weakest link in wall penetration is NOT the door. It is the seals and threshold. Once the Jamb is fastened securely, which I would use screws under the stops, completely caulk the gap between frame and jamb on both sides of the wall(before sheetrocking.) well, enough of my babble. Later, good luck.
fitZ
What has to be aligned, is the jamb to the door, as the door may NOT be square, from side to end, or parallel for that matter Thats why you hang the jamb WITH THE door in it. Then shim the jamb as you fasten it. But a studio door has to have tighter tolerances AND should have a rabet along the edge to create a double stop. The weakest link in wall penetration is NOT the door. It is the seals and threshold. Once the Jamb is fastened securely, which I would use screws under the stops, completely caulk the gap between frame and jamb on both sides of the wall(before sheetrocking.) well, enough of my babble. Later, good luck. fitZ
C
casenpoint
New member
I am fabricating the jamb with 1x's. I do not want any gaps plus the rubber between the rough opening and jamb will cut some vibration Even though it is screwed to the rough opening.
Casenpoint
Casenpoint
C
casenpoint
New member
I almost went with that magnetic seal. That was a nice diagram on that other thread. You come up with that design?
I will be using 1/4" sponge Closed cell. As soon as I get to that juncture. I am going to hang the door and build around it. My tolerances aroun the door are 1/8" on the sides and 1/4" top and bottome. Except the bottom is askew. Not much I can do about that.
I will be using 1/4" sponge Closed cell. As soon as I get to that juncture. I am going to hang the door and build around it. My tolerances aroun the door are 1/8" on the sides and 1/4" top and bottome. Except the bottom is askew. Not much I can do about that.
C
casenpoint
New member

DDev
New member
CP,
About your recording setup. Does the mixer have channel inserts or direct outs? You can use those to feed your HD24 recorder in lieu of the sub outs. If you use the inserts, you just have to be careful that you only go to the first click as you plug in the cable. It is an unbalanced signal, but that's not much of a problem in most cases. Direct outs are typically balanced. I've found that I'm going direct to the recorder from my outboard preamps nowadays more often than through the board unless I have lots of channels to record simultaneously.
Anyway, when I got to your stage in my control room, I installed an insulated steel exterior door with the pre-hung jam and seals. It works well except for the bottom where I have the majority of my sound leakage. I guess I need to install a bottom stop with a seal to close up that spot, but I don't want to have to step over it, so I've been reluctant to do that.
Anyway, have fun. Sounds like you're getting close to the finish line.
Darryl.....
C
casenpoint
New member
Hey, I was thinking about pealing off sound from the desired channel and route that to the recorder. Would that work?
This mixer has no direct out's!
The mixer has insert points at the top under both the xlr and 1/4 connect. It does not go through eq and fx. Would I still be able to here the mix through my headphones or monitor speakers?
I just finished hanging the door with the frame all around it. It is a good fit. Will probably start on the lockset jamb tomorrow if I have time . Just starting a new job and I need to round up my tools for the haul. Luckily they are all machinist tools. Yes, the project is nearing completion. I definetly knew I could perform all the tasks. I just need to do some studying on the subject before I got strung up. I used two books "Small Budget Recording Studio" by Mike Shea and " Sound Studio Construction On a Budget" by F. Alton Eversest. Both were welll easy to read but if you no nothing about construction it might be hard to understand.
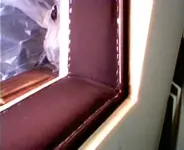
Here is a photo taken tonight and another. It shows the upper frame with the seals. And the other shows the near finished project. So now you can see how important the rough opening was to me.
This mixer has no direct out's!
The mixer has insert points at the top under both the xlr and 1/4 connect. It does not go through eq and fx. Would I still be able to here the mix through my headphones or monitor speakers?
I just finished hanging the door with the frame all around it. It is a good fit. Will probably start on the lockset jamb tomorrow if I have time . Just starting a new job and I need to round up my tools for the haul. Luckily they are all machinist tools. Yes, the project is nearing completion. I definetly knew I could perform all the tasks. I just need to do some studying on the subject before I got strung up. I used two books "Small Budget Recording Studio" by Mike Shea and " Sound Studio Construction On a Budget" by F. Alton Eversest. Both were welll easy to read but if you no nothing about construction it might be hard to understand.
Here is a photo taken tonight and another. It shows the upper frame with the seals. And the other shows the near finished project. So now you can see how important the rough opening was to me.
Attachments

Last edited:
Similar threads
S
- Replies
- 8
- Views
- 4K
- Replies
- 42
- Views
- 3K
B
- Replies
- 2
- Views
- 1K
B
- Replies
- 26
- Views
- 10K