Michael Jones
New member
Well, I have nearly finished the framing in my studio. I still have the control room rear wall, the control room ceiling, and the live room front wall to do. Everything else is pretty much done, framing wise.
I wont do the control room rear wall until the rear external wall is insulated and sheetrocked. I wont do the control room ceiling until the inside roof is insulated and sheetrocked, and I wont do the front live room wall until I complete the soffit mounts for the control room monitors.
It's funny how normal construction sequencing kind of takes a "back seat" in studio construction.
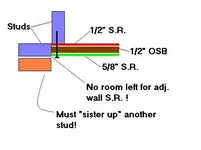
As I was working in the studio today, I was checking the framing that I had done. Everything looks real good, and I started thinking about how the Sheetrock will go up. When you come to a corner, you normally have two studs at opposing angles so you can screw the sheetrock to the two walls. I have that, and made sure I did during framing construction.
Well, if you plan on doing a multi-layered wall system, this doesn't work so well because by the time you finish off one wall with SR-OSB-SR, there's nothing left exposed on the opposing stud! So, at some point, I'll have to go back to EVERY corner, and "sister up" a stud so that I have something to screw the adjacent wall's sheetrock (et al) to. :rolleyes:")
Not that big of a deal, but.... Live and Learn, as they say.
Here's a graphic of what I mean:
I wont do the control room rear wall until the rear external wall is insulated and sheetrocked. I wont do the control room ceiling until the inside roof is insulated and sheetrocked, and I wont do the front live room wall until I complete the soffit mounts for the control room monitors.
It's funny how normal construction sequencing kind of takes a "back seat" in studio construction.
As I was working in the studio today, I was checking the framing that I had done. Everything looks real good, and I started thinking about how the Sheetrock will go up. When you come to a corner, you normally have two studs at opposing angles so you can screw the sheetrock to the two walls. I have that, and made sure I did during framing construction.
Well, if you plan on doing a multi-layered wall system, this doesn't work so well because by the time you finish off one wall with SR-OSB-SR, there's nothing left exposed on the opposing stud! So, at some point, I'll have to go back to EVERY corner, and "sister up" a stud so that I have something to screw the adjacent wall's sheetrock (et al) to.
Not that big of a deal, but.... Live and Learn, as they say.
Here's a graphic of what I mean:

")