The Mess II

  • Thread starter Thread starter frederic
  • Start date Start date
frederic

frederic

New member
Today was enjoyable, took "the next step".

I discovered that Home Depot not only rents trucks, they also deliver for about $50. So, taking advantage of this option I purchased 40 pieces of 4x8x.75" plywood, 20 bundles of R19 insulation, and about $350 worth of electrical stuff (switches, boxes, outlets, PVC conduits, tracks and adaptors, angles etc, track lights, dimmers, overheads).

Though after all this, I forgot the moisture barrier. Duh. Have some pictures soon, gonna move the stringers this afternoon then start slapping in the electrical.
 
Yeah. Home Depot "delivers". :rolleyes:

In my area they charge you 50 bucks and have a courrier service bring your stuff out. I had an order with them for over $2000 once. (A door and some ... other stuff.)

This courrier guy comes out and says something like "I got your stuff here."

"Great", I say, Bring it on down the driveway and off load it into the studio."

"No can do", says the guy, "it's curb service delivery." (The studio is about 100 feet from the curb.)

"BULLSHIT", I say, "I didn't place a 2000 dollar order AND pay 50 bucks to have you leave it at the curb! Back on down here, and I'll even help you unload."

"Can't do it man", says the guy, "My truck will hit your tree limbs hanging over the drive."

"I'm OK with that". I say.

"I'm not", says the guy.

"Well we got a problem here then buddy", I tell him. "I'm not signing ANYTHING, and you ain't leaving here, untill that stuff is delivered to my satisfaction, now do I need to call Home Depot, or XYZ Delivery to get this worked out while you wait?"

He reluctantly complied.
 
"Well we got a problem here then buddy", I tell him. "I'm not signing ANYTHING, and you ain't leaving here, untill that stuff is delivered to my satisfaction, now do I need to call Home Depot, or XYZ Delivery to get this worked out while you wait?"

The Home Depot Guy in an orange apron assured me its "against the house" delivery. I asked him to write it on the invoice and the workorder, which he promptly did, no questions asked.

I then stated "if they refuse to put this stuff against the house, I'll be back for you to refund shipping".

He smiled and said "Don't be paranoid, we'll deliver it to the side of your house, no problem at all.

See, I thought your experience was the commonplace, so I'm prepared. Worse case, I'll have my wife answer the door and play the wimpy, helpless but really hot and tips well housewife while I hide inside laughing :)

I guess I'll know for sure tomorrow.

Since I bought, and installed three ceiling fans, my wife offered to "clean the studio floor" so I can work in there. I promptly agreed and smiled. I don't think she realized the rubble is 2 feet deep corner to corner.

I ganged two electrical boxes (4 switches a piece) for the studio, so thats all ready to go. Just need the delivery monday and I can start assembling the place.

By end of tomorrow, the remaining insulation, cedar panels, and other crap will be completely out of the room.

I think I'm going to go upstairs now, I feel bad that my wife agreed to "clean the floor" not realizing its a days work. heh-heh.

Frederic <--- causes severe structrual damage
 
Before:

attachment.php


After:
 

Attachments

  • im000245.webp
    im000245.webp
    15.4 KB · Views: 422
Switch Panel

Switchboxes in the front (not screwed in yet), and the steel plate the boxes will attach to, which will be fitted in the slanted ceiling.

I've already cut the neoprene gaskets for the steel plate and the plywood slanted ceiling, and the tabs on the boxes will attach to a stud i've already installed.
 

Attachments

  • im000246.webp
    im000246.webp
    24.5 KB · Views: 422
Top view of the plate drying in the sun.

I've sanded it, I've primed it, and this is the first coat at the time of the picture. Now there's four coats, and tomorrow when its completely dry it gets gently buffed then two clearcoats assuming the humidity isn't over 50%.

I'm not sure why, but I've decided on a beige and red theme for the studio, so 99% of the studio will be beige (except the floor which will be white birch pergo), and the moulding will be red. This way there is a little splash of color in there, but the red doesn't dominate the room.

I did find a use for the carpenter ant eaten cedar paneling I've removed!!! I know viewing these are the highlight of your day :D

I coincidentally found a krylon red paint for metal/plastic that matches the 2 gallons of latex paint I bought for the trim - exactly!

Now to pick up beige. Local paint store was having a sale. Can't beat 50% off regular price!
 

Attachments

  • im000247.webp
    im000247.webp
    23.1 KB · Views: 388
Now it probably looks like something.
 

Attachments

  • im000248.webp
    im000248.webp
    8.8 KB · Views: 393
Glad to see you're cleaning up your act :D :D BTW are those two white switches dimmers? Do you think you'll get any "buzz" out of them? I would have loved to have dimmers but I was too worried about the buzzing.

DD
 
DigitalDon said:
Glad to see you're cleaning up your act :D :D BTW are those two white switches dimmers? Do you think you'll get any "buzz" out of them? I would have loved to have dimmers but I was too worried about the buzzing.

DD
From what I understand, if you use "varible transformer dimmers", and NOT solid state dimmers, you'll wont get a buzz.


(Maybe it's something in the way their grown.) :D
 
Glad to see you're cleaning up your act :D :D

Actually, that was my wife's doing. She cleaned the floor in exchange that I would hang three ceiling fans. She was a good sport, she got the worse end of the deal by far.

BTW are those two white switches dimmers? Do you think you'll get any "buzz" out of them? I would have loved to have dimmers but I was too worried about the buzzing.

They are dimmers, and the box said "no noise dimmer", which means they hum but much less than normal dimmers.

It won't matter really, because the switches in the top box are being fed from the existing power thats in the room, where as the bottom switches are being fed from the new studio feeds off the isolation transformer thats in the attic.
 
From what I understand, if you use "varible transformer dimmers", and NOT solid state dimmers, you'll wont get a buzz.

Those are called "Variacs" :) And yes, they essentially are hum free. I couldn't find those locally.

Nowadays, I see less of a problem with all thats available in elecrical stuff.

Circuit breakers can have noise filtering built in.
Dimmers can be purchased as low-noise or noise-free
Put dimmers in a circuit seperate from the audio gear
Run the dimmers off the mains, along with a UPS system, and run the audio gear off the UPS system (the UPS isolates the audio gear from the line. Remember that most UPS systems you are always running off the battery, and the house current simply recharges it in the background).
 
More Progress

This is whats left of the vocal booth, the two platforms. The closer platform is part of the floor, and the further platform is the flip part.

If anyone is interested, I can take better pictures of it now that its exposed, and I can stand within the focal point of the camera and take a picture of how it was done. It covers a stairwell :)

Anyway, you can see the walls of the booth are gone, and the insulation above is all gone too which you can't see in the camera angle.

The paneling on the back wall is staying, only because when I tore out the other side's paneling I didn't realize the window frame was nailed to the wrong stuff, so when one yanks the panel, viola, the window comes out. The ceiling is gone so I'll be filling that with rock wool etc.

Poor job of construction in 1941. Finishing nails hold the windows in, how scary.

Maybe I'll tear the back windows out too. Would stink to have to address that at a later date, better to do it at once.
 

Attachments

  • im000249.webp
    im000249.webp
    20.4 KB · Views: 339
Last edited:
No more wool insulation!

Dead mice removed!

Discovered this particular wall actually extends all the way down into the garage. Ugh! Going to seal it up by apply chaulk, then nail in 2x6's across the bottom. There is insulation in the wall below for the garage, which I'm going to leave. It only extends down two feet so I don't think this will affect my studio very much, as long as I seal the footers.
 

Attachments

  • im000250.webp
    im000250.webp
    13.2 KB · Views: 324
Same wall, different angle, showing the naked wall.

There is some paneling, and insulation, behind the radiator, but when I loosened the threads the radiator is still full of water which I found suprising, so I'm going to have to drain the system at least partially so I can take it out to get at the paneling.

Since I'm doing a burgandy/beige theme I'm going to hot-tank the radiator at my buddy's machine shop, which will remove all the rust inside and the paint outside, then I'm going to acrylic blast, prime and paint it a burgandy color that matches the above switchplate and the eventual moulding.

This is the window I mentioned above thats falling out. The window frame is 60 years old and completely falling apart, and like the doorframe on the opposite side of the room is held in with just a few finishing nails. I'm suprised the window stayed where it is for so many years considering this.

Anyway, I added a few nails so it stays while I figure out what the replacement should be.

A local window supplier had a window thats 1/2" wider and the same height which would be fine, there is at least 1" of shims on both sides, so I may pickup that window. Its double hung, double panes per sash, and has nice weatherstripping and its only $45 cash and carry. I'll figure that out tomorrow after my monday morning conference calls.

So today was a good day, the entire ceiling is down and went out the window, the insulation is down, bagged and in the street (37 bags of wool insulation, I just counted them!), and the weird slant two pictures up next to where the vocal booth was still has 5 bats of insulation which I didn't take down yet because friends showed up with uncooked steaks and beer. Had to bail and partake, of course :)
 

Attachments

  • im000251.webp
    im000251.webp
    14.6 KB · Views: 318
It seems like in any renovation project the initial cleanup and prep work take the longest. The empty room looks like a nice space (wish I had that much to work with). Now the fun can begin!!

Darryl.....
 
DDev said:
It seems like in any renovation project the initial cleanup and prep work take the longest. The empty room looks like a nice space (wish I had that much to work with). Now the fun can begin!!

Darryl.....

Thanks Darryl!

Including the stairwell/flipfloor vocal booth the entire space is 20x13, with a 36" deep "sofa cove" at the back and to the right (next to the double windows several pictures up).

The ceiling slants are really annoying on the one side where the console table is going, but it will work out. I initially had the console table sideways, the length of the room (despite all smart logic) simply because I didn't see how I could suffer under the slant. This time I'm going to do it right though, and use the length of the room properly. Of course there is going to be the vocal booth at the end of the room over the stairs again because it has to go somewhere and the flip floor makes for useful space (stairwell) that I won't be using very much. I debated reversing the vocal booth and the sofa, but then to get in/out of the studio via the stairwell, one has to move the sofa THEN flip the floor up. Too much work LOL. The stairwell leads outside and will only be used by clients and friends with heavy equipment, otherwise I'll be walking through the house into the undersized side entrance, which I have to enlarge.

Since the roof slant continues over the doorframe, the 1941 construction crew put in a 6' high 26" wide door. What I'm going to do is buy an 8' high door thats the normal width, then miter the top 30 degrees along with the doorframe I'll have to take apart. While this sound strange, the door can be wider so I can get certain pieces of gear in and out of the studio that are "stuck" in my wife's office, next door.

I have a Peavey TKO120 bass amp that doesn't fit through the door, as well as an old Ampeg 270 with a 4-12" cabinet that also doesn't fit. My new fender cybertwin barely fit, getting it through the door took about 15 minutes as not to scratch it! Even had to take the knobs off!

13x20 is cool, I must admit, but the ceiling slants are more than irritating!!!!!!

I am happy that my wife offered me this space. I was looking at the basement this morning (with 6.5" high ceilings with all the plumbing hanging down), and this is much better than the basement.

Even though we are 30 minutes by train to NYC, this is "rural" for us. When we bought this, we had given up on finding a Jersey City brownstone near the path station (subway from Jersey to NYC), and my wife's selling point to me was if we got a brownstone, I'd get the entire basement apartment as my studio, most of which (at least the ones we looked at) had 10' high ceilings in the basement, were 25' wide, and 60' long. Was going to put the console room in the back, and a large live room in front, with two vocal booths against the front of the structure, with a small kitchen next to that.

Anyway, just rambling.
 
I might be a bit confused on this, but does your slant ceiling run the length or width of your space? Are you going to have any symmetry issues to deal with for that?

Darryl.....
 
DDev said:
I might be a bit confused on this, but does your slant ceiling run the length or width of your space? Are you going to have any symmetry issues to deal with for that?

Darryl.....

The slant is across the width, 13' wide, and a 30 degree incline off the floor.

Design Drawing:

https://homerecording.com/bbs/attachment.php?postid=820051

In the above picture, the ceiling slant runs from the bottom of the diagram, going up. The lowest point of the slant is 36" and the highest is now 8', which is where the new ceiling will be. The rest of the ceiling heading "up" the diagram (towards the vocal booth in the diagram) angles down from 8' at a 7 degree downward. The means the vocal booth will have a 7' ceiling at the very back wall (top of the diagram), and about 7.4" or thereabouts at the front of the vocal booth.

The double windows are at the top of the picture, the single window over the radiator is at the left of the diagram, and the 24" thats 6' high is at the right side of the diagram.

As far as acoustical problems, I'm expecting tremendous problems on the slant side, but its the only place to put the console table and have room for other stuff. I have too much gear :D

What I will be doing is once the plywood is up, I'll be installing beige carpet on the ceiling slant and back wall (yeah, yeah, I know) then attaching velcro to auralex 2'x2' panels, and moving them around on the carpet until the room sounds better.

I like carpet on the walls. I know its not the most acoustically useful stuff, but I like how it looks to some degree. This also allows me to avoid spackling and other stuff I'm terrible at. I plan to install molding which will be painted a burgandy color, like a grid, on the slant, which will help the glue and staples hold the carpet flat.

The roof is all fixed! I did tar work yesterday morning and friday night. Had the test last night, nasty thunderstorm - couldn't see my yard from the window during the worst of it the rain was so thick. Not one drop made it in. :)
 
Some of the stuff arrived!!!!!!

Apparently they broke the plywood into two deliveries for whatever reason.

No hassle, no fuss, no muss, the guy delivered it right where I pointed without any BS at all.

Not bad :)

Guess its time to get my ass out of these jeans, put on shorts and a tank top, and go into the scorching hot loft and start moving the stringers up, add a few 2x4's to the short wall (some of them fell out when i was ripping the cedar down - more finishing nails - ugh!) and start slapping in the electrical.
 

Attachments

  • im000257.webp
    im000257.webp
    18.8 KB · Views: 265
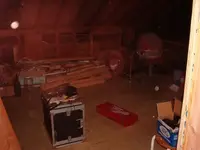
I'll upload pictures tomorrow, or saturday, depending when I remember to bring my camera downstairs.

Anyway, all but one stringer is up. The last one is in a tight spot (the wall was built between the ceiling joists, and connected with a metal strap :( ), so I'll do that tomorrow when I'm wide awake. Too beat now to engineer this on the fly correctly.

Built a new wall under the deep slant next to the doorframe that fell down, tying the studs to a floor sill (2x4) and the slanted joist, as well as the doorframe. Put silicone chaulk under the floor sill, between the studs, and the roof joists. So thats done.

Put two junction blocks in the crawl space, hooked them to the transformer, and moved the current studio feed to the transformer. Flipped the breaker and the transformer produced 60V, but thats because the primary is expecting 240V, and I don't have that in the house yet, so it got 120V. But at least I verified the electrical is run correctly.

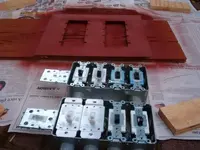
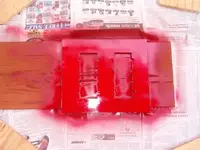
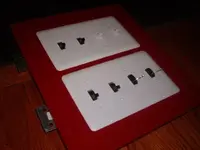
Mounted the wall switches I pictured further up this thread, and attached the computer feed to the transformer, as well as the studio feed. 20A 120V a piece.

Then tapped the exiting electrical (since I'm tossing whats there anyway) in this space for the lighting feeds.

I'm still thinking LED overhead console lights will be a nice, very low profile touch, but at the same time, zapping a track overhead and some really short hingey lights with 10W bulbs or so might do the trick instead. I'd just prefer not to drill holes into the surface unless I'm sure they are staying.

Anyway, don't have to worry about that since there is no surface to drill into yet. Looks like I can put in the flourescent light internals tomorrow late afternoon if I keep the pace I'm going, and at least the remainder of the construction will be well lit. Using a bunch of lamps, small spot lights, and other things of equal sadness just ain't cutting it.

Plus the one good clip on spotlight I was using got ruined today. I didn't realize the cord was under my table saw, and when I fired it up, well, it sucked it in and flipped the breaker.

Just one of those dumbass moves I have to do on occasion just to make things more time consuming. So I rewired it with some 12-2 electrical cable which works fine, except that its solid wire so its incredibly stiff and hard to torque around. Nothing can be easy. Nothing not ever oh well, tomorrow is another day :)

BTW, I'm using deck screws for strength and ease off application. Before each screw goes in, I fill the hole with silicone and put a bead in and around all the joints, even for studs, joists, and stringers. I figure it will help seal it up later, but more importantly, keep things from loosening up.

Anyway, I bought these neat square drive deck screws at ace hardware, and they are very neat except they are made in tiawan and when they torque down tight, 20% of the time the heads come off. The bit doesn't strip, neither does the hole the bit goes in, but the heads come off.

Picture a balding guy covered in dirt, swearing at foreigners he's never met, while taking the remainder of the screws out with vicegrips one at a time.

Its an amusing sight, I'm sure.
 
Back
Top