A
Acoustech
New member
I received several requests for information regarding soundproofing the family garage, either for a studio facility or a practice room. Let me preface this by pointing out the reality of physics as well as cause and effect of a large db signature introduced into a small space...say .. 18x20x8.. (ft.) As some of you have experienced, it does not take much to light up an un-treated space.
The structure instantly goes into a mode of propagation...acting like a speaker ..if you will... This is the result of the db profile and sound pressure level overwhelming the space. Airborne signal leaking through the structure just multiplies the anomaly. > Just so you have a point of reference > sound pressure level is measured at 10 times the logarithm to the base of the ratio of the db profile and frequency band. Dominant room frequency multiplies acting in a bucket brigade fashion..leading to a mode of what's termed " Permanent threshold shift" by the standards and practice of ANSI, ASA and OSHA.This of course is not only ear damaging but can cause stress to the structure.
Sound pressure is colorless, odorless and invisible to the naked eye but it is a physical force that can be measured and seen with sophisticated measuring equipment.....That said ...we will move on... Understand the garage will no longer funtion as such from this point on.
OK....lets start with the garage...we have a 4" concrete slab...most likley 2x4 wall construction and 2x6 ceiling joist and rafter.... To get the best - db profile...we need to elevate the STC rating..
To do so ...follow the procedure's below.....>
Remove all electrical, remove all debris from the structural members leaving just the bare studding and ceiling grid. Run new electrical feeds to their locations...do not use (romex) Use what's termed "jacketed 3 wire" M/3 type cable for isolated ground. K....Next .....you will need to suit up for this...and use a respirator.
Cut and install OC 705-2" un-faced into the stud and ceiling joist cavities.
(snug) Make sure to be precise in cutting and installing. Mount flush to the stud surface leaving 1.5" of air to the outside sheathing. Once installed... use 30 year caulk to close and cover all seams....this will take a while...it is very important to close all airborne at this point. So do it right.
Apply wall and ceiling treatment composite....5/8" GWB-FC--1/2" Sound stop--5/8"GWB-FC...to completion ..stager the joints in the application.
...tape, joint and caulk every layer to seal. (Floor System)..
There are (2) Types of floor isolators that will work for this application because of their low profile. ( maintaining ceiling height)..Both systems are manufactured by Kinetics Noise Control of Ohio....just e-mail me I will get you the part numbers for ordering.
(1) Puck Isolator-- (2) Concrete form blanket ...The first seems to be the one.
Puck isolators are to be 12" on center and sleepers will be 12" on center as well. Sleeper stock at a minimum will be 5/4" sub-straight or strapping...Once installed....apply 3.5 R-19 within the bays of the sleeper layout.
Install 3/4" sturdy floor using PL-400 adheasive and fasten by course screw. Add a second layer crossing all joints using the same method. Make sure when chalking out the floor system that you leave at least a 1/2" clearence from the floated system to the garage structure. (do not make contact)
Once the shock mounted floor system is installed....layout your acoustical membrane wall system. Using metal studding...Frame a new inner wall system @ 24 on center..This is a membrane wall system that moves with low frequency further eliminating infiltration to the outer demising system...
Leave the walls 1/2" short of the sub-ceiling....secure the walls in a temp mode the same way you would do to plumb a house wall... (attatch temp scrap studding from the walls to the floor to maintain level and plumb)...Using Kinetics model - Iso max channel-- ..install to the sheetrock sub-ceiling making sure to connect to the joist above...This system is a shock mounted linear application which de-couples from the structure. Out of the stud scraps...fabricate gussetts or spline to connect the wall system to the ceiling Iso-Max channel every 16 inches or better to hold the system in place. Bring your electrical into the new system... Install 5/8" GWB-FC to the ceiling spline...install OC-705 2" un-faced in the stud cavilties using the same methods of caulking as before ..then apply 5/8"GWB-FC -1/2" Sound Stop- 5/8 GWB-FC follow the same manner as the outer wall systems...(air tight)
Make sure while in the rough..you install an induction fan to bring freah air into the space...so you can live to enjoy it....use a variac type dimmer to control fan speed and use 3 times the flex duct required to reach its destination. All doors are to be SR- rated with full gasketing and set within the seperate wall systems...(air-lock) don't bother using windows....its just a great expense to treat any opening within the structure.
Finish treatment is a whole other world....when you get there...I would be happy to discuss it.
Hope this helps,
Best regards,
Jack Piercy
Acoustech
 which, has been beat to death as a no no. Clarification needed
  please.
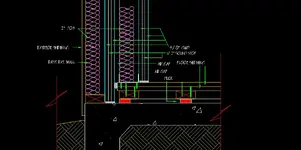
 Thats a first here. I must celebrate with a big glass of grapefruit juice and Mountain Dew!!
  Still no alcohol, but damn would I love a cold beer.
  :rolleyes:") dream on Rick. Later.
dream on Rick. Later.")