heatmiser
mr. green christmas
This is my attempt to document the disassembly of a tascam 688 midistudio. This is a continuation of a recent thread:
https://homerecording.com/bbs/showthread.php?t=301643
which outlines the issues I was having with pitch/speed. I have a capstan belt on the way from the manufacturer in california and wanted to take it apart both to have a look at the innards and to get prepared for belt replacement.
I used a prior thread from this forum as a guide:
https://homerecording.com/bbs/showthread.php?t=283800&page=2
Post #26 by Ely in particular was invaluable to keep me on track. Keep in mind I have zero experience with this sort of thing, but I have to say, at least with regard to taking it apart...anyone with some patience, an assortment of screwdrivers and an hour or two to spare can do this.
I hope this will be of some help to any fellow 688 owners/fans.
First, the work surface. You will need a good deal of room and a variety of screwdrivers. I drew pictures of the pieces the screws came from and taped each screw to the corresponding drawing. Note, the Finding Nemo flashlight is optional") .
.

Next, remove the right side panel (two screws - no problem):

Next, remove the front arm rest at the bottom of the unit. Note - all 5 screws should be loosened not removed. 2 of the screws are recessed and if you simply loosen them, the arm rest should slide out. I made the mistake of removing them (highlighted in the photo below) and had to turn the unit upside down to get them out. I think it will be difficult to reattach them...oh well:

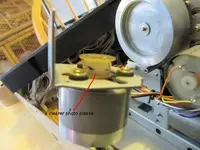
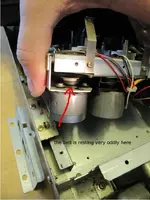
Next, gently pull off the pitch control knob. Then, loosen 2 screws on the back top cover above the tape cover door. Now you can remove the cover to the whole tape control portion of the unit. Note - it is attached by several bunches of wires to several other parts of the unit, so movement is limited. First, I slid it to the left (photo below), then I opened it to the right like the back cover of a book and left it laying on its side up against the right side of the unit (next post):

https://homerecording.com/bbs/showthread.php?t=301643
which outlines the issues I was having with pitch/speed. I have a capstan belt on the way from the manufacturer in california and wanted to take it apart both to have a look at the innards and to get prepared for belt replacement.
I used a prior thread from this forum as a guide:
https://homerecording.com/bbs/showthread.php?t=283800&page=2
Post #26 by Ely in particular was invaluable to keep me on track. Keep in mind I have zero experience with this sort of thing, but I have to say, at least with regard to taking it apart...anyone with some patience, an assortment of screwdrivers and an hour or two to spare can do this.
I hope this will be of some help to any fellow 688 owners/fans.
First, the work surface. You will need a good deal of room and a variety of screwdrivers. I drew pictures of the pieces the screws came from and taped each screw to the corresponding drawing. Note, the Finding Nemo flashlight is optional
.Next, remove the right side panel (two screws - no problem):
Next, remove the front arm rest at the bottom of the unit. Note - all 5 screws should be loosened not removed. 2 of the screws are recessed and if you simply loosen them, the arm rest should slide out. I made the mistake of removing them (highlighted in the photo below) and had to turn the unit upside down to get them out. I think it will be difficult to reattach them...oh well:
Next, gently pull off the pitch control knob. Then, loosen 2 screws on the back top cover above the tape cover door. Now you can remove the cover to the whole tape control portion of the unit. Note - it is attached by several bunches of wires to several other parts of the unit, so movement is limited. First, I slid it to the left (photo below), then I opened it to the right like the back cover of a book and left it laying on its side up against the right side of the unit (next post):
Last edited:


 eek
eek") in here along with the expected dust and grit. A q-tip soaked in water helped, but more cleaning might be in order prior to reassembly:
in here along with the expected dust and grit. A q-tip soaked in water helped, but more cleaning might be in order prior to reassembly: