Rescuing a Forgotten Ampex AG 440B Mono and perhaps 2 more...

  • Thread starter Thread starter temploprods
  • Start date Start date
temploprods

temploprods

New member
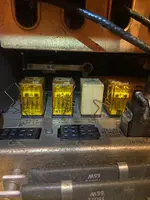
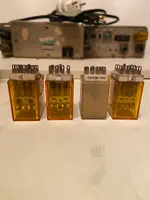
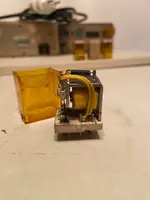
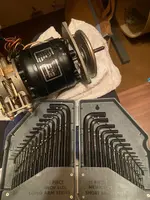
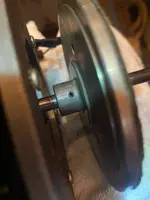
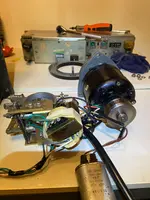
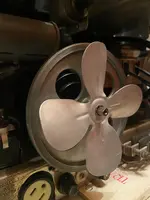
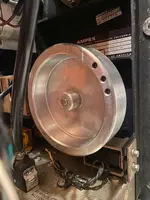
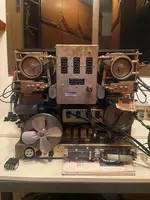
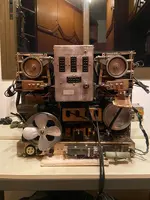
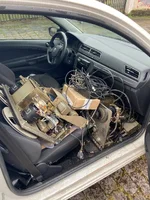
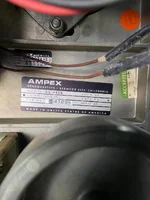
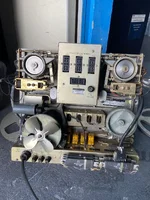
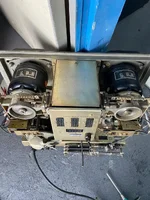
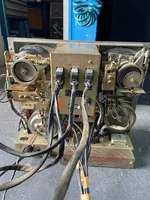
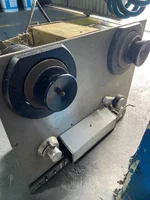
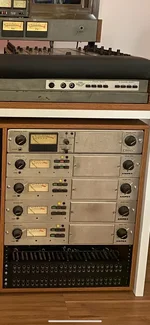
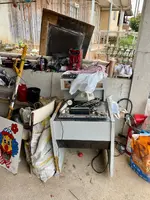
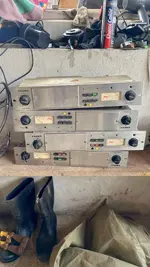
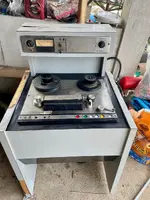
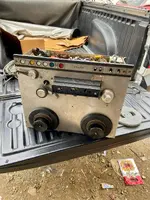
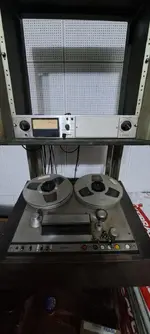
While picking up a Tascam Model 10 from a house being cleared out by a scrap dealer, I had the unexpected luck of stumbling across something much more exciting — a mono Ampex 440, mostly intact and sitting among the rubble. Even better, I also found four preamp modules from another Ampex 4-track machine that apparently was too heavy to be taken by the guy clearing the place. He ended up just ripping out the preamps and cutting the cables (painful to see), but I’m now in touch with the homeowner and currently negotiating to go back and rescue the two other Ampex decks that are still on site (last two photos of the post).

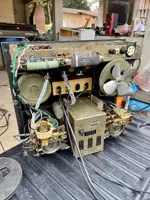
To my surprise, the mono 440 powers on and both the play and rewind functions are working. Fast-forward isn’t responding yet, but this is already a much better starting point than I expected. There’s still a lot to inspect and test, but this machine is alive — and that’s something.

Anyone here with experience restoring Ampex 440 decks? I’d love to hear any insights, common issues to watch for, or tips for getting these beauties back to full glory.

Will post updates as I go. Grateful for any guidance from those who’ve walked this path before.
 

Attachments

  • WhatsApp Image 2025-07-14 at 22.08.20 (2).webp
    WhatsApp Image 2025-07-14 at 22.08.20 (2).webp
    142.9 KB · Views: 43
  • WhatsApp Image 2025-07-14 at 22.08.20 (3).webp
    WhatsApp Image 2025-07-14 at 22.08.20 (3).webp
    194 KB · Views: 35
  • WhatsApp Image 2025-07-14 at 22.08.20.webp
    WhatsApp Image 2025-07-14 at 22.08.20.webp
    115.7 KB · Views: 38
  • WhatsApp Image 2025-07-14 at 22.08.20 (1).webp
    WhatsApp Image 2025-07-14 at 22.08.20 (1).webp
    161.8 KB · Views: 38
  • WhatsApp Image 2025-07-14 at 22.08.20 (4).webp
    WhatsApp Image 2025-07-14 at 22.08.20 (4).webp
    187.2 KB · Views: 39
  • WhatsApp Image 2025-07-14 at 22.08.20 (5).webp
    WhatsApp Image 2025-07-14 at 22.08.20 (5).webp
    188.8 KB · Views: 33
  • WhatsApp Image 2025-07-14 at 22.08.20 (6).webp
    WhatsApp Image 2025-07-14 at 22.08.20 (6).webp
    92.6 KB · Views: 33
  • WhatsApp Image 2025-07-14 at 22.08.20 (7).webp
    WhatsApp Image 2025-07-14 at 22.08.20 (7).webp
    133.4 KB · Views: 32
  • WhatsApp Image 2025-07-15 at 12.15.56.webp
    WhatsApp Image 2025-07-15 at 12.15.56.webp
    88.9 KB · Views: 30
  • WhatsApp Image 2025-07-15 at 12.15.55.webp
    WhatsApp Image 2025-07-15 at 12.15.55.webp
    71.5 KB · Views: 31
I’ve owned an AG-440B-8, AG-440B-1, AG-440C-4, and currently own an MM-1000, which uses what is essentially AG-440B signal electronics (you called them “preamps”, but they are not preamplifiers…they are strictly line amplifiers…there is a plug-in transformer that allow them to source mic-level sources, but the transformer does the step-up to the line amp…no preamp)…search here for Ampex threads…I’m probably involved with a lot of them. Also consider joining the old-school Ampex List email listserv at recordist.com…essential community for Ampex enthusiasts.

Looked at the pics. Looks like a hoarded property. The transports and signal electronics are a mix of B and C. You can’t intermix the signal electronics between them. Remember the value of any tape machine is in the heads. You can use C heads with B electronics but you have to have the C repro plugin amp cards to take advantage of the better HF performance potential of the C heads. I see a mix of AC hysteresis sync capstan setups and one DC servo capstan. If you want to get a DC servo capstan transport up and running, make sure the servo and servo power supply chassis is present and complete with the plugin servo card. It’s usually mounted the back of the system roll-around, but that’s with factory roll-around and none of those roll-around in the pics are factory. Lots of good parts and assemblies there though…curious what’s mounted for heads and if all the parts are present (head cans, flutter idlers, etc.). I’m not clear on what all you are bringing home, but you’ll want to try and make sure it’s enough to make a good machine. I can answer questions, but you’ll want to join the Ampex List for ongoing support when you get into the stickier binds and need a broader base of support. If it was me and I was serious about putting together a good working AG-440 I’d get everything you can get since you don’t know probably how to tell what’s B and what’s C, and I see it looks like some of what’s pictured has been parts donor.
 
Last edited:
Quick update on the Ampex 440 I rescued recently (see my previous post) — I’ve made some solid progress this weekend.

I gave the line amplifier a deep cleaning, reassembled everything, and to my surprise, the VU meter lit up immediately when I powered it on. That was a small but exciting win — a great sign that at least part of the signal path is alive. However, I’ve hit a new roadblock: the machine powers up, and both the rewind and play relays engage, but the tape won’t move during playback. After some manual testing, I noticed that the pinch roller isn’t activating when I hit play. If I manually pull the roller down to press the capstan, the transport starts moving as expected — so the motor and drive system seem to be functioning.

Has anyone dealt with this issue before?
What’s the first thing I should check — solenoid, linkage, or control logic? I'd love to hear what typically fails in this area or where I should start diagnosing.

Thanks in advance for any insight!
 
Step 1 is to replace the plug-in relays on the transport control box. IIRC there are four of them…standard “ice cube” relays. Replace all of them with new. This will save yourself a mad amount of chasing your tail.
 
Step 1 is to replace the plug-in relays on the transport control box. IIRC there are four of them…standard “ice cube” relays. Replace all of them with new. This will save yourself a mad amount of chasing your tail.
Thanks a lot for the tip about the relays!
So far, I went through and cleaned all the edge connectors with fine water sandpaper, but unfortunately it doesn’t seem to be a contact issue — fast-forward is still not working. I just finished a deep cleaning, and little by little the machine is starting to come back to life and look like something again.

Regarding the relay replacement, could you please help me with the exact model or spec I should buy? I want to order the correct “ice cube” relays so I can replace all four at once.
On another note, I’m having a really hard time disassembling the motors. I’d like to oil the bearings because they’re totally dry. I saw your video on YouTube and it’s a joy to hear the machine running with fresh bearings:
There are 2 tiny screws on each motor, but they don’t seem to have any shape — I tried metric Allen keys but none fit (photo 5).
Do you have any suggestion for how to get them out safely?

Thanks again for all the guidance!
 

Attachments

  • WhatsApp Image 2025-07-30 at 16.47.20.webp
    WhatsApp Image 2025-07-30 at 16.47.20.webp
    190.4 KB · Views: 16
  • WhatsApp Image 2025-07-30 at 16.47.20 (1).webp
    WhatsApp Image 2025-07-30 at 16.47.20 (1).webp
    114.9 KB · Views: 15
  • WhatsApp Image 2025-07-30 at 16.47.20 (2).webp
    WhatsApp Image 2025-07-30 at 16.47.20 (2).webp
    111.9 KB · Views: 16
  • WhatsApp Image 2025-07-30 at 16.41.05.webp
    WhatsApp Image 2025-07-30 at 16.41.05.webp
    265.2 KB · Views: 16
  • WhatsApp Image 2025-07-30 at 16.41.05 (1).webp
    WhatsApp Image 2025-07-30 at 16.41.05 (1).webp
    101.2 KB · Views: 15
  • WhatsApp Image 2025-07-30 at 16.47.19 (2).webp
    WhatsApp Image 2025-07-30 at 16.47.19 (2).webp
    192.9 KB · Views: 14
  • WhatsApp Image 2025-07-30 at 16.47.18.webp
    WhatsApp Image 2025-07-30 at 16.47.18.webp
    124.4 KB · Views: 16
  • WhatsApp Image 2025-07-30 at 16.47.19.webp
    WhatsApp Image 2025-07-30 at 16.47.19.webp
    193.1 KB · Views: 17
  • WhatsApp Image 2025-07-30 at 16.47.19 (3).webp
    WhatsApp Image 2025-07-30 at 16.47.19 (3).webp
    245.5 KB · Views: 15
  • WhatsApp Image 2025-07-30 at 16.47.19 (1).webp
    WhatsApp Image 2025-07-30 at 16.47.19 (1).webp
    241.6 KB · Views: 17
…I went through and cleaned all the edge connectors with fine water sandpaper, but unfortunately it doesn’t seem to be a contact issue — fast-forward is still not working.

I’d be careful with using actual abrasive paper on the edge connectors. I’m not sure how fine grit you used, but I wouldn’t even use 1000 or 2000 grit on edge contacts. If you truly need to burnish them, a good quality contact cleaner and multiple cycles of reseating is usually all that’s needed. And if more than that I’d use broken-in fine scotchbrite pad with contact cleaner. Remember that effort only addresses half the contact. You have the female contacts in the card cage that may be just as oxidized, or bent. Inspect…re-align as needed. Again, contact cleaner and exercising is usually all that’s needed, sometimes tweaking a socket if it’s bent.

Regarding the relay replacement, could you please help me with the exact model or spec I should buy? I want to order the correct “ice cube” relays so I can replace all four at once.

24V 14-pin blade-type 4PDT relays are what you are looking for. I think they also came in 8-pin and octal-type pin pattern…probably others as well, but you want the 14-pin type. These are extremely common. If you Google 24V 14-pin ice cube relay you’ll get a bunch of results. They use these things in all sorts of automation machines…bowling machines…pinball machines…but you get what you pay for, so resist the urge to get the cheapest ones you can find on Amazon or whatever. Be prepared to pay $12-18 each for them. Omron is a current company that makes them and I’d trust those. That’s my recommendation. If you can get a good deal on hermetically sealed ones they will last longer. These are the same relays used on the back of the signal electronics modules for the record relays as well.

On another note, I’m having a really hard time disassembling the motors. I’d like to oil the bearings because they’re totally dry. I saw your video on YouTube and it’s a joy to hear the machine running with fresh bearings…

Now you’re getting into it…you don’t oil the bearings. They are sealed cartridge-type bearings. If yours are noisy, it’s time to replace them. You can oil them if you want, but A. it won’t last long and B. you’ll run the risk of contaminating the motor windings.

The bearings are packed with grease from the factory and are sealed, so you can’t re-pack them, unless you want to try removing the shields and repacking, but this size of bearing was not intended for repacking, and if they are dry and noisy the races are likely worn and they should be replaced. It is just not a good idea to cut corners here because replacing the bearings is a grade 9 PITA. And if you make it as far as getting to the bearings you should replace them.

Those aren’t hex socket set screws on the reel tables. Those are roll pins pressed in. I can’t recall what size. You have to have or build or have access to a jig to safely cradle the motor, motor shaft and reel table so you can carefully drive (or ideally press) the roll pins out with an appropriately-sized pin punch without bending the motor shaft. You hqve to make absolutely certain you mark the orientation of the reel table on the shaft so it goes back on the same way. It will only work one way…it must be reinstalled in the same orientation. Once you get the reel table off, and mind you the motor shafts can easily bend and then you’re done, unless you have the proper equipment and skill to straighten the shaft…side-note I actually straightened the shafts on my AG-440B-8 because they were bent when I got it, but I had the proper measuring equipment and skills to do it from working in a machine shop…it was not easy…so once the reel table is off you remove the end-cap of the motor, and you can slide out the motor shaft assembly which has the bearings on each end. Be on the watch for shim washers. They must be installed exactly as they were when you pulled the motor apart. Sometimes they can stick in the end cap and then fall out without you knowing it. So be aware. Once the motor shaft is out you have to pull the bearings off the shaft with any appropriate puller…they are not slip-fit but rather press-fit onto the motor shaft. An appropriate puller is nothing I ever found off-the-shelf, so I made one. You want to not skimp on the bearings, but rather get high quality parts spec’ed for electrical motors by SKF, NSK, Nachi, etc. be prepared to pay $10-12 a bearing. You absolutely get what you pay for and as much of a PITA as it is to do this job it is not worth skimping on the service parts. You don’t want to have to do the job again anytime soon. Once the bearings are off and the proper new parts are sourced, chill the motor shaft assembly in the freezer for an hour or so, and just before install warm the bearings in an oven on the lowest heat just long enough to get them good and warm. You don’t want to melt the grease. You need a machine press and appropriately sized drifts to press the bearings on to ensure the only pressure being placed is on the inner races of the bearings. If you apply pressure to the shields the bearing is toast. If you apply pressure to the outer race the bearing is toast. You only want to be pressing on the inner race of the bearing…the part that mates with the shaft. Once the bearings are on, reassembly is the reverse of the disassembly. Use new roll pins. Measure what came out with a dial caliper. That will tell you what size to get for the replacements. Press the new roll pins in place with a vice.

Yes. A grade 9 PITA.
 
I’d be careful with using actual abrasive paper on the edge connectors. I’m not sure how fine grit you used, but I wouldn’t even use 1000 or 2000 grit on edge contacts. If you truly need to burnish them, a good quality contact cleaner and multiple cycles of reseating is usually all that’s needed. And if more than that I’d use broken-in fine scotchbrite pad with contact cleaner. Remember that effort only addresses half the contact. You have the female contacts in the card cage that may be just as oxidized, or bent. Inspect…re-align as needed. Again, contact cleaner and exercising is usually all that’s needed, sometimes tweaking a socket if it’s bent.


24V 14-pin blade-type 4PDT relays are what you are looking for. I think they also came in 8-pin and octal-type pin pattern…probably others as well, but you want the 14-pin type. These are extremely common. If you Google 24V 14-pin ice cube relay you’ll get a bunch of results. They use these things in all sorts of automation machines…bowling machines…pinball machines…but you get what you pay for, so resist the urge to get the cheapest ones you can find on Amazon or whatever. Be prepared to pay $12-18 each for them. Omron is a current company that makes them and I’d trust those. That’s my recommendation. If you can get a good deal on hermetically sealed ones they will last longer. These are the same relays used on the back of the signal electronics modules for the record relays as well.


Now you’re getting into it…you don’t oil the bearings. They are sealed cartridge-type bearings. If yours are noisy, it’s time to replace them. You can oil them if you want, but A. it won’t last long and B. you’ll run the risk of contaminating the motor windings.

The bearings are packed with grease from the factory and are sealed, so you can’t re-pack them, unless you want to try removing the shields and repacking, but this size of bearing was not intended for repacking, and if they are dry and noisy the races are likely worn and they should be replaced. It is just not a good idea to cut corners here because replacing the bearings is a grade 9 PITA. And if you make it as far as getting to the bearings you should replace them.

Those aren’t hex socket set screws on the reel tables. Those are roll pins pressed in. I can’t recall what size. You have to have or build or have access to a jig to safely cradle the motor, motor shaft and reel table so you can carefully drive (or ideally press) the roll pins out with an appropriately-sized pin punch without bending the motor shaft. You hqve to make absolutely certain you mark the orientation of the reel table on the shaft so it goes back on the same way. It will only work one way…it must be reinstalled in the same orientation. Once you get the reel table off, and mind you the motor shafts can easily bend and then you’re done, unless you have the proper equipment and skill to straighten the shaft…side-note I actually straightened the shafts on my AG-440B-8 because they were bent when I got it, but I had the proper measuring equipment and skills to do it from working in a machine shop…it was not easy…so once the reel table is off you remove the end-cap of the motor, and you can slide out the motor shaft assembly which has the bearings on each end. Be on the watch for shim washers. They must be installed exactly as they were when you pulled the motor apart. Sometimes they can stick in the end cap and then fall out without you knowing it. So be aware. Once the motor shaft is out you have to pull the bearings off the shaft with any appropriate puller…they are not slip-fit but rather press-fit onto the motor shaft. An appropriate puller is nothing I ever found off-the-shelf, so I made one. You want to not skimp on the bearings, but rather get high quality parts spec’ed for electrical motors by SKF, NSK, Nachi, etc. be prepared to pay $10-12 a bearing. You absolutely get what you pay for and as much of a PITA as it is to do this job it is not worth skimping on the service parts. You don’t want to have to do the job again anytime soon. Once the bearings are off and the proper new parts are sourced, chill the motor shaft assembly in the freezer for an hour or so, and just before install warm the bearings in an oven on the lowest heat just long enough to get them good and warm. You don’t want to melt the grease. You need a machine press and appropriately sized drifts to press the bearings on to ensure the only pressure being placed is on the inner races of the bearings. If you apply pressure to the shields the bearing is toast. If you apply pressure to the outer race the bearing is toast. You only want to be pressing on the inner race of the bearing…the part that mates with the shaft. Once the bearings are on, reassembly is the reverse of the disassembly. Use new roll pins. Measure what came out with a dial caliper. That will tell you what size to get for the replacements. Press the new roll pins in place with a vice.

Yes. A grade 9 PITA.
Maybe so…. A PITA, but lots of valuable info there. :thumbs up:
 
Back
Top