V
Vhyle
New member
Hey folks, sorry it took me so long to get around to posting this lesson! Life gets in the way sometimes; you know how that goes.
Here we go - drum fills! If you're stuck programming a monotonous drum beat to your guitar track (or whatever other instrument you're recording), and maybe you're slightly intimidated, or just unsure of how to break up the monotony with a tasty drum fill, these following lessons should be of great value to you.
This first lesson in fills covers a few concepts on creating tasteful, fairly simple drum fills. In future lessons, I'll cover more complicated fills (jazz, prog metal/rock, odd time signatures, extreme metal, so on). Drum fills can possibly span TONS of lessons, but I'll try to keep it as simple as I can in just a few lessons. The knowledge you will potentially gain from these lessons should open up a whole new aspect of your drum programming.
And as always, if something is amiss or just doesn't make sense, don't hesitate to post in this thread and ask questions. I'd be more than glad to help you out, and clarify anything that needs it.
Alright - once again, we'll use 120bpm at 4/4 time - default format for Reaper. No need to change it for this lesson, so we'll just leave it at that.
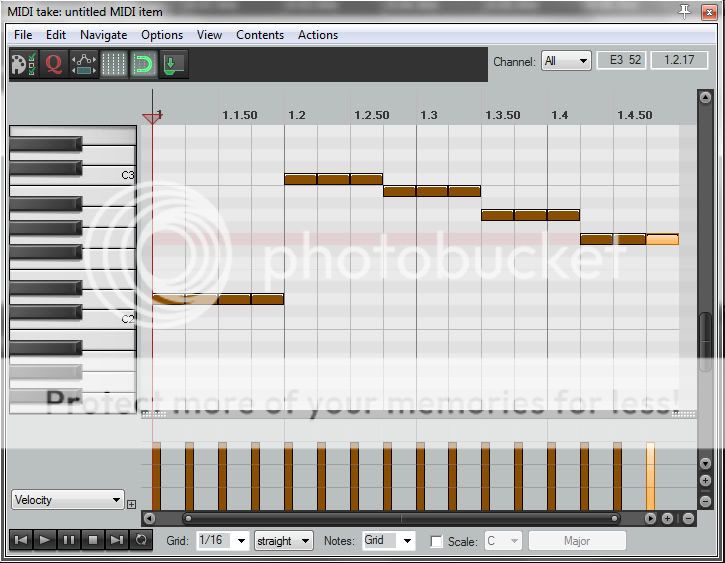
Here is the sample fill we're using. Simple 16th-note drum fill. Nothing frilly. This example here shows no velocity changes; no dynamics. It sounds stale, uninteresting and fake.
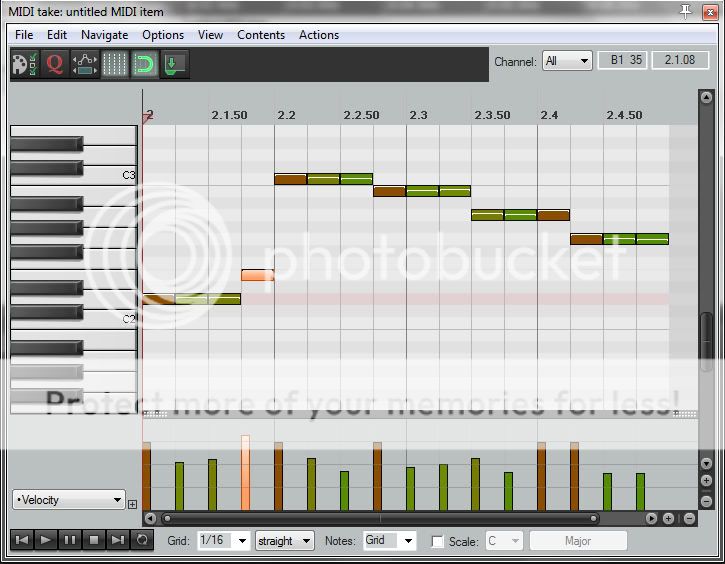
Now, a few simple edits to the velocities. All I did was change the last snare hit to a rimshot (the highlighted note on the left side - a separate line for snare rimshots, as covered before), and change the velocities for most of the tom hits. I varied them a little bit, adding some much-needed dynamics. These changes took all of about one minute to do, and it made the fill sound much more realistic.
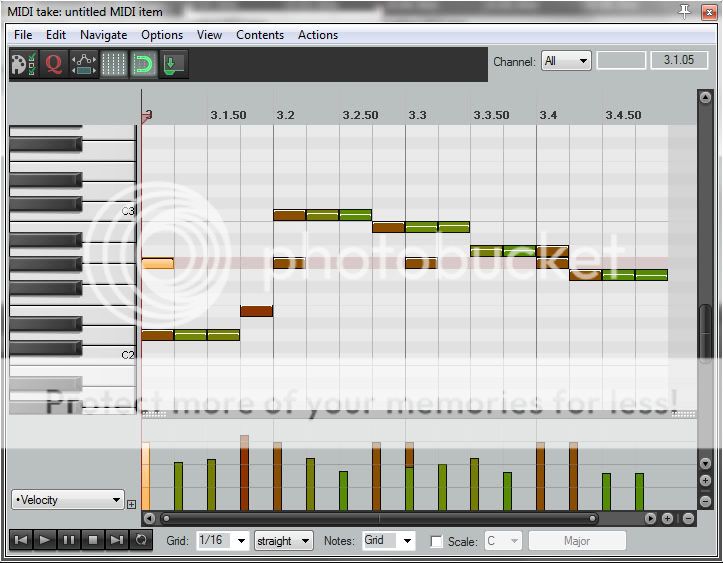
Third very minor change - this took even less time; about 10 seconds to do. All I did was add a hi-hat close on the quarter notes. Lots of drummers will keep time with the hi-hat pedal during their fills. This is exactly what that is - keeping time during the fill.
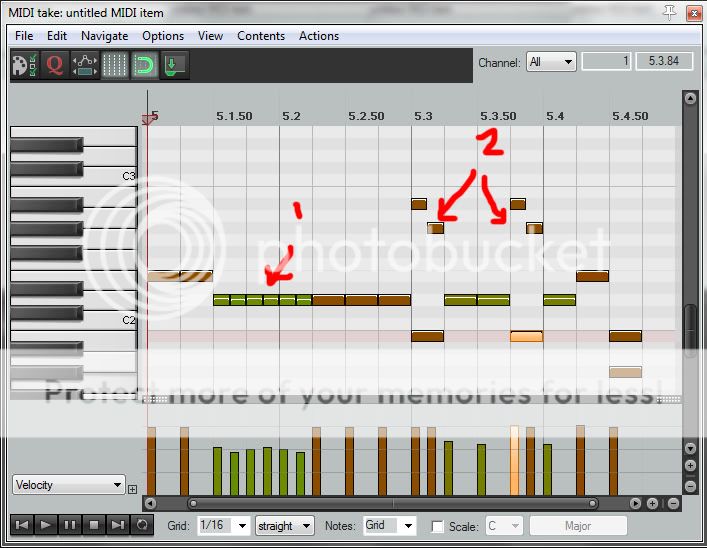
Now, let's make the fill a little more complicated. I added a few changes to the sticking patterns and the notes during the fill. I'll explain each change, which are numbered:
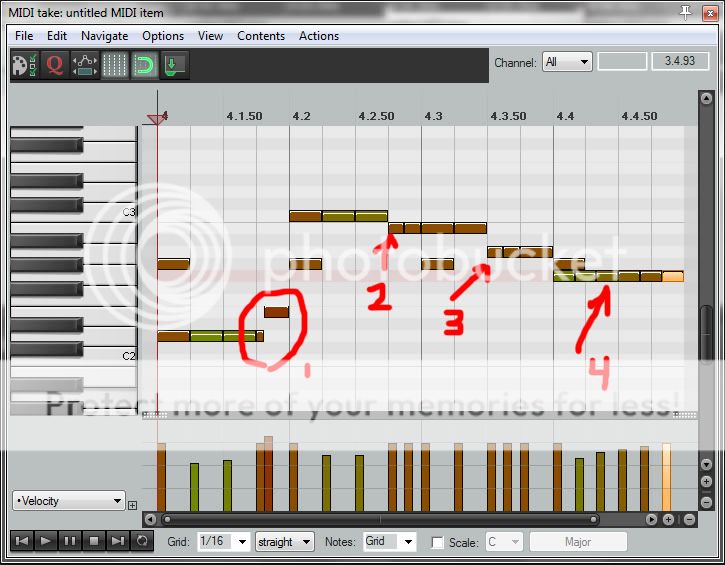
1) Added a 64th-note flam. The grace note of the flam is a normal snare hit, and the accented note is a rimshot. I covered flams in an earlier lesson. As I said before, there IS an actual flam sample already in EZ Drummer, but creating a flam manually like this makes it more realistic. You can also change the note duration this way.
2 and 3) Two 32nd notes followed by the two 16th notes - in the world of drum rudiments, this is called a "herta". Very common rudiment played by lots of drummers of many genres. Add these into a drum fill and it will add a bit more complexity and taste to the fill.
4) 16th-note triplets, in crescendo (volume increase). Note the velocities.
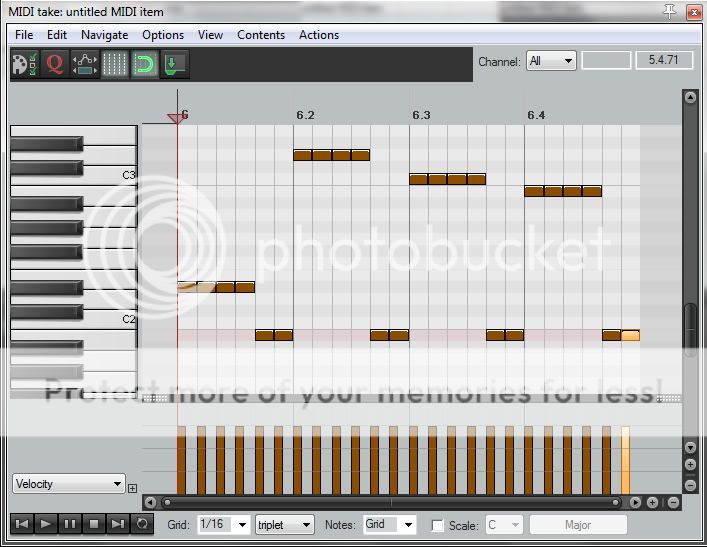
Now it's time for a different fill altogether. Just another example fill in a world of a million possibilities. I'll explain this one as well.
1) 32nd notes at low, varying velocities - this simulates a drum roll. Simple to do, and effective.
2) These are hi-hat strokes, followed by immediate chokes (the top line is the open hi-hat samples, and the two lines below it are the hi-hat closing; the same line we used in fill #3 above). Your MIDI editor will recognize this, and actually choke the hi-hat in the note duration that you want. For this, I used 32nd notes.
Another thing to think about during drum fills is the sticking pattern. In this fill, you have the two rimshots, followed by the drum roll, then three full 16th note snare strokes, and then the hi-hat chokes, ending with a crash. The sticking pattern on those hi-hat chokes would be performed like this: R L L R L L R. Right hand on the hi-hat, left hand on the snare. You can take this concept of changing the sticking patterns to anywhere on the drum kit. It's important to understand this concept, because drum fills are not always R L R L R L R L R L and so on. If you know of a drummer who strictly plays drum fills like this, then chances are his fills are very boring! Changing up the sticking pattern can let you access different parts of the drum kit at any point during any of your fills. The possibilities are endless!
Here's one more fill. This one is effective and powerful. It's commonly heard in metal songs. It involves varying the hands with the feet of a double-kick drum kit. This particular fill is commonly performed by drummers like Mike Portnoy, Martin Lopez, Vinnie Paul, and the like.
These are 16th note triplets - four on the hands, followed by two on the feet, repeated. These fills work great in metal songs, as they allow the drummer to execute fast, powerful fills. Of course, it doesn't have to be 16th note triplets. They can be any note duration you want! 32th notes, 16th notes, 8th note quintuplets, 16th note septuplets... anything! It's all up to you. As long as you keep the expectations that a live drummer very well may play this stuff for you and your music in mind, then it will be fine.
Just remember this during these lessons - drummers have two hands and two feet. Until an octopus evolves to the point of becoming musically inclined, this will not change.
(but don't worry... if an octopus DOES learn to play the drums, I will cover that in future lessons as well!)
That concludes the first lesson in drum fills. These are fairly simple fill samples. Once you grasp the concept of these fills, you can create limitless amounts of easy, flowing fills for your tracks. The next lesson will shed some light on some more complex fills and concepts. Enjoy!
If you have any questions, ask away! And also, let me know about anything you'd like to see in future lessons. Or if you have something to show me, I'm all ears!
Here we go - drum fills! If you're stuck programming a monotonous drum beat to your guitar track (or whatever other instrument you're recording), and maybe you're slightly intimidated, or just unsure of how to break up the monotony with a tasty drum fill, these following lessons should be of great value to you.
This first lesson in fills covers a few concepts on creating tasteful, fairly simple drum fills. In future lessons, I'll cover more complicated fills (jazz, prog metal/rock, odd time signatures, extreme metal, so on). Drum fills can possibly span TONS of lessons, but I'll try to keep it as simple as I can in just a few lessons. The knowledge you will potentially gain from these lessons should open up a whole new aspect of your drum programming.
And as always, if something is amiss or just doesn't make sense, don't hesitate to post in this thread and ask questions. I'd be more than glad to help you out, and clarify anything that needs it.
Alright - once again, we'll use 120bpm at 4/4 time - default format for Reaper. No need to change it for this lesson, so we'll just leave it at that.
Here is the sample fill we're using. Simple 16th-note drum fill. Nothing frilly. This example here shows no velocity changes; no dynamics. It sounds stale, uninteresting and fake.
Now, a few simple edits to the velocities. All I did was change the last snare hit to a rimshot (the highlighted note on the left side - a separate line for snare rimshots, as covered before), and change the velocities for most of the tom hits. I varied them a little bit, adding some much-needed dynamics. These changes took all of about one minute to do, and it made the fill sound much more realistic.
Third very minor change - this took even less time; about 10 seconds to do. All I did was add a hi-hat close on the quarter notes. Lots of drummers will keep time with the hi-hat pedal during their fills. This is exactly what that is - keeping time during the fill.
Now, let's make the fill a little more complicated. I added a few changes to the sticking patterns and the notes during the fill. I'll explain each change, which are numbered:
1) Added a 64th-note flam. The grace note of the flam is a normal snare hit, and the accented note is a rimshot. I covered flams in an earlier lesson. As I said before, there IS an actual flam sample already in EZ Drummer, but creating a flam manually like this makes it more realistic. You can also change the note duration this way.
2 and 3) Two 32nd notes followed by the two 16th notes - in the world of drum rudiments, this is called a "herta". Very common rudiment played by lots of drummers of many genres. Add these into a drum fill and it will add a bit more complexity and taste to the fill.
4) 16th-note triplets, in crescendo (volume increase). Note the velocities.
Now it's time for a different fill altogether. Just another example fill in a world of a million possibilities. I'll explain this one as well.
1) 32nd notes at low, varying velocities - this simulates a drum roll. Simple to do, and effective.
2) These are hi-hat strokes, followed by immediate chokes (the top line is the open hi-hat samples, and the two lines below it are the hi-hat closing; the same line we used in fill #3 above). Your MIDI editor will recognize this, and actually choke the hi-hat in the note duration that you want. For this, I used 32nd notes.
Another thing to think about during drum fills is the sticking pattern. In this fill, you have the two rimshots, followed by the drum roll, then three full 16th note snare strokes, and then the hi-hat chokes, ending with a crash. The sticking pattern on those hi-hat chokes would be performed like this: R L L R L L R. Right hand on the hi-hat, left hand on the snare. You can take this concept of changing the sticking patterns to anywhere on the drum kit. It's important to understand this concept, because drum fills are not always R L R L R L R L R L and so on. If you know of a drummer who strictly plays drum fills like this, then chances are his fills are very boring! Changing up the sticking pattern can let you access different parts of the drum kit at any point during any of your fills. The possibilities are endless!
Here's one more fill. This one is effective and powerful. It's commonly heard in metal songs. It involves varying the hands with the feet of a double-kick drum kit. This particular fill is commonly performed by drummers like Mike Portnoy, Martin Lopez, Vinnie Paul, and the like.
These are 16th note triplets - four on the hands, followed by two on the feet, repeated. These fills work great in metal songs, as they allow the drummer to execute fast, powerful fills. Of course, it doesn't have to be 16th note triplets. They can be any note duration you want! 32th notes, 16th notes, 8th note quintuplets, 16th note septuplets... anything! It's all up to you. As long as you keep the expectations that a live drummer very well may play this stuff for you and your music in mind, then it will be fine.
Just remember this during these lessons - drummers have two hands and two feet. Until an octopus evolves to the point of becoming musically inclined, this will not change.
(but don't worry... if an octopus DOES learn to play the drums, I will cover that in future lessons as well!)
That concludes the first lesson in drum fills. These are fairly simple fill samples. Once you grasp the concept of these fills, you can create limitless amounts of easy, flowing fills for your tracks. The next lesson will shed some light on some more complex fills and concepts. Enjoy!
If you have any questions, ask away! And also, let me know about anything you'd like to see in future lessons. Or if you have something to show me, I'm all ears!

")

