How to soder and wire my XLR connectors!

  • Thread starter Thread starter frank_1
  • Start date Start date
frank_1

frank_1

New member
I have instructions to do it but I have a few questions.

I have the Mogami quad so do I twist the 2 blue wires together, then soder them; same with the other wires?

What is the grounding wire? Is it the other copper strands?

Last one: How the hell do I soder it! I can't control the XLR wires, the soder, and the XLR ends all at the same time. What shall I DO?!?
 
for the last one get someone to help...or get some vice grips...the rest i have no clue...my cousin is an electrical engineer so he does all the soldering for me :D

FYI...if the solderer touches you it'll just give you a 2nd degree burn at most and if the solder falls on your skin it'll sting similar to wax so it isn't hazardous at all so if thats what your worried about no need to worry..
 
I'm not worried about burns; I just can't even accomplish it. Damn me!

Help, Sonusman, Blue Bear, anyone!:eek:
 
I don't know exactly what goes to where, but I can help as far as soldering.

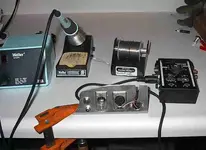
First, it REALLY helps if you have a quality soldering iron. I've used everything from Generic cheapie to Weller to Metcal. Cheapie was impossible to do a decent job with. Weller made the job possible. And the Metcal made the job easy.

You can start by tinning the wire. Use a vise or makeshift equivalent to hold the wire, and touch the solder to the bare wire and touch the iron to the wire. The solder should flow over the bare wire tinning the wire.

Next put the XLR connector in the vise. Tin the area where the wire is supposed to go by touching the solder and the iron to it. I don't know what your connectors look like, but usually they have a tab with a hole in it. Or just a tab. If it has a hole, I like to make sure it is filled in with solder. Then I take the tinned wire and touch it to the tinned connector. Touch them together, apply the iron, and the solder from both should flow together. If it has a hole, touch the iron to the connector until the solder starts to run, and then push the wire through the hole.

Pull away the iron and hold the connection still until the solder cools (5 seconds or something like that.) Give it a tug. If the wire stays attached to the connector, you've got it soldered. If it comes right off, try again.

Hopefully you've avoided big globs of solder everywhere and the joint is smooth. The neater the joint, the better.

Still having trouble. Repeat the process about a thousand times, and it'll get real easy.:D
 
If you are going to be doing this a lot, make a soldering jig. I have fabricated an aluminum plate with male and female XLR, TRS, 5-pin mini-DIN, and RCA connectors all mounted on it. I can clamp that to my workbench, and then plug the connector I'm working on into the mating connector on the jig- that keeps it from going anywhere.

I also cut a slot in the jig that tapers from 3/8" to 1/8" to hold the wire while I tin it. I strip it, drop it in the tapered slot so that it can't go anywhere, tin it, then pull it out of the slot and solder it to the connector.

If I get a chance in the next day or two, I'll post a picture. But the way I figure it, having the right tool for the job is priceless: if you do more than 30 or 40 cables in your life, you're wasting time not to have one of these. I've probably put several _thousand_ connectors through mine, after building 3 studios now...

One other thing: a clever person might consider connecting the pins on the connectors on the jig all in parallel to a cable that would plug into a cable tester, allowing the cable of interest to be assembled and tested *simultaneously* while it is still in the jig... Just a thought (;-).

Hope that helps. I'll try and put up a picture tomorrow.
 
As promised: here's a picture of my cable maintenance station.

You can see all the connectors- the MIDI cable off the back is bridged across all of them in the correct pin order, so that the far end of a cable under construction can be plugged into the other side of the cable tester and tested while the solder is still cooling: regardless of what set of connectors the cable might have. It's a great timesaver. You can also see a cable dropped into the tinning slot, already stripped and ready to tin. Plug the connector insert from _any_ flavor of connector into the mating connector on the jig, and it'll be going nowhere while you solder it up.

The other thing you might notice is that the XLRs and mini-DIN are installed in what looks like upside-down orientation. This was done so the the solder cups on Neutrik connectors came out facing up- making them easier to tin and the final cable assembly much faster.

It's just a random scrap of 1/8" aluminum with some connectors on it. Build yourself one of these and cable building and maintenance becomes a very quick and easy task. You can do it with only two hands!
 

Attachments

  • jig.webp
    jig.webp
    20.7 KB · Views: 231
Teacher said:
FYI...if the solderer touches you it'll just give you a 2nd degree burn at most and if the solder falls on your skin it'll sting similar to wax so it isn't hazardous at all so if thats what your worried about no need to worry..

Unless of course you are using the old style lead based solder.
 
Not to put too fine a point upon it, but *all* modern-day electronic solder is essentially lead-based. There's no joy in having a blob of *any* molten solder deposited on your skin. Trust me. I grew up in the printing industry in the 60s (with a Mergenthaler Linotype Model 14: look it up), and the feel of molten typesetting metal hitting my skin (same lead, less tin, more antimony, no silver) is still fresh on my mind: many, many, many, _many_ years later. 40, in fact. I have solder scars too: but fewer of them, and much less deep, thank Gawd.

Solder is *not* wax. Holy fucking Jesus Whomever Frankenstein (or Christ, as you like it) on a rubber crutch, it *ain't* wax. Trust me, and let's compare scars one day over beers or the Moral Equivalent.

Note to whatever religious faction might be out there: dump some molten lead on yourself, and get back to me, _before_ bitching about the wording above... Try it a few times, and your vocabulary will probably expand more than you could possibly imagine...

This is in fact a public service message about learning to do it right. And well. No smiley.
 
Nice Jig

Hi, I know this is an old thread, but I just found it today and thought I'd respond. Thanks for the great documentation and photo of the soldering jig. Most of it is stuff I already knew, but the tapered slot -- that is a nice touch that I never would have thought of. What a great idea!

Thanks!

Buddy Brinkley
www.EngineersGuideToGod.com
 
Back
Top