Console Tables

  • Thread starter Thread starter frederic
  • Start date Start date
frederic

frederic

New member
Greetings... this is probably more to Rick I guess...

Anyway, starting to think about my steel-frame console table... steel offers me several advantages... its stronger for the same dimensions over wood, which saves space. I already have a lot of stock in the garage, so cost will be significantly lower. Finally, having an open frame table allows more gear to be shoved in, whereas a wooden desk type of furniture all the gear goes on top I guess. I'm sure the latter could be thwarted with some ingenuity.

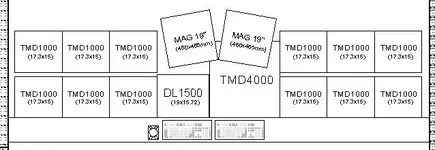
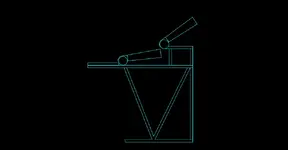
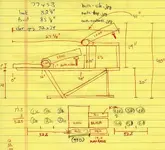
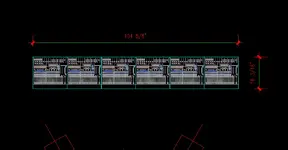
The console will be three sections, with the center section being different than the two side sections (which are identical to each other). Here is what I have so far, its a multi-tier open frame that provides for a three TMD-1000's in one row, three in the second row, raked at a higher angle for visibility. This will clear my slanted ceiling. These sketches are sideviews, as I'm currently struggling trying to sketch the front view at the moment.

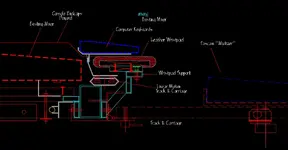
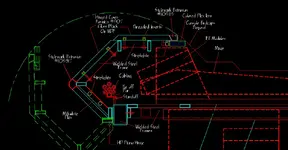
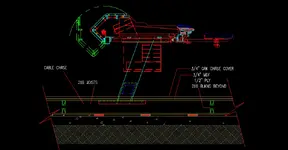
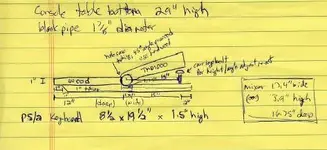
Anyway, its all 1" square steel tubing, except for the circles, which are 1.75" OD black pipe, which BTW is a dirt cheap material thats VERY strong. Putting a 10' section suspended at the ends on 2x4's, and standing in the middle (175lbs) the sag was less than 1/16" which is darn good in my book for this application.
 

Attachments

  • table1.webp
    table1.webp
    19.8 KB · Views: 436
Hello frederic, how are you? Sorry I didn't get back to you earlier. I've actually been working on my conole too. But I tore down my computer for the day to start running cables up through the floor brackets for my console frames. OK, now, what can I do for you?:D Would you like me to lay this out as I already have this:

Hmmm, first of all this is just a test for posting large compressed .gif files. This is new to me as I just loaded PaintPro8 as a conversion app. Hope this works cause it sure the fuck didn't last night. I stayed up late and did a bunch of drawing on my console to post here, only to end up with a big nothing:mad: :mad: Boy was I pissed. Ha. Well, lets just try this.
 

Attachments

  • tm-d1000.webp
    tm-d1000.webp
    40 KB · Views: 395
YES YES YES ! Get back to me ok? I'm here all night.

fitZ:D
 
Heres another. Not what your drawing, but what we can do. As the govenor of Calif says, "I'll be back. With more.:p

fitZ
 

Attachments

  • tm-d1000b.webp
    tm-d1000b.webp
    24.4 KB · Views: 388
Hello frederic, how are you? Sorry I didn't get back to you earlier. I've actually been working on my conole too. But I

No worries... take your time... we all have lives LOL

through the floor brackets for my console frames. OK, now, what can I do for you?:D Would you like me to lay this out as I already have this:

Pretty cool layout... I like the actual pictures of the mixers... thats cool. DXF's from Tascam's contractor page? I tried importing those into visio, but they didn't want to scale correctly.

I have to make my table straight though, otherwise the entry door will be in the way. Plus, I'll have a few more than six :)

You're conversion turned out okay, actually, its very clear, especially since its a reversed image. For whatever reason, I like it that way.

Anyway, top view, more or less :)
 

Attachments

  • studio.design.webp
    studio.design.webp
    16.9 KB · Views: 381
as far as what I was hoping you could do for me, was just shoot the breeze with ideas... since you're at the same stage in thinking about console tables, I thought maybe sharing ideas might help both of us :)
 
Pretty cool layout... I like the actual pictures of the mixers... thats cool. DXF's from Tascam's contractor page? I tried importing those

Nope. I drew those. Heres some of mine. Just to give you an idea what I'm doing.
Got all my cables out today, only to remember that when I first packed them up, I stored a suitcase full of my snakes in a storage shed behind the house. Two days later I discovered someone had broke in and stole not only the suitcase, but a small compressor, my rack of router bits, cordless drlls and some other stuff. NOW I"M SHORT on snakes. SHIT. :mad: :mad: Anyway I have some questions regarding cables frederic. If you don't mind. I'll email you, ok? Anyhoo, heres my stuff. It'll take 3 replys.
 

Attachments

  • consldtl2.webp
    consldtl2.webp
    25.6 KB · Views: 373
And another, vertical section detail at the front.
 

Attachments

  • consldtl1.webp
    consldtl1.webp
    39.9 KB · Views: 363
Hey, feel free to email anytime (frederic@midimonkey.dyndns.org), happy to help you if I can.

Sorry your stuff was stolen, that completely stinks... been in that spot before... never notice it until its critical, of course!

I really like the tracks you're thinking of doing.... moving the keyboard side to side is a very cool feature. I was going to route the wooden desk surface, and just insert them somewhat flush so they don't slide around and fall off.
 
Here is the whole vertical section. I'll start posting pics tommorrow.
 

Attachments

  • consldtla.webp
    consldtla.webp
    37.7 KB · Views: 357
Wow.

I see why you really like Autocad. I can't even come close to that in Visio.

THough my drawings take about 15 minutes :)
 
Hey frederic, everything in the sections are already built, even the rolling tracks. AND MORE. Lots of cool little goodies I've collected over the years. The linear tracks I had custom braked at a metal shop, and fabricated the rolling carraiges myself. 2 of them for 2 keyboards and mouse pads. Anyway, just let me know if theres anything I can do for you. I'd be happy to.
Your console is going to look great. Hey, is that TWELVE TMD's?:eek:

fitZ:)
 
RICK FITZPATRICK said:
Hey frederic, everything in the sections are already built, even the rolling tracks. AND MORE. Lots of cool little goodies I've collected over the years. The linear tracks I had custom braked at a metal shop, and fabricated the rolling carraiges myself. 2 of them for 2 keyboards and mouse pads. Anyway, just let me know if theres anything I can do for you. I'd be happy to.
Your console is going to look great. Hey, is that TWELVE TMD's?:eek:

fitZ:)

Yep, twelve 1000's, and one 4000. And a few other items like the DL1500 since thats the akai remote for my pile of recorders.

I have to have two PS2 kepboards because the DL1500 does not like KVM switches at all, switch off, and the unit reboots. Switch back, and it won't recognize the keyboard, so I'm stuck with two. I can use the KVM switch however for the two computers and the rack of akai recorders. Tested it and it works.

Hopefully you'll have pictures of your pieces... this is very cool stuff :)

yes, I'm pic beggin!
 
since I do midi mixing primarily, and only have one booth, recording multiple acoustic instruments is never going to happen. So cascading the mixers s/pdif to s/pdif works for me. giant 2-buss mixer, and I can use the 4-busses out the tdif ports to the recorders, so it works all around.

the nice thing about the TMD1000's are multiple...

First, channels 1-8 are analog, 9-16 are TDIF returns from the recorder. When I had the PC setup, I had cakewalk flip all the mixers into record mode, thus all the synths played through 1-8, mixed down to stereo for monitoring only, while I zapped it all to tape. Then I had cakewalk flip all the mixers into mix mode, whereas I used channels 9-16 on each mixer as tape returns, and mixed to stereo.

if I needed to track something thats not midi based, such as an acoustic guitar, sax, vocalist, I simply recorded that instrument only, while either using cakewalk to play the midi synths live, or playback from the recorders. Both worked well and I could do either interchangably.

Second, the TMD1000's transmit fader and pan real-time, even though the faders aren't automated. Which means, with clever routing on the PC, I actually never have to leave the center of the console, I can adjust volume and pan on one mixer, and send it over to a mixer in the corner.

I could also get up :)

For what I do, this is a cheap, perfect solution and I do have enough faders and pans to touch in real time. I found it generally better to adjust the volume of a particular TMD1000 channel, than to adjust the midi volume of the actual instrument - one gets significantly less noise, grunge, etc that way. I have two synths that only provide 64 volume steps rather than 128 like everything else, just because they are older. Anything at midpoint or lower they sound like someone is squeezing an angry yak in the background. So this works.

I was originally going to use three of these mixers only, with a Motu 2408 as a hard disk recording system, but at the time i was having so much problems with windows ME running this, I demoted the 2408 MK I to a simple format converter, bought a used akai recorder, and fell in love with the operation of the the thing. So now all the computer does is send midi data, and it has been dead-nuts reliable since, even though I upgraded ME to 2K, then to XP pro. I'm sure with XP Pro recording audio on the PC would work fine, just that I have the akai recorders, and I managed to fangle up a way of accessing the disks through the supposively proprietary "akainet" cabling scheme. Since it was 50 ohm coax with terminators, exactly like the old "thinnet", I plugged in a network analyzer and found that Akai simply implemented data streams over antiquated protocols. Load that protocol driver on the PC, and magically you can see the hard disks of the akais. Had to have a specific version of the DR16 recorder code, and one of my units had such, so I yanked the eprom and made 5 more copies. :)

Here is a niftier thing... the only difference between an Akai DR8, and an Akai DR16 are the number of analog I/O it has (8 or 16), two buttons on the front panel, and the code in the eprom.

So.. if you use 16-ch lightpipe cards like I do, the analog I/O is irrelevent (even though they were awesome in their day - 18 bit burr browns through and through), I simply took DR16 eprom copy and shoved it into the DR8 with a 16-ch lightpipe card.

Instant DR16. Since I don't use the front panels, but rather the DL1500 remote, the button configuration on the front panels also are irrelevent.

I found this out a few years ago by accident, by putting the wrong eprom in the wrong machine, but it worked out well.
 
First, channels 1-8 are analog, 9-16 are TDIF returns from the recorder. When I had the PC setup, I had cakewalk flip all the mixersnto record mode, thus all the synths played through 1-8, mixed down to stereo for monitoring only, while I zapped it all to tape. Then

Frederic, I always knew you were a genius, but in reality, you are UNFUCKING BELIEVABLE!!!:eek: :eek: Next you'll say ya got cakewalk runnin a fusion generator!

I bet this is a real turn on to see it all run. IF I ever get a chance to get a couple of more TDM's, I'll hire ya to fix me up, ok? Ha! I'd dig the hell out of that. But right now, I'd be happy to get my ole analog set up tuned in and running. Never had it all hooked up. Anyway, good luck with the frame frederic. Let me know if theres anything I can do.

fitZ
 
Hey frederic, I just scanned your drawings, and figured out what your doing. VERY cool

I really like the pipe idea. Functional simplicity is really where its at. The mixer pad extrusion sits on the pipe. Ingenious. Love it. That way it rotates to what ever height you need. Right? And the legs look good too. Set back angles and all. All open, for cabling. Cool design frederic.
Man, I love it. Well be sure and take pics, and I'll do the same. Hey, I hope I didn't come across as a dick earlier. I was so excited about getting my pics up, I didn't take time to converse ideas with ya. Man, lay it on me. I'll do the same tommorrow. Hey, I got some really cool brackets you might be interested in. for monitors, or remotes, or what ever. They are used in hospital rooms for electronic gear. All kinds of adjustments, mounting positions, very hi tech, and stronger than hell. I'll post a pic of em tommorrow. I have a few extra if your interested. Well, time for bed. Besides, its rainin like I've NEVER seen it rain before. Gotta go see. SHIT. Its fucking pouring buckets. Steve was RIGHT. Holy moly!! Gads, kinda scary where my house is. Might wash down the hill!:eek: :p
fitZ
 
4 1/2 minutes flat:D Hey, give me a section with the 4000 and I'll punch it in. then I'll punch in some other stuff and see if ya like it. No dims yet, but its to scale. At least you can see it in real proportions.
Cheers

fitZ:)
 
Hey frederic, I just scanned your drawings, and figured out what your doing. VERY cool

Thank you :)

I really like the pipe idea. Functional simplicity is really where its at. The mixer pad extrusion sits on the pipe. Ingenious. Love it. That way it rotates to what ever height you need. Right? And the legs look good too. Set back angles and all. All open, for cabling. Cool design frederic.

You got it, thats exactly what I'm doing. Black pipe is strong, yet cheap, because of what its made for (high pressure natural gas). A little work with a wire wheel in the old drill and the black stuff comes right off and one can weld to it easily. Its cheap carbon steel.

The TMD1000's weigh nothing, you could throw one overhand, so all I did was buzz the screws to the extrusion out, apply threadlocker (the red stuff) then buzzed the back in and those extrusions won't loosen up supporting the mixers. To support the back of the mixers... I intended to do what I did with the sloppy 2x4 console table, which was run a 2x4 across the back of the mixers, about 2" in underneath from the back panel, drill a hole for each mixer, hammer in a t-nut, then crew in a carriage bolt with another nut on it as a jam nut. This way I can level the mixers to each other, and at the same surface angle as the slightly more angled TMD4000 in the center section. This worked REALLY well before.

The TMD4000 can be suspended the same way, I had it configured that way before, except I had to use three carriage bolts to support the weight in the back instead of one. I was careful to make sure the carriage bolts for the 4K met with the bottom of the 4K at the rubber feet, and had one in the center which rested on a rubber foot I added by taking the case apart, drilling, and screwing the foot on.

Man, I love it. Well be sure and take pics, and I'll do the same. Hey, I hope I didn't come across as a dick earlier. I was so excited about getting my pics up, I didn't take time to converse ideas with ya. Man, lay it on me. I'll do the same

Dick? um, not at all my friend. Any input is welcome, if you have none thats perfectly AOK too. This is just a free exchange of ideas here... You liked my crude/simple idea, and I really liked what you're doing with your console table, so at least for me, I may end up stealing some of your ideas :)

adjustments, mounting positions, very hi tech, and stronger than hell. I'll post a pic of em tommorrow. I have a few extra if your interested.

Please, this all helps me with my own design which is not completed yet.

Well, time for bed. Besides, its rainin like I've NEVER seen it rain before. Gotta go see. SHIT. Its fucking pouring buckets. Steve was RIGHT. Holy moly!! Gads, kinda scary where my house is. Might wash down the hill!:eek: :p
fitZ [/B]


Lucky you.... I have a foot of snow outside and its still going strong!i
 
Back
Top