Combo Jacks...Switching or Non-Switching?

  • Thread starter Thread starter sjaguar13
  • Start date Start date
S

sjaguar13

New member
If I was going to buy a combo jack for audio stuff, would it be stereo switching, or stereo non-switching?
 
I just built a bunch of wallplates with the combo connectors. I went with the non-switching version. The solder cups on the back for the TRS and for the XLR pins are separate _anyway_, so if you get the switching version you are just paying for contacts that you aren't going to use (you have 9 cups back there instead of 6). You end up bridging tip-to-2, ring-to-3, and sleeve-to-1 when you terminate the wires on them, no matter which ones you get....

These are great for setting up studio wallplates with the maximum flexibility. Two thumbs up...
 
Woohoo! I'm glad someone did this before me! I'm looking to do the same thing, but I don't really know what I'm doing. I emailed Parts Express (is that where you got your combo jacks?), but the guy only checks his email once a day, so it's not really helping. I plan on ordering the stuff tonight or tomorrow. I'm 4 hours away from Parts Express, so I get it the next day. I want to use it Friday night. In the plate, how did you punch the hole in it for the jacks, or didn't you have to do that? My plate is aluminum, and I don't think I have a drill bit big enough. Also, the cable has three wires, does it matter what one I put where as long as I solder the other end to the same thing, so I can use any wire for ground, as long as each end goes to the ground?

Thanks!
 
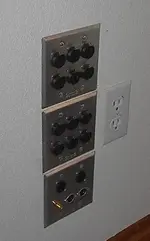
For my wallplates I use a Greenlee 15/16" punch- which was worth the investment for me because I seem to do a lot of these. It can be obtained from Markertek here: http://www.markertek.com/MTStore/product.CFM?BaseItem=GL730A But probably not by Friday: check your local electrical distributor, because these are also used by electricians all the time. If you intend to be doing this often, get them both. The results are _much_ more professional than you'd ever get with even the best Unibit stepped bit. These punches just use a 3/8" pilot hole, and they are a complete nobrainer to use: perfect every time, even on stainless.

As to the pinout: it does very much matter which is which! You don't want one of your signal lines on the shield. I have an easy mnemonic for the "standard" (well, US standard since the 80s, anyway) pinout:

Tip-to-2. Tip is always signal positive, or hot.
Ring-to-3. Ring is always signal negative, or cold.
Sleeve-to-1. Sleeve is always the outside shield, or ground- which makes sense, because on a regular metal TRS jack, sleeve is shorted to chassis ground by the jack.

If you can't remember anything else, remember "tip-to-2". Sleeve/shield is dead easy: it's the sleeve on a TRS, and on an XLR female, the contact for pin 1 is always pushed out a little further in the jack than the other two. This is done so that shield/ground is always connected _first_ when you plug 'em in. Betcha didn't know that...

Which conductor of the pair do I use for hot? Simple. Remember "white-hot" or "red-hot", and if you don't have either white or red, "light-hot": the lighter color of the pair is hot. Whatever is left is cold!

White/red/light-hot-tip-2. Piece of cake- amuse your friends...

From Parts Express, the part number you want is 092-043: the Neutrik NCJ6FI-S jack...
 
What kind of place would have the punch, RadioShack, HomeDepot, Lowe's, or some place else? Makertek doesn't say how much shipping is, or if I could get express shipping. If I order the punch now and they send it tomorrow from New York, I'll get it Friday. That's cutting it close. If they send it from Nevada, I won't get it until Tuesday. Hmmmm....think I should take my chances and just order it? If I do find it in a store, is it going to be cheaper?
 
Yup. Knock yourself out (;-).... (Sorry, had to say it...)

Most local electrical supply distributors will also have the whole Greenlee line on the shelf- they were designed for making knockout holes for running conduit, and they are very, very common stocking items for the local distributors: the guys who sell to working everyday electricians and contractors. There's at least one in essentially every town over 5000 people... Check your Yellow Pages for "Electric Equipment and Supplies-Retail" and save yourself the freight, maybe.
 
Since we're talking about wallplates, I decided to shoot some photos of mine. I did this before at the old house, but we've moved since then, so I had it all to do over again. Maybe this will give you some ideas...

First, the wallplates upstairs in the piano/vocal area. The studio is in the basement, but the vaulted ceilings make this a perfect spot for doing acoustic music. The barbershop quartets I've been recording love the sound there. So, rather than have to drag the snake up there for each session, I built in the wiring I needed: 16 pair snake cable (two pairs of which I use for MIDI), Neutrik speakons for the foldback speakers, and a run of RG6 for video- so that I can set up the video camera and see the performers, which is a very useful timesaver when you are trying to position vocalists around a stereo pair and get the balance just right...
 

Attachments

  • uswallplate.webp
    uswallplate.webp
    21.8 KB · Views: 166
Next, one of the playing positions downstairs- this one is used for guitar/Stick. Similar deal: 16 pairs, two used for MIDI. I set this one up with more TRS jacks and fewer combos, because of the way I like to do my monitor foldback (with a local mixer for each player).
 

Attachments

  • gwallplate.webp
    gwallplate.webp
    31.1 KB · Views: 157
This is the setup behind the E-drum kit. This one gets 26 pairs (a 16 and a 10) so that I can send all the discrete ouputs from the TD10 and DM5 back over to the board and mix there in the analog domain. MIDI is plumbed in there as well, although it is hard to see... You can also see one of the little Behringer MX602s I use at each playing position so that the monitor mix is under the player's control.
 

Attachments

  • drumwallplate.webp
    drumwallplate.webp
    23 KB · Views: 153
And lastly, the plate at the board where all this ironmongery pops out. Pardon the mess- I haven't gotten around to tidying it up yet...
 

Attachments

  • mainwallplate.webp
    mainwallplate.webp
    33.7 KB · Views: 124
Those look sweet. I'm pretty sure mine will come out all uneven and sloppy looking. I got the cable and stuff today. I got a couple questions. First, do I have to mount them on the aluminum plate if I have aluminum close to it do ground it? Also, on the jacks, there is 1, 2, 3, T, R, S, and G. What do I do with G, bridge that was S and 1?
 
I typically tie G to a signal ground on one, and only one, jack per plate. Realistically, you can leave the plate floating (ungrounded). If you look closely at my plates, you'll see that the TRS jacks are isolated from the plate (insulated plastic jack body), just like the combos. This I do to prevent the formation of ground loops. By tying the shield of only one pair (or better yet, the heavier-gauge drain wire for the overall shield within the snake cable, which is what I use) to the plate, you get the plate grounded without forming any loops. I then bond all the snake cable drain wires star-style at the big wallplate at the mix position, and then bond that plate to the signal ground at the mixer with a single run, completing the star. Tie two or more grounds together the plate at the far end, and you automatically get loops- so I avoid them by design.

This give you a very quiet signal ground on the plate. The noise difference between doing this and leaving the plate floating is usually indetectable, unless you live in a high RF noise area- in which case, my technique of mounting the plates on low-voltage rework frames (instead of real metallic electrical boxes) wouldn't work all that well. If you are in a noisy area (like downtown in a major metro area), you'd need a real shielding box behind the plate, bonded to signal ground, for best noise rejection. Luckily, out here in the middle of nowhere, RF noise is not a problem for me...
 
I'm a little confused. Does the G get bridged with the sleeve and then goes to the box on just one jack, or does the just the sleeve go to the box and you do nothing with the G?
 
If you look at the combo jack, you'll see that the G pin goes to a little sharp tooth on the mounting boss. When you fasten the jack to the plate, that tooth cuts into the back side of the plate, shorting to the plate and giving you the connection.

I bridge sleeve and 1 with the shield on every jack, ignoring G. I then connect the overall shield drain wire from the snake cable to the G pin on one jack.

If your snake cable does not have an overall shield (one that wraps around all the pairs in the snake, completely separate from the shield on each pair), you can still ground the plate through it. Just bridge sleeve, 1, and G on one single jack- using the shield on that pair to provide ground to the plate.

The point is that you want only one shield connection to the plate. if you connect them all, you create a whole bunch of ground loops.

If you are putting the whole thing in a metallic electrical box that is grounded to the building's power distibution safety ground, you ignore G on all the jacks- which keeps your signal ground completely isolated from the safety ground, and avoids loops and noise injection.
 
I'm still working on my cable. The holes are sloppy and uneven. I'm thinking about getting another plate and redoing it. I'll probably use this one for now, though. How did you label the cables to know what end goes where?
 
Real snake cable has each pair separately color-coded and/or labeled inside the jacket. On connectors and plates I use a Brother label printer. If you're using individual pair cable runs instead of a snake cable, you just label each end of each run with the Brother.

The first one's _always_ for practice... (;-)

The Neutrik insulated-boss jacks go in a 7/16" hole very nicely. If you're using the regular metal jacks, those go in 3/8".
 
I need to label the plate and connector. Did you just number them? Is the Brother label printer the thing that prints norrow pieces of tape? Do those fall off? I used some kind of label thing once and the next day, all of the labels were on the floor.
 
I label them so I can identify them. For example, I have 4 playing positions downstairs: A, B, C, and D. The guitar position I show you above is position A, for example. So I label its pairs A1-A16. The runs that go upstairs are LR1-LR16 (for "living room"...), and so on. Any nomenclature that you can keep straight is fine, of course...

I've never had one of those Brother labels fall off- in fact, after they've had a couple of months to cure, they are almost impossible to get off. I keep a paper towel and some Windex around to make sure that there's no skin oil on the metal surface that might affect adhesion, but that's probably turd-polishing. The are extremely sticky, especially compared to the old Dymo embossed-label-maker junk...

I use the black-type-on-clear tape for plates, and the black-type-on-white for connectors. If you look at the picture of the main wallplate above, you can see the white connector labels on the black connector bodies. The black-on-clear labels on the plate really aren't visible at that scale. You can just barely make them out as tiny dark spots right above each XLR...
 
Back
Top