Basement Studio Questions...

  • Thread starter Thread starter Velvet Elvis
  • Start date Start date
Velvet Elvis

Velvet Elvis

Ahh humma humma humma
Hey all...

I think I know the answers to some of these, but I wanted to get some feedback...

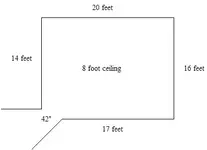
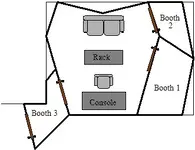
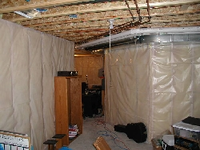
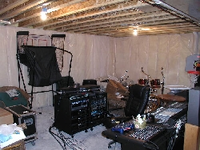
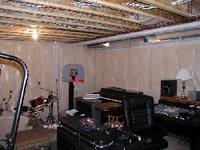
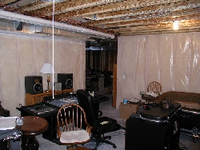
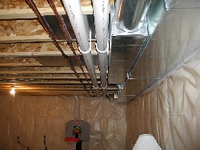
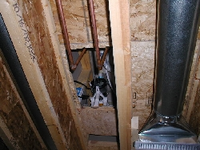
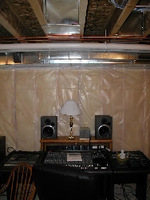
I'm starting in on building my new studio in my basement. The walls of the studio area are solid concrete (foundation of the house) and the ceiling of the studio will be RIGHT at the height that the wood footers for the upstairs walls meet the concrete (IE - the ceiling will be just below the I-beams).

The contractor who built the house by law had to frame the exterior walls, insulate and wrap the walls (they are ready to be dry walled)... I'm wondering if this is an adequate start... or do I still need to build free standing walls (given that the outer walls are concrete?)

There is only a 4 foot wide exit space leaving the room... otherwise ALL walls are solid concrete (no windows). The ceiling is my biggest issue (making sure that is isolated).

Thoughts?

Velvet Elvis
 
I am just finishing up my basement studio and all I did was drywall the framed in walls. The concrete will do a great job of isolation. No need for a third wall..

I will post pics in a seperate thread if I can get to it.

Make sure you insulate the walls before you drywall though.. It could get cold. :D
 
Scott,

Pictures would be great.

Do you record drums etc in your studio?

What I am thinking is NOT floating the floor in the main control room (to save money)... but floating it in the drum booth... and maybe doing the complete room inside of a room scenario for the drum/guitar room only.

Velvet Elvis
 
What I am thinking is NOT floating the floor in the main control room (to save money)... but floating it in the drum booth... and maybe doing the complete room inside of a room scenario for the drum/guitar room only.

Keep in mind a floating floor is more effective when it has mass, AND isolated from the main subfloor.

You might have to make the floater out of thicker materials and possibly triangulate it a bit.
 
Overhead noise can disrupt the comfortable atmosphere or good listening environment you're trying to create. Here's how you can cut it down.

Eliminate floor creaks. Now's as good a time as any to tackle this problem, as you may need to add cleats or other bracing to stop floorboards or subfloors from moving and squeaking.

Sound travels most easily through air, so if there are actual open gaps between the main floor and the basement, you need to seal them. Caulk small gaps or spray insulation into larger areas, paying attention to holes where pipes and ducting come through.

There are new type of non-DIY insulation thats a liquid sprayed onto surfaces, which foams up like shaving cream then hardens fairly quickly. It seals cracks very well, adds thermal insulation, and some sound isolation properties (though not a heck of a lot).

Next, install fibreglass insulation between the joists. Don't pack it too tightly; leave it loose and it will do a better job.

You may want to consider soundproofing batts on top of the fiberglass thermal insulation.

You may also want to add a carpet on the main floor, which will help absorb sound from the upper rooms.

This work will cut out most of the higher notes from upstairs, but you'll still hear low notes that reverberate through your home's structure.

A drop ceiling will help to isolate the basement room from these vibrations. Ideally, install resilient bars designed for drywall, and hang two layers of drywall or plywood to this. Chaulk everything and use screws.
 
frederic...

The room above the studio is a bed room/bathroom... it is carpeted... It uses I-beams for the floor, so I have plenty of room to install insulation.

If I make the ceiling at the same level as the top of the concrete, 99% of the room will be below grade and will have a solid concrete wall/floor... leaving the ceiling as the only "wood" construction area.

I'm making up a diagram right now to show the layout and give you and idea... I still need to take some picture and get actual measurements.

Velvet Elvis
 
I'm making up a diagram right now to show the layout and give you and idea... I still need to take some picture and get actual measurements.

Cool.

BTW, were you the gent with odd ductwork in the basement? Or was that Michael?
 
frederic...

That was me... but I think I found a way around it :)

I actually set up my studio gear in the space this past week (vacation time is great) and had a chance to get a feel for it.

I think I can cover the duct work with the front wall of the studio... IE - the soffit mounts for the speaker etc will be below the ductwork, and allow me to completely enclose the ducts on the one end of the room.

By doing this (laying out the room this way), I ALSO can have the drain access to my shower (on one end) and my tub (on the other end) enclosed in two seperate booths rather than having them in the ceiling of the main control room.

All in all I think it will be a killer layout.

Velvet Elvis.

Now... what program can I lay these out in? I tried Smart Draw, but it thinks it was installed at one time on this machine so it doesn't like me.
 
All in all I think it will be a killer layout.

Now... what program can I lay these out in? I tried Smart Draw, but it thinks it was installed at one time on this machine so it doesn't like me. [/B]

Aaaaaah.

How about this, take eight pictures, two of each wall from opposite corners, then either post them here or email them to me, with dimensions of everything in text?

That would do the job too, and you don't have to suffer any software.

frederic@midimonkey.dyndns.org
 
Frederic...

Here are the rough measurements fo the room...


More to follow...

Velvet Elvis
 

Attachments

  • measure.webp
    measure.webp
    3.3 KB · Views: 280
And here is my idea of how it could lay out... I want to take advatange of that curved wall in the entry way to make it kind of a booth/airlock.

Velvet Elvis
 

Attachments

  • idea.webp
    idea.webp
    12.5 KB · Views: 268
And now the pictures....

This is the slooped entry way... looking into the studio
 

Attachments

  • mini-p1010182.webp
    mini-p1010182.webp
    56.5 KB · Views: 263
This is looking from the entry way into the studio room...

Note that 99% of the ceiling is without obstruction (I will show the 1% later that DOES have stuff in the way).

Concrete wall ALL the way up to the ceiling joist line. The contractor studed, insulated and vapor barriered the room (as per code in Iowa).
 

Attachments

  • mini-p1010183.webp
    mini-p1010183.webp
    62.3 KB · Views: 255
This is looking from the far back corner towards where Booth 1 would be (in drawing). The basketball hoop is sitting in the corner of that booth.
 

Attachments

  • mini-p1010184.webp
    mini-p1010184.webp
    59.4 KB · Views: 242
This is showing the OTHER back corner looking towards the front of the room. The console is pretty much exactly where it would be in the drawing of the floor plan.

Notice the HVAC/drain/water etc on the ceiling tucked against the wall... my thought is to enclose that and use the "bump out" it would make to include the soffit mounts for the speakers (event 20/20 - non powered). That way I can kill two birds with one stone.
 

Attachments

  • mini-p1010186.webp
    mini-p1010186.webp
    57.8 KB · Views: 246
Here is a close up of the "obstruction"
 

Attachments

  • mini-p1010196.webp
    mini-p1010196.webp
    56.2 KB · Views: 234
Here is an example of the bathroom drains etc that I need to probably keep access to in one way shape or form.

There would be two accesses needed in booth 2 and one needed in booth 1.
 

Attachments

  • mini-p1010187.webp
    mini-p1010187.webp
    60.6 KB · Views: 233
Here is a close up of the wall construction....

See how the 2x4 outer wall runs right up to the ceiling joists... the 2x4 wall is NOT load bearing.... there is 1 ft solid concrete all the way around the outside of that 2x4 wall. With the exception of the 42 inch doorway opening.
 

Attachments

  • mini-p1010193.webp
    mini-p1010193.webp
    48 KB · Views: 227
Last picture.... this is head on view of the board... to help keep perspectives on ceiling height etc.

From floor to the ceiling joist is 8 feet exactly.

This is obviously lower where the HVAC etc obstructs the ceiling (which is only along the one wall).

Let me know what you think.

Velvet Elvis
 

Attachments

  • mini-p1010190.webp
    mini-p1010190.webp
    50.3 KB · Views: 233
Velvet,

Cool pictures, I like the space you're working in.

You're right about framing in the plumbing/hvac, thats probably the best way and what I was thinking originally, so I probably don't need to outline that (happy to if you want me to). Though not an expert by any means, I not frame it in at a 90 degree angle though, I'd make the vertical part vertical, and the bottom part at a slight angle so its not parallel to the floor. Maybe 10 degrees? Its against the wall so its not like you're going to stand leaning on the wall. The HVAC looks about 10" deep from the joist.

Layout wise, I'd have turned the console room sideways, along the longer wall, and have the three iso booths in line along the other wall.

While it makes your console room narrower, one thing you would get is the ability to wheel large guitar amps into all three booths, since they'd be joined together.

See, to shove something large into the back rightmost booth, you're racks are in the way :D

If this is solely for yourself, and you'll never slide large stuff through the console room, that might not be necessary.

BTW, our spaces are fairly similar in size. 13x20 here.
 
Back
Top