AKG 451 E - issues

antichef

pornk rock
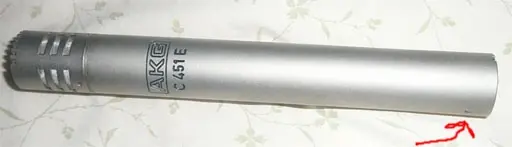
I just picked up two used AKG C 451 E mics for cheap enough that I wasn't too worried about testing them. They both work, but one of them has lower output and less bass than the other.

It almost seems like a rolloff and a pad are engaged, because the difference is about 10db, and the bass seems rolled off, but of course there's no pad or rolloff on the mic. I swapped capsules, and the problem stayed with the body -- the capsules sound about the same on either mic, that is. (I did other tests, too, like switching them back and forth on the channels to make sure I hadn't messed up with the channel settings, etc. - I'm sure it's something in the mic body that's behind it)

I don't even see how to open them -- anyone work on these before? Is there an internal pad/rolloff switch?
 
Last edited:
It has what looks like a locking ring thing at the base around the XLR pin assembly. I mangled it a little with my needle nose pliers, and I can get it (and the entire internal mic body) to spin around, but not to push out in either direction...
 
From a photo of that mic, it looks like there are some screws (or possibly set screws) near the top, so perhaps you loosen the set screw for the XLR connector, then take out the screws or screw in the set screws at the top and pull the guts out from the top. Dunno. Just guessing here.
 
Method: brace microphone firmly in workbench vise. Use special tool #435172-H (see fig. 1a). Use as necessary.

Fig. 1a
hammer-1.jpg
 
I try and get some pics up -- on this one, there are screws, but they're in the capsule, not the body -- the body is screw-free.
 
these are the old ones or new ones? i've got the EBs which do have a roll off...

did you swap the cables? had to ask...

Mike
 
These are the older 'E' model. I did swap cables -- I was using a pair that I had made the night before, and so they were immediately suspect. I swapped them and also tried a known-good other pair. Also swapped preamp channels, etc.

I'm thinking one or more capacitors are going bad - if I could just get the darned thing open!!

I still don't have pics, but it looks just like the one on this page:

http://audiotuts.com/tutorials/reco...io-microphones-ever-how-and-when-to-use-them/ (if you scroll down just over halfway, there's a close-up - it's the same "champagne" colored 451E that's depicted at the top)

I'll try and get a good pic of the actual ring I'm talking about -- I have to find my camera first, though - cell phone camera won't cut it.
 
ok here are some pics:

akgC451E-base.jpg


another:

akgC451E-base2.jpg


and here's the mic:

akgC451E.jpg


(actually, this is the mic that seems to be working - but it looks just like the other one)
 
Judging by those photos, my guess is that it goes something like this:

1. First, unscrew the capsule. (I assume the capsule unscrews.)
2. Then, screw in the set screw shown in the attached photo (assuming that's a screw).

I suspect at this point the entire guts of the mic should slide one way or the other... probably out the XLR jack end.

You might also find hidden screws under the capsule, but I sort of wouldn't expect any.
 

Attachments

  • 451e.jpg
    451e.jpg
    32.2 KB · Views: 246
that's a not a screw - it's a scuff mark. I agree that the guts should slide out -- more pics in a second.

OK - here's the top, without the CK1 capsule screwed on:

akgC451E-top.jpg


and to help establish (to myself included) that I'm not schmokin' rock, here's the scuffless and screwless body of the mic with the problem:

akgC451E-body1.jpg

akgC451E-body2.jpg

akgC451E-body3.jpg
 
Last edited:
Any chance that the tab sticking outwards from the "locking ring", as you put it, might actually unscrew the guts if you spin it often enough counterclockwise?

Wait... upon looking at it again, make that clockwise....
 
Any chance that the tab sticking outwards from the "locking ring", as you put it, might actually unscrew the guts if you spin it often enough counterclockwise?

Wait... upon looking at it again, make that clockwise....
Maybe that's it - I had to bend in the tab that was formed into that little slot in the bottom rim, and then I could rotate it -- I tried going a turn or two in each direction, but didn't notice any progress. But maybe I should keep trying...
 
Maybe that's it - I had to bend in the tab that was formed into that little slot in the bottom rim, and then I could rotate it -- I tried going a turn or two in each direction, but didn't notice any progress. But maybe I should keep trying...

Or that might be twisting wires inside.... :D

If the top part (the capsule connection) doesn't rotate when you turn that bottom part, chances are, that's not the way to pull it apart. Maybe the two prongs are supposed to move towards each other and compress the ring or something.... Just guessing here. It'd be nice if somebody from AKG would read this thread.... :)
 
Here are a couple of service manuals for the C451 which might help (also to help diagnose the problem once you get the thing open):

http://www.akg.com/mediendatenbank2/psfile/datei/66/c451_452_E45b4627a7b1f0.pdf

http://www.akg.com/mediendatenbank2/psfile/datei/97/C451B4055d1ffc4013.pdf

The newer 451s have a screw in the side which is fastened to the XLR socket, but from those documents it looks like the older style mics have an XLR 'inner' sleeve which snaps into the outer casing. There's also seems to be some kind of (locking) ring involved.

Also, there's a couple of other documents available... they're for the 'B' version of this mic, but the info should still apply to your mics bar the pad and roll off switches.

User's manual: http://www.akg.com/mediendatenbank2/psfile/datei/2/c451b4055c45b571e0.pdf

Data sheet: http://www.akg.com/mediendatenbank2/psfile/datei/49/C451B4055c23f6aa5f.pdf
 
awesome -- that older manual (the first one) looks like it applies - I looked hard for that thing, but I don't think I was going to find it. It doesn't contain step by step instructions, but seeing the exploded parts drawing is a great help -- I think I'm trying to turn the wrong thing :o
 
yes!!!

akgC451E-open.jpg


had to pull off that locking ring, and then was able to rotate and pull out the guts. That looks like some shrink wrap around the board that I'll have to cut, and it looks like it'll be really hard to source capacitors that are the exact same -- I'll probably have to get creative.
 
OK - I claim victory on the KSM27 (in another thread), but at least temporary defeat on this little guy.

So far, I've cut off the sleeve, and replaced one capacitor to no effect (so I put back the original). I guess I can keep this up, but...

Anyone work on these?

Alternatively, I could post the schematic and ask for a little armchair quarterbacking.
 
Last edited:
Step 0: Cut away the clear shrink tubing and take another photo. :D

Step 1: Stick the capsule from the problematic mic on your other mic and make sure the problem follows the body and not the capsule.

Step 2: Check all of the capacitors for shorts. Use an ohmmeter across each one. Caps should block the DC. The meter might jump up momentarily, but it should quickly drop to at or near infinite resistance. If it doesn't, odds are you've found the problem; replace that capacitor.

Step 3: Check for cold solder joints. Touch up any solder joint that looks dodgy.

Step 4: Study the two mics side-by-side and see if any capacitor or resistor values differ. Sub parts out in the problematic one to make them match.

Step 5: Test the DC voltage at the capsule on both mics. Unscrew the capsule, set your multimeter to... maybe 5VDC or so, put the black lead on the ground or the body of the mic, then touch the red lead to the center contact where the capsule screws on. The voltage should be very close in both mics.

Step 5a: If the voltage is way off, you should start by identifying the power supply voltage and ground rails. You can find these by looking for large electrolytic caps between two long traces on the board. The + side of those electrolytic caps will almost always be V+ and the - side will almost always be the power supply ground for the board. It is exceptionally rare to see electrolytic caps outside the power supply parts of a microphone, at least from the ones I've seen.

Step 5b: Take both mics apart and trace your way backwards through the circuit, testing at various random points until you find a point where they are both suddenly not different. Try to figure out the point physically farthest from the capsule where you can find a significant difference in voltage. You should be very close to the failed component. Look for parts that go from that point to ground or to a voltage source.

A failed part between that point and power could be too high resistance. A failed part between that point and ground could be shorted or low resistance. Test each resistor nearby in-circuit with an ohmmeter on both mics (with the mic unplugged) and see if you get a significant difference. If so, try pulling the part out of circuit and measuring the resistance and comparing it with what the band code says it should be. If you see a cap nearby, check again to make sure it isn't shorted....
 
Of course - it's so simple! :D

(and I must spread some reputation around before giving it to dgatwood again)

I have found one bad capacitor so far - a tantalum 33uf. I had a replacement ready, but for some reason I'm getting a lot of noise when I put it in, and now the old one's noisy too -- :( messed up I guess. Well it's late, and this little sucker's going in the toolbox for the time being.
 
Back
Top