My Quasi-Recording/Mix Room Build

They sure are pretty though :)
Pretty...perhaps. Fully functional, not so much. :D

One patchbay is in. Waiting on the other.

Now to solve this monitor stand riddle. The cedar is certainly more massive than what I currently have. I have some extra brick and manufactured stone from my house build...but I know nothing about putting that stuff together. And more importantly...how the f am I going to move it into the room even if I did manage to get it done?
 
Hand truck or refrigerator dolly, tilt it back and roll it in.

I'd say, get a, 16"x16" solid square patio stone, and drill a four hole bolt pattern. Then drive lag screws up from the underside of the stone into the bottom of the cedar beam, with ONE METRIC SHIT TON of construction adhesive.

Or, if your lumber yard can cut you square planks (I'd say 1" think 12x12 minimum for the bottoms, and just big enough for the monitor speakers as the tops), use that instead of patio stones.

Still wanna use ONE METRIC SHIT TON of construction adhesive, either way.
 
Oh, and I'd recommend some big-ass feet:

Penn-Elcom F1686 Rubber Cabinet Foot 1.57" Dia. x 0.61" H

260-770_s.jpg
 
Ok Myriad. My BEST advice. Bite the bullet. Go to a local Steel vendor, and order 2 pieces of square steel tubing, 1/4" wall, 6"x6"x(length determined by horizontal SIGHTLINE between midpoint of Line between tweeter and woofer to 18" behind head at engineering position. Vertical height/angle of this line is determined by your own views/requirements on height of this line and or angle. However, there are some recommendations. Ask me if you are interested. This will determine the angle at which one end of the steel tubing must be cut. If any.

Also, order 2 steel plates, 1/4"thick(1/2" is better)x14"x14" These are the floor plates

and 2 steel plates, 1/4"x dimensions of your monitor bottom. These are the monitor support plates.

Have tubes centered and welded on bottom plates. Fill with concrete(buy a bag of Premix at home depot or such.) Now have the top plates welded. Clean, prime, paint.

Done.
 
Quite the invincible pillar of power just for your monitors. Overkill is so much fun!! MOOOAAAHAHAHA!! *rubs hands maniacally*

But once these are made, you'll never complain about them vibrating or wobbling or coloring the sound.
 
Overkill is so much fun!!

Quite the contrary. This is standard procedure in Pro studios that have freestanding nearfields vs soffit mounted monitors.

Like this one. Bridge recording Studios. Probably the most professional studio on the west coast. Certainly the largest. Note their custom built stands. Just like I said. Except possibly 4" tubing instead of 6". No big deal. Use the 4" if it's cheaper.

is.php


Hey Myriad. Just finished with the first of 2 computer mods. Whatta ya think? Here it is on the bench for testing. No rear plenum added yet.
is.php

is.php

is.php

is.php

is.php


Here is one of the empty case, checking for fit. This is the rear.
is.php


They go in here.:)
is.php


I just installed this computer tonight. I'll be posting some pics real soon.


If your interested, you can see the build sequence here. Lots of little tricks illustrated.
Like decoupled HDD's, amongst other things.

nubee with studio computers project mod questions - Page 2 - Soundcards, Speakers, & Audio - Xoxide Forum Network


PS I just installed this computer tonight. I'll be posting some pics real soon. Everything worked perfect, including the crossflow fan cooling.
 
I doubt that crossflow heat sink is store bought. Heh heh. Is that a DIY custom job, or is that kind of heatsink radiator available?
 
I doubt that crossflow heat sink is store bought.
:confused:

Heatsink?...um, I don't think you understand. It's a FAN!:rolleyes: And a HUGE one at that. Creates 192 cfm airflow. I drop it to half with an AC fan speed control module
which causes a noise drop by a factor of 4.

The heatsink is a CPU cooler with a decoupled duct mounted AXIAL fan.

is.php


The plenum that the fan resides in goes under this opening. This pic was taken before the plenum was installed. Once installed, it's difficult to see..in fact, almost impossible to see.

is.php


is.php


Make sense now?

And yes, the CPU cooler is common Computer modding stuff. It's a Scythe Mugen 2, on a i7/975 CPU. I fabricated the "red" duct out of clear Acrylic plex, as the fan comes with a built in LED.
If you are interested, you need to become familiar with computer modding. Do a search. There are tons of sites.
And btw, modding is extremely popular. Try this one on for size.:) It's called "Dark Blade"

is.php


UNFUCKINGBELIEVABLE. This build RE-DEFINES the term DIY. see the build here

Scratch Build Dark Blade by G69T - Page 109 - bit-tech.net Forums


That's the last page. Go to page one and be ready to become enlightened.:D
 
Last edited:
I meant what looks to me like 5 stacks of sheet metal in this photo.

is.php


And yes, hackin and slashin computer chassis and creating weird stuff is quite fun.

But that Dark Blade is borderline Hollywood sci-fi movie worthy!!!

I'd have to try to build one to look like a runic tablet from Old Norse mythology. Maybe the Tower of Orthanc in Isengard. OOOH!!! A recording station that has a Flux Capacitor in it!!!!! "You guys want that vintage 70's sound? Well, we'll just dial this puppy back and BLAAAAAMMO!!! 1st year production Traynor bass amps and hand assembled Marshalls!!!"
 
fitZ, that stuff is absolutely insane. I'd love to come see that stuff in person! This all begs the question...are you retired? Do you have a job? Because I would never get that done. Let alone have the know how.

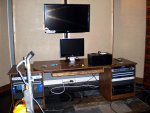
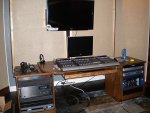
So...after being shamed by fitZ' work yet again, here's some pics of where I'm at right now. :cool:

This is what it looked like over the weekend.
setup1.jpg

This is what it looked like 5 minutes ago. I'm moving slow. You can also see that I totally rearranged all of the rack gear from the first pic. This makes the 3rd or 4th time I've done that.
setup2.jpg

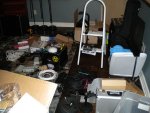
And this is the mess in the back part of the room that seems to be breeding. I wish it would start breeding something worth a damn. Like API and Neve gear.
mess.jpg
 
Two words.

Temporary shelving.

If you got a spare wimpy sheet metal shelf, like those $30 POS shelves, bring it in, and stack your crap on it.

Then put all the packaging back in their packages, and consolidate their crap. I know you may be saving all that packaging in case a component needs to go back, but the first thing I do is repack the packaging, masking tape the box back shut, and get it out of the same room.


And yes, tap lights on the underside of the racks in the back are a wise idea. I have one in the back of my bass rack for dark stages when I haven't yet plugged in my power cable and have lights on. I can spot genius when I see it!


But I still say you should build your table legs, so you can angle those racks inward for easy access to front controls and not rolling from side to side.
 
fitZ, that stuff is absolutely insane.
ummm, I think it comes with the territory.:p Anyone considering building a home studio has GOT to be insane in the first place.;)

So...after being shamed by fitZ' work yet again, here's some pics of where I'm at right now
Naahhhhhh, your handiwork looks great Myraid, and at least your studio is comin right along...vs mine..which seems to be a lifes work.:laughings

This all begs the question...are you retired?
Yea,kinda, but not from my own choosing. There just isn't any work(for what I do.)here. I moved here a few years back and found work at a couple of local cabinet shops..one as a CAD detailer, and when that one closed, got another job as a cabinet maker , but at half the wages I was making where I came from. Then the economy crashed...:mad::rolleyes: and STAYED crashed..at least where I am. :( But I keep busy, and do get some side jobs, as my shop is pretty complete.

Because I would never get that done.

Well, I do a little each day. That's why mine STILL isn't finished. But I'm close. Now if I could only remember how to play my guitar.:laughings:

Let alone have the know how.
Well, I learned a lot of stuff when I worked at a Store Fixture manufacturer. But tell ya what. You can learn a lot on Youtube now. Maybe not everything, but a lot. And there's tricks to everything. If I don't know how to do something, I do what my dad has always told me. THINK about it..and LOOK at it. Like welding. I've got a project for my car that requires brazing a custom made adapter for my power steering pump.

Ever heard of a REVERSED FLARE? Neither had I. Mindboggling. The fittings for the hose are called reversed flare fittings. Weird. I thought a flare was a flare was a flare...NOT. Almost made a BIG f--king mistake. At the last minute, one of the clerks at Ace hardware turned me on to what it is. Anyway, I found some tubing at NAPA auto parts, that are manufactured with this reversed flare on each end with a tubing nut on each end. They come in various lengths. So I bought one, and cut it in half.
I'm making this adapter because the car is from the 70's(Dodge van). I've ordered the pressure hose three times, and none of them would fit.:mad: Anyway, I have to make this here adapter, with two opposite right angle bends, in very close proximity to the reversed flare nuts. I only have about 1 1/2"" clearance between the rear of the power steering pump and the smog pump behind it.

Normally, the hose has a metal tube with a reversed flare and nut, but the tube is curved. Well, somehow over the years, the spec for that curve has changed, and now, none of them fit. You really can't cut this tube and re-weld it, as the tube dies into a rubber tube with a crimp fitting, and would melt the rubber.

So I thought about it, and came up with the idea of making an "offset" fitting. No easy task though. Took a week of trips to the hardware store to find all the little f--king reversed flare fittings. By the time I bought everything, it cost as much as the damn hose.:eek::mad::rolleyes: There were right angle fittings and straight fittings. Well, I made up a prototype and...it didn't fit. Fuck. So........

I thought real hard how to make a right angle bend in a metal tube. Wouldn't you know. It came to me in a dream. Hahahahaha!

All I had to do, was use a hacksaw, and make 2 notches about a 1/4" apart, almost completely through the tube, leaving enough material to keep the tube intact, and then bent the tube twice. Worked like a friggen charm.:D I have to make TWO of these, and then braze the two ends together, using another piece of short tube over a butt joint. That's where I'm at today. The point being, it's been years since I've welded/brazed, but I recently bought a used Oxy/Acetyline setup at a yard sale, but haven't used it yet. Well, this shit is dangerous if you don't understand the safety side of things. So I got on Youtube. Hahahahaha! Tons of videos showing literally EVERYTHING you need to know. Now I'm confident to check out the equipment, and to braze this damn thing safely. BTW, to illustrate, if you try to weld/braze something with oil on it...BOOM!! It will cause an explosion. DAMN:eek: Never knew that. I coulda killed myself.:laughings: Anyway, here's a pic of one of the ends before cutting and welding two together.


is.php


This is what it looked like 5 minutes ago.

You should be proud. Any number of people here would absolutely KILL to have what YOU created Myriad. It looks professional, clean and functional. I think the only thing I would add is a padded wrist pad. Ask me how if you are interested. I've learned a trick or two.:p

Anyway, keep it up. You're almost done and you're doing terrrrrrrrrrific!!:D
 
Temporary shelving.
Nah, it doesn't bother me. I'll clean it up soon enough. I kind of know where everything is right now. Sort of. It's controlled chaos.

And yes, tap lights on the underside of the racks in the back are a wise idea.
Already ahead of you. I did that this past weekend when I got all the crap in my racks.

But I still say you should build your table legs, so you can angle those racks inward for easy access to front controls and not rolling from side to side.
I have an oak template made for one leg right now. I could make another, no big deal. But, I can only angle the racks so much before they go off the carpet. Since I'm a bit OCD and anal retentive, that won't fly with my brain. Besides, I play guitar a lot and I've learned over the years that angles in desks make for headstock dings on my nice guitars. So I'll probably pass on the angles...at least for now.


Good luck on your build fitZ! You've covered a lot of ground, that's for sure. You and everyone else have been a huge help to me. For me, my next step is figuring out the cabling question. I have to calculate how much I need and then get to ordering! I've never soldered anything before so this should be interesting. Then I'm back on the speaker stand issue...still haven't figured out what I'm doing there but I did find a metal shop locally so we'll see.
 
I've never heard of oil on material causing problems, but definitely do not oil your regulators!
 
Yup. Oil is hella combustible, and hitting oily steel with a torch either flares up a big flame in your face or outright BLOW'D UP.

As for soldering, I've been doing TONS of XLR fittings on mic cables. It's not hard at all. And if you buy your cable on a bulk 100ft or 250ft spool, and order bulk of your XLR connectors, you can set up a bit of an assembly line and make everything run like clockwork. If you wanna do cost cutting, order bulk, set up a TV by your table, and listen to your shows as you cut, strip, crimp and solder away.

I wanted six 40ft mic cables. Store bought with good quality products, that was around 300 bucks. After shopping around, I did it home made, around 87 bucks.
What kind of cable did you use? What kind of connectors? Brands? Where did you get them?
 
As for soldering, I've been doing TONS of XLR fittings on mic cables
Speaking of soldering..well, maybe not soldering but BRAZING...


is.php


Finished. Looks like shit. But it doesn't know it:D

note to self..file under
".. serious nervousness requires copious amounts of alcohol upon completion...

and

...set aside time for welding/brazing practice..along with guitar scale tone 7th chord/60 chord system inversion and fretboard options review."


:D
 
Mogami cable, Neutrik XLR connections. And after I chopped stripped and soldered everything, I bought big ass 1" BRIGHT YELLOW heat shrink tubing to encase the connectors. So if I ever take my cables to a gig or studio, I know they're mine.

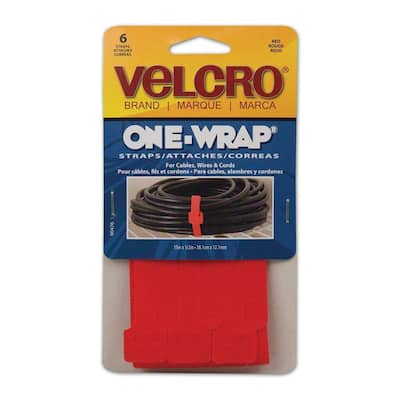
Oh, and guys.... just in case you didn't know, this is your mic cable's best friend.

9904c2fb-6c11-4795-9a24-9fe7dad71e8f_400.jpg


Every damn cable I own has one on it. Power cables, extension cables, cables on drills routers and belt sanders, mic cables instrument cables midi cables speaker cables, even pedal board snakes.

And being red, they don't hide on the floor wrapped around cables. Don't put black Velcro on black cables. Red is easy to spot on the ground.
 
Back
Top